ZKTeco PL10D Скачать руководство пользователя страница 10

6

.

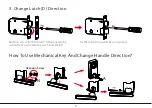
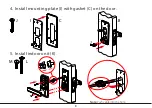
Install the battery.

K

E

G

F

7

.

Mark and drill holes for strike.

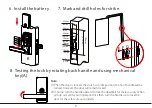
8.  Testing the lock by rotating back handle and using mechanical 
      key(A). 

Note :  

1) W

  hen  the  door  is  locked,  the  clutch  is  in  idle  position,  the  front  handle  will  be       

      turned.  However,  the  door  will  remain  locked.
2)  At  home,  turn  the  handle  upward  to  lock  the  deadbolt  for  more  security. W

  hen   

      you  go  out,  verify  your  fingerprint  first,  then  turn  the  handle  up  to  lock  the  
      door  for  the  safety  of  your  property.
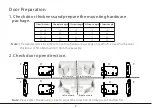
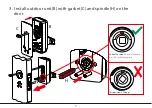
28.5mm 

[1 1/8"] 

[4 19/64"] 

21mm 

[53/64"] 

18mm 

[45/64"] 

18mm

[45/64"]

22mm

[55/64"]

3.5mm

[9/64"]

13mm

[33/64"]

109mm

9

Содержание PL10D

Страница 1: ...Installation Instruction Version 1 0 Date Nov 2014 PL10D ML10D...

Страница 2: ...Before Installation Diagram B A C C D E F I H G K J L M N 1...

Страница 3: ...64mm 72mm 35mm 40mm 30mm 35mm Mounting Hardware Package Mounting Hardware Package 39 46mm door thickness 47 54mm door thickness A H E L M J H E L M J G F K Packing List B D C I N 2...

Страница 4: ...ture to adjust the direction of strike plate F and latch D 1 Check door thickness and prepare the mounting hardware package 2 Check door open direction F F F F D D D D 30 38 56 20 10 25 39 46 64 30 10...

Страница 5: ...im panel by using screw Remove screw from the latch trim panel with a screwdriver and rotate the latch bolt at 180 Hexagon Screw N A How To Use Mechanical Key And Change Handle Direction How To Use Me...

Страница 6: ...ower on the lock four alkaline AA batteries not included are required Non alkaline and rechargeable batteries ARE NOT RECOMMENDED 4 Please avoid strong light direct to the fingerprint holder otherwise...

Страница 7: ...er line of the latch D at the desired handle height and tape it to the door Note2 Mark the holes first then start drilling 1 Drilling holes on the door 2 Install the latch D E E D center line of the h...

Страница 8: ...Correct Position The small triangle must be vertically upward This position is Wrong 3 Install outdoor unit B with gasket C and spindle H on the door B H C 7...

Страница 9: ...4 Install mounting plate I with gasket C on the door J 5 Install indoor unit K M Note Push cable into the hole L B C I I C J 8...

Страница 10: ...is in idle position the front handle will be turned However the door will remain locked 2 At home turn the handle upward to lock the deadbolt for more security When you go out verify your fingerprint...

Отзывы: