background image

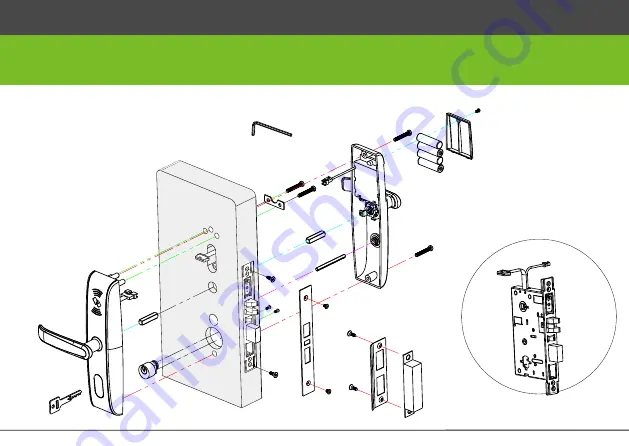
Diagram and Caution

P

A

E

H

I

T

A

B

C

D

F

G

J

K

L

M

K

N

O

Q

R

H

S

Diagram

1

Содержание LH4000

Страница 1: ...Installation Instruction LH Version 1 0 Date May 2014 4000 ...

Страница 2: ...Diagram and Caution P A E H I T A B C D F G J K L M K N O Q R H S Diagram 1 ...

Страница 3: ...Caution Inward Outward R R Do not overexert when tighten the screws Do not use electric tool to tighten the screws Please wear eye protection device to protect your eyes when drilling and slotting 2 ...

Страница 4: ...Align the template along the vertical center line of the mortise at the desired handle height and tape it to the door Drill the hole on the door desired handle height handle centerline door thickness 35 55mm backset 70mm 3 ...

Страница 5: ...2 Remove two screws D from mortise latch plate A C D D A 4 ...

Страница 6: ...3 Install mortise A 4 Install mortise latch plate C C D D B B A Note Two Triangles on the mortise must be in horizontal alignment as the above enlarged figure 5 ...

Страница 7: ...5 Install lock cylinder E E F G G F E F E 6 ...

Страница 8: ...6 Install 8x8 spindle H and fix outdoor unit I H H H J K H I J K Note Please confirm the two triangles of the mortise be in horizontal position always As step3 in this installation instruction K 7 ...

Страница 9: ...H L M H L L H L M K 7 Install 8x8 spindle H and 5x5 spindle L and fix the indoor unit M 8 ...

Страница 10: ...O N 125mm 89mmX25mm 22mm 3mm S S Q R P P 8 Install batteries N 9 Measure the doorframe for strike dimensions and drill the hole 9 ...

Страница 11: ...mix up positive and negative while replacing battery 5 To avoid leaking it is better to renew battery at least once in half year Do not use battery of poor quality Warm tips 1 The demonstration figure in this installation instruction maybe different with your actual product the actual product shall prevail 2 The software within the lock manages the RFID cards for more details please refer to the s...

Отзывы: