ZKTeco L4000 Скачать руководство пользователя страница 6

2

.

How to use mechanical key ? 

A

3. How to use emergency 
     power?

Cautions

1. New lock is defined as always open mode.
2. Please register administrator firstly to prevent from any illegal access.
3. The lock is equipped with mechanical keys for manual unlocking. Remove mechanical keys from the 
     package and keep them in a safe place.
4. To power on the lock, four alkaline AA batteries (not included) are required. Non-alkaline and 
     rechargeable batteries ARE NOT RECOMMENDED.
5. Do not remove batteries when the lock is in working state.
6. The operation of setting lock has a stand-by time limit of 10 seconds. Without any activity, lock will shut 
     off after 15 seconds.
7. Keep your fingers clean when using this lock. 

Remove the cover on the key
hole with screwdriver or nails.

Insert the key into key hole 
and rotate 90°.

5

Содержание L4000

Страница 1: ...Installation Instruction Version 1 0 Date Dec 2014 L4000 ...

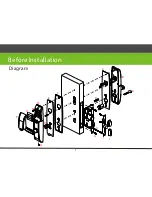
Страница 2: ...B A C D E H F G I J C K D L M N O P Q Diagram Before Installation 1 ...

Страница 3: ...A I J M B F C K E G D 50mm L N Q 30mm 40mm Mounting Hardware Package 35 50mm door thickness 20mm 8mm Packing List Mounting Hardware Package 50 65mm door thickness D 70mm L N 45mm 55mm H 70mm 2 ...

Страница 4: ...ength mm 35 50 50 40 30 8 40 50 65 70 55 45 8 50 65 80 70 70 60 8 60 Note 1 The standard lock includes 2 mounting hardware package only which is used for the door thickness of 35 50mm and 50 65 mm separately Note 2 40mm cylinder is recommended for the door thickness of 35 50mm But it can be used in the door thickness of 50 65 mm if the mortise is not placed along the centerline of door side 3 ...

Страница 5: ...e plate I has 2 types one is for inward open the other is for outward open Please use the correct one Left inward Right inward Left outward Right outward Tips 1 How to change the handle direction Press down the component pointed by the arrow At the same time rotate the handle at 180 Then release your hand from the pressed component 180 Press down the component 4 ...

Страница 6: ...p them in a safe place 4 To power on the lock four alkaline AA batteries not included are required Non alkaline and rechargeable batteries ARE NOT RECOMMENDED 5 Do not remove batteries when the lock is in working state 6 The operation of setting lock has a stand by time limit of 10 seconds Without any activity lock will shut off after 15 seconds 7 Keep your fingers clean when using this lock Remov...

Страница 7: ...tion door thickness 35 80mm 55mm 2 Install the mortise F 1 Drill holes on the door Note 1 Align the template along the vertical center line of the mortise F at the desired handle height and tape it to door Note 2 Mark the holes first then start drilling Backset 6 ...

Страница 8: ...3 Install lock cylinder E H E H Note Install lock cylinder in right direction then tighten screw H to fix it 4 Install spindle D D Note Ensure the red dot have to be vertically upward D 7 ...

Страница 9: ...5 Install outdoor unit B with gasket C B C 8 ...

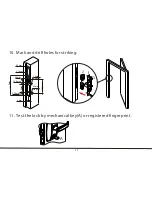
Страница 10: ...L B C K K C L 6 Install mounting plate K with gasket C on the door 7 Install spindle D on the door D 9 ...

Страница 11: ...N 8 Install indoor unit M Q 9 Install the battery O N Q O P Note Push cable into the hole M 10 ...

Страница 12: ...10 Mark and drill holes for striking 3mm 69mm 38mm 180m m 130mm 15mm Depth 25mm Depth 27 5mm 16 5mm 21mm 25mm I J G 11 Test the lock by mechanical key A or registered fingerprint A 11 ...

Отзывы: