


-7- -8-
Product Appearance
Face Recognition Area
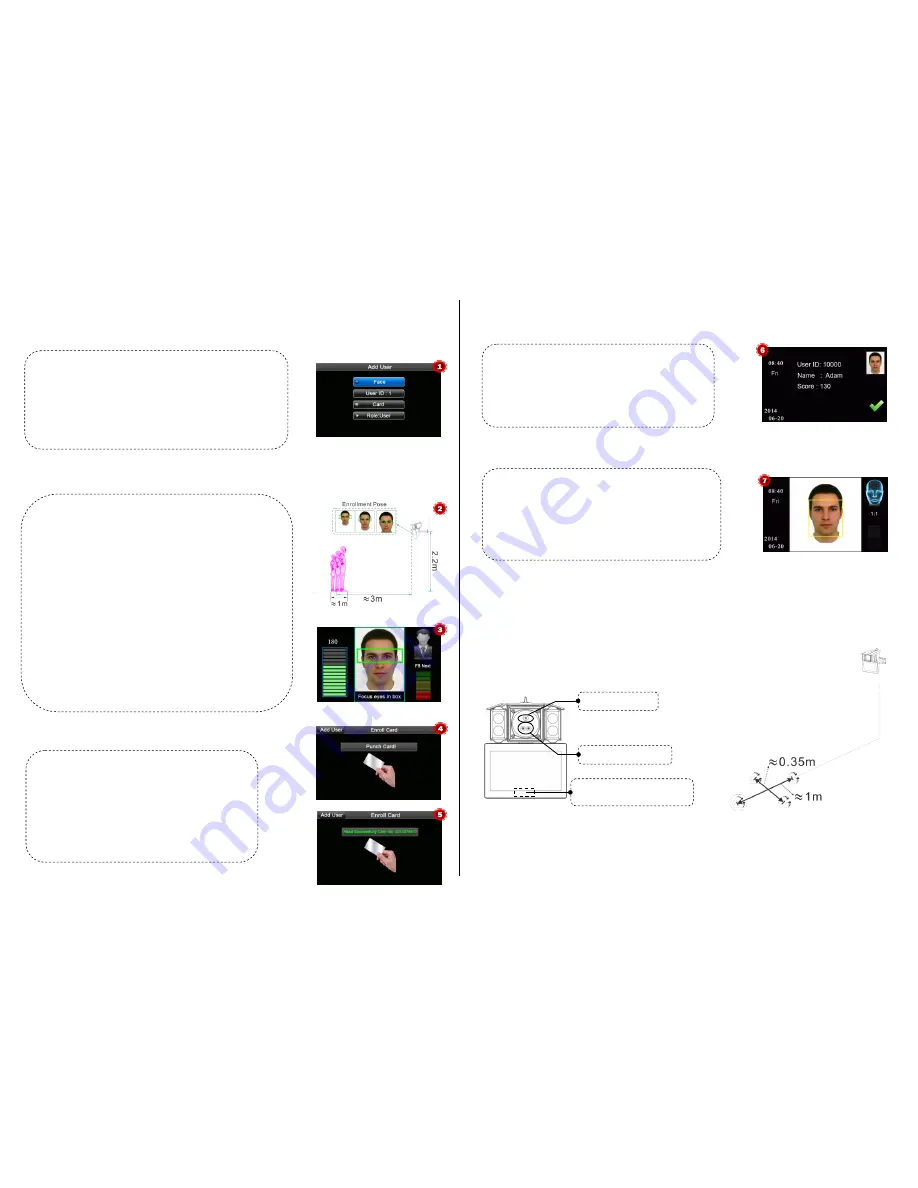
2. Add User
Press the
[OK]
key on the
Remote Control
to enter the
Main Menu
. Press the
[OK]
key again to enter the
Add User
interface,
shown as
Figure 1:
3. Verification Modes
1: N Facial Verification
1: 1 Facial Verification
Tips:
For details about how to use the device, see the
BIOCAM Series Products User Manual
, which is
available on the disk delivered with the device.
4. Product Appearance and Face Recognition Area
Face:
Enroll a user’s face.
User ID:
Enter a user ID. 1- to 5-digit user IDs are supported by default.
ID card:
Enroll a user card.
Role:
Set the rights of a user. A user is set to
User
by default and can also be
set to
Administrator
.
Users
are only granted the rights of facial verification,
while
Administrators
are granted the access to the main menu for various
operations apart from having all the privileges granted to
Users
.
Enrolling Face
(1)
On the
Add User
interface, press
[OK]
key to enter the
Face enrollment
interface.
(2)
According to the prompt appears on the
device’s screen (Focus eyes in box,
shown as
Figure 2
). During face registration, you need to move from back to
front to adjust the position of eyes. Display the face in the centre of screen as
possible.
(3)
Upon a successful face collection, the interface prompts "F8 Next" (shown
as
Figure 3
). Take off your glasses (skip this if you do not wear glasses), and
then press the
[F8]
key on the
Remote Control
to continue the registration.
(4)
Upon a second successful face collection, the interface prompts "F8 Next"
(shown as
Figure 4
). Wear your glasses (skip this if you do not wear glasses),
and then press the
[F8]
key on the
Remote Control
to continue the
registration.
(5)
If your facial image is enrolled successfully, the system will display a prompt
message and automatically return to the
Add User
interface.
Enrolling Card
(1)
On the
Add User
interface, press
[
]
key on the
Remote
Control
to move the cursor on the
Card
button, and then press
[
OK
] key to access the
Enroll Card
interface,
(2)
The
[Punch Card!]
interface pops out as shown in
Figure 4
.
Swipe your ID card properly in the swiping area.
(3)
If the card passes the verification, the device displays a prompt
message "Read Successfully! Card No.: **********", as shown in
Figure 5
, and returns to the
Add User
interface.
(1)
Compare the facial in a proper way. (Same as enrolling Face)
Place the face in the area in which the camera can capture images,
the device automatically distinguishes face verification
(2)
Comparison of interface display the current image collected by
the camera. If the verification is successful, an interface as shown in
Figure 7
will display.
(
2
)比对界面显示当前摄像头采集的图像,验证通过后界面显示
如图
4
。
(1)
Punch a registered ID card on the card reader in the correct way.
(2)
After card authentication is passed, the system enters the 1:1 face
image authentication mode. At this time, the face image on the interface
is highlighted and a prompt "1:1" is displayed, as shown in
Figure 7
.
(3)
Compare the facial in a proper way. Comparison of interface display
the current image collected by the camera, as shown in
Figure 6
.
Face Recognition Camera
Surveillance camera
Infrared receiver:
Receives signals
from the Remote Control.


