Установочный мануал для продукта ZKTeco AL30Z доступен для загрузки бесплатно на manualshive.com. Руководство позволяет установить и настроить устройство правильно. Скачайте его сейчас, чтобы начать использовать продукт без проблем.
Outdoor unit
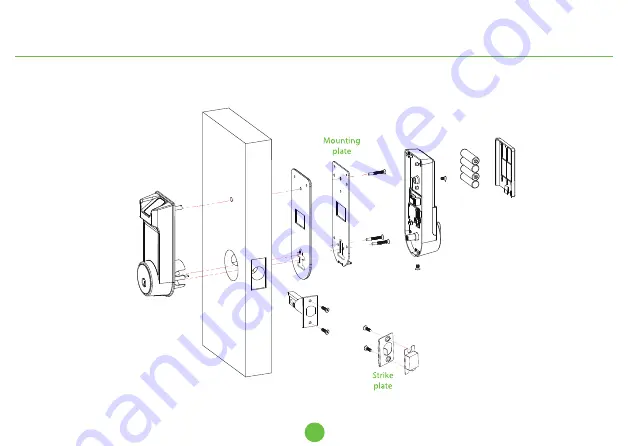
2. Installation Diagram (AL30Z)
Battery cover
Latch
Screw B
Door
Screw C
Gasket
Strike box
AA Alkaline
Screw A
2
(not included)
Battery
unit
Indoor
Страница 1: ...Installation Guide AL30Z AL40Z Version 1 1 ...
Страница 2: ...he correct set of screw C as per your door thickness 16 5mm 30mm 35mm 1 What s In the box Outdoor unit Indoor unit Latch Gasket Strike box Mounting plate Screw A Screw B Keys Screw C For door thickness Strike plate Screw length 35 40mm 40 50mm 50 53mm 1 ...
Страница 3: ...Outdoor unit 2 Installation Diagram AL30Z Battery cover Latch Screw B Door Screw C Gasket Strike box AAAlkaline Screw A 2 not included Battery unit Indoor ...
Страница 4: ...of the door Below is the graphical representation of handing in reference to your location outside the room Please read all the in this manual or call customer care before returning the product to the store Whenever you install this lock on any door you must perform the initialization process just after the installation as described in Initialization step on page 10 3 Standpoint instructions ...
Страница 5: ...Drilling holes in the door 4 1 Paste the installation template at a desired handle height 2 Mark the holes and start drilling the holes Handle center line 35mm 53mm 60mm ...
Страница 6: ...tal wire runs over the center as shown Backset is the distance from the edge of the door to the center of the hole drilled on the door The default backset is 60mm if you want to change the backset to 70mm backset grasp body and twist faceplate as shown below By default the metal wire runs over the center as shown Rotate the faceplate Rotate it back ...
Страница 7: ...efore installing the latch make sure the latch bolt is in extended Locked position and the UP arrow direction is facing upwards UP 6 Installing the latch Secure the latch by inserting the screws B 1 1 2 ...
Страница 8: ...ting it through the drilled hole Note If the direction of the door is right hand the rotate the highlighted spindle to the extreme right and if the door is left hand then rotate it to the extreme left Turn left Left open Right open Turn right Before inserting the unit inside the door make sure the highlighted spindle is in the vertical position as shown ...
Страница 9: ...te with gasket on the door 8 Attach the mounting plate to the gasket and route the cable through the hole on the mounting plate and gasket Place the gasket and mounting plate on to the door and use screws C to secure them 1 2 ...
Страница 10: ...nector to the port on indoor unit Place the indoor unit properly on the mounting plate push and adjust the excess cable to the left Then use screws A to secure indoor unit The knob dot must be in direction of bolt Adjust and push the cable to the left 1 ...
Страница 11: ...ck you must perform initialization process as explained in below steps 1 Press and hold the reset button then remove one battery and place it back again keep holding until the lock prompts Restore to default settings wait a moment 2 And after 10 seconds the lock will prompt Complete which means the initialization process is finished ...
Страница 12: ... strike box is in level of latch bolt then use installation template to drill holes 2 Align the strike box and plate with the drilled hole and use screws B to secure them 14mm 70 127 35mm 1 48 127 21 5mm 215 254 33mm 1 19 64 Depth 2mm 10 127 58mm 2 36 127 29mm 1 18 127 1 1 ...