background image

iFace100 Series Product User Manual


23 

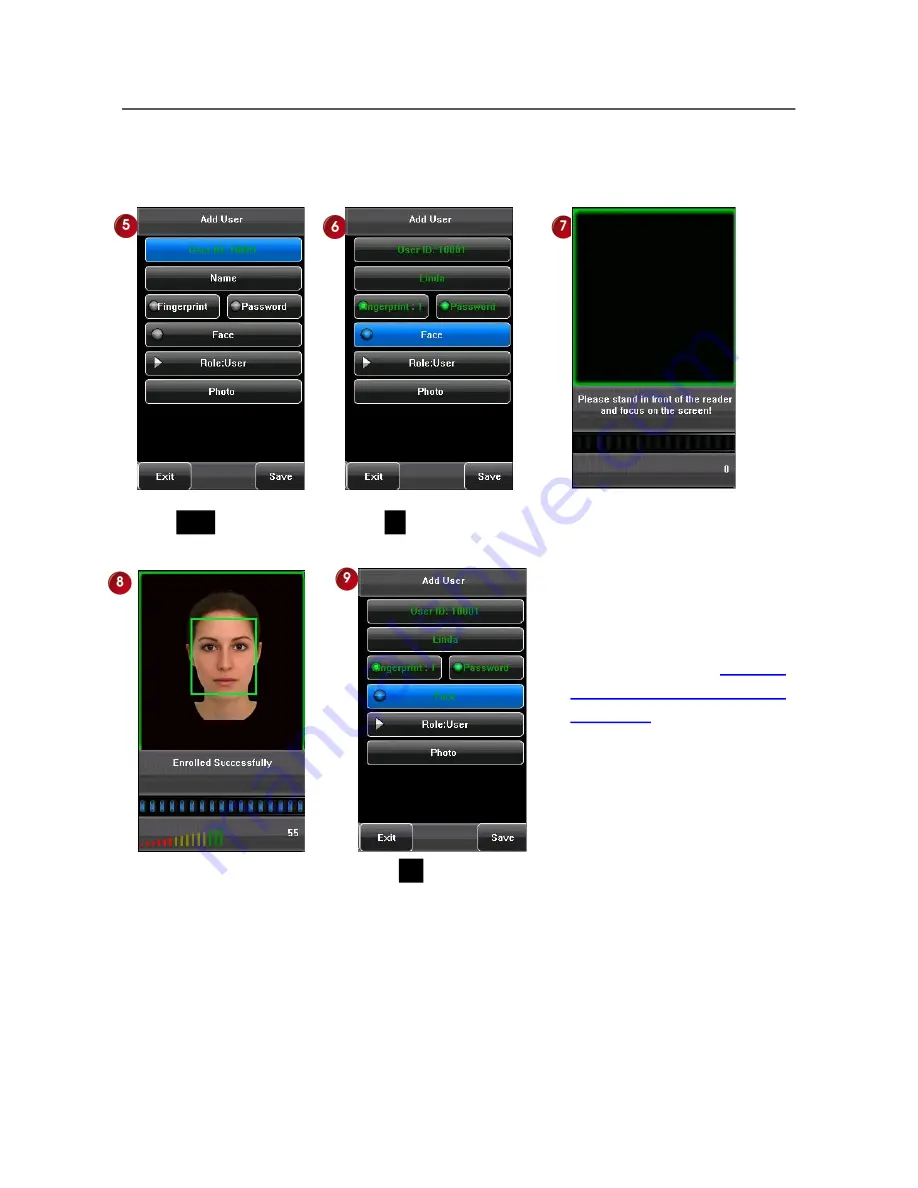
3.6 Enrolling a Face


Press

F2/

q

4 times. 

Press

OK

once to enroll face. 

Press 

A­B 

once  to  save 

and  return  to  the  main 
menu 

Enroll fingerprint successful. 

Turn  your  head  to  the  left  and 
right  slightly,  raise  and  lower 
your head according to the voice 
prompts, so as to enroll different 
parts  of  your  face  into  the 
system  to  assure  accurate 
verification.  See


1.1  The 

distance,  Facial  Expression  and 
Stand Pose.

Содержание iFace 100 Series

Страница 1: ... User Manual Version 1 1 Date August 2011 About This Manual This document introduces the user interface and menu operations of the iFace100 series products For the installation see iFace100 Series Products Installation Manual ...

Страница 2: ...tly updated of product nor assume any dispute resulting from the actual technical parameters does not match this information any change without prior notice The marked feature of the manual that not all equipment available Please subject to the actual product Captions in this document may does not match the picture of the product Please subject to the actual product ...

Страница 3: ...on 7 1 6 2 Face Verification 9 1 6 3 Password Verification 11 1 6 4 ID Card Verification 12 2 Main Menu 15 3 Adding a User 17 3 1 Assign user ID 18 3 2 Input user name 19 3 3 Enrolling a Fingerprint 20 3 4 Enrolling a Password 21 3 5 Enrolling an ID Card 22 3 6 Enrolling a Face 23 3 7 Modify User Rights 24 3 8 Enroll Photos 25 4 User Management 26 4 1 Adding a User 27 4 2 Delete a User 27 4 3 Edit...

Страница 4: ... 6 7 Update 42 7 Data Management 43 7 1 Query a Record 44 8 Date Time Setting 46 8 1 Set Date Time 46 8 2 Bell Setting 47 9 Auto Test 50 10 USB Disk Management 52 11 System Information 54 Appendix 56 Appendix 1 T9 Input Method 56 Appendix 2 Photo ID Function 57 Appendix 3 Statement on Human Rights and Privacy 59 Appendix 4 Environment Friendly Use Description 61 ...

Страница 5: ...he obtained face image from device to adjust when the face image is comparatively bright please move backwards appropriately when the face image is comparatively dark please move forwards appropriately Note During the enrollment and verification please remain the normal facial expression and stand pose 2 The recommended facial expression and several poor effect facial expressions 3 The recommded s...

Страница 6: ...ce s voice prompts do some small scope head actions such as turn left turn right rise bow and so on to ensure that the different parts of face are inputted into system to improve the verification accuration The enrollment poses are as follows Look ahead rise Focus on the screen Focus on the camera bow Turn left slightly Turn right slightly ...

Страница 7: ...acement 2 Improper finger placement Slanting Off center Not flat to the surface Off center The finger is flat to the surface and centered in fingered guide Please enroll and verify your fingerprint by using the proper finger placement mode We shall not be held accountable for any consequences arising out of the degradation in verification performance due to improper user operations We shall reserv...

Страница 8: ...tor Keypad TFT screen Camera Indicator Keypad Fingerprint sensor ID card swipe area TFT screen Camera 1 4 Appearance of the iFace100 product serials The feature may be different from your device Please subject to the actual product ...

Страница 9: ...NU menu OK Space back Press it when User ID password and system value are input incorrectly to delete the wrong value and input the value again OK OK 1 page up page down key in list page 2 shortcut 1 page up page down key in list page 2 shortcut F1 1 upward 2 shortcut F2 1 downward 2 shortcut F3 1 modify current item value 2 shortcut F4 1 modify current item value 2 shortcut A B Facial Fingerprint...

Страница 10: ...rently in the facial recognition mode if a fingerprint image is displayed the terminal is currently in the fingerprint recognition mode You can change current recognition mode of the terminal through Facial Fingerprint Switch Key and Keyboard Shortcut Keys Facial Fingerprint Switch Key By pressing the A B key you can switch between the facial and fingerprint recognition modes Notice Only certain m...

Страница 11: ...rent fingerprint collected by the fingerprint sensor with all fingerprint data on the device Place the enrolled finger properly on the fingerprint sensor Wait a second before removing the finger from the fingerprint sensor The terminal verifies user displays the ID and prompts Verified If verification failed the terminal prompts Please try again ...

Страница 12: ...n relation to the user ID entered through the keyboard Adopt this mode only when it is difficult to recognize the fingerprint Place the enrolled finger properly on the fingerprint sensor Enter the user ID by the keypad Press F3 to start 1 1 fingerprint verification The terminal verifies user displays the ID and prompts Verified If verification failed the terminal prompts Please try again ...

Страница 13: ...e verification mode the device compares current face collected through the camera with all face data on the device Compare the facial in a proper way For details see 1 1 Standing Position and Posture and Facial Expression Wait a second The terminal verifies user displays the ID and prompts Verified ...

Страница 14: ...relation to the user ID entered through the keyboard Adopt this mode only when it is difficult to recognize the face Compare the facial in a proper way For details see 1 1 Standing Position and Posture and Facial Expression Press F2 to start 1 1 face verification The terminal verifies user displays the ID and prompts Verified Enter the user ID by the keypad ...

Страница 15: ...e device compares the password entered with that in relation to the user ID Press F4 to start password verification The terminal verifies user displays the ID and prompts Verified If verification failed the terminal prompts Please try again Enter the user ID by the keypad Enter the password using keypad ...

Страница 16: ... verification modes ID Card Only Users only need to swipe their ID cards for verification ID Facial or fingerprint Verification After passing the ID card verification you also need to perform facial verification or fingerprint verification For the settings of these two verification modes see 5 5 Attendance Parameters 1 ID Card Only Swipe the card at the induction area The terminal verifies user di...

Страница 17: ... 13 2 ID Facial Verification Swipe the card at the induction area Compare the facial in a proper way For details see 1 1 Standing Position and Posture and Facial Expression The terminal verifies user displays the ID and prompts Verified ...

Страница 18: ...int Verification Swipe the card at the induction area Place the enrolled finger properly on the fingerprint sensor The terminal verifies user displays the ID and prompts Verified If verification failed the terminal prompts Please try again ...

Страница 19: ...the main menu for various operations apart from having all the privileges granted to ordinary users Press MENU once Any user can access the main menu by pressing the Menu key if the system is free from administrators After administrators are configured on the terminal the terminal needs to verify the administrators identity before granting them access to the main menu To ensure terminal security i...

Страница 20: ...est extent in terms of functions and display Data Mgt Through this submenu you can perform management of data stored on the terminal for example deleting the attendance record all data and promotional pictures purging management rights and resetting the terminal to factory defaults Date Time The date and time of the terminal must be set accurately to ensure the accuracy of attendance time Through ...

Страница 21: ...t maximum Password Enroll a user s password 1 to 8 digit passwords are supported by default Card Enroll a user s card Face Enroll a user s face Role Set the rights of a user A user is set to ordinary user by default and can also be set to administrator Ordinary users are only granted the rights of facial fingerprint or password verification while administrators are granted the access to the main m...

Страница 22: ... 1 for every user in sequence If you use the ID allocated by the terminal you may skip this section Press MENU once Press OK once Press OK once Assign user ID for the user Assign user ID successful Tip The user ID can be modified during initial enrollment but once enrolled it cannot be modified ...

Страница 23: ...user name through T9 input method Press F2 q once Press OK once to start T9 input Input user name successful Tip The terminal supports the 1 to 12 character names by default Input the user name Pres The steps please see Appendix 1 T9 Input Method Press ESC to end input ...

Страница 24: ...2 q 2 times Press OK once to enroll FP Place the same finger on the fingerprint sensor for three consecutive times correctly Press A B once to save and return to the main menu Enroll fingerprint successful Tip Only some models have the fingerprint options ...

Страница 25: ...lling a Password Press F2 q 3 times Press OK once to enroll Enter password maximum 8 digits password Press Ok once consecutive times correctly Re enter the password to Press A B once to save conform Press OK once to and return to the main menu save ...

Страница 26: ...ing an ID Card Press F2 q 4 times Press OK once to enroll card Press A B once to save and return to the main menu Enroll card successful Swipe your ID card properly in the swiping area Tip Only some models have the ID card options ...

Страница 27: ...once to save and return to the main menu Enroll fingerprint successful Turn your head to the left and right slightly raise and lower your head according to the voice prompts so as to enroll different parts of your face into the system to assure accurate verification See 1 1 The distance Facial Expression and Stand Pose ...

Страница 28: ... users are only granted the rights of facial fingerprint or password verification while administrators are granted the access to the main menu for various operations apart from having all the privileges granted to ordinary users Press F2 q 5 times Press A B once to save and return to the main menu Press OK once to select Administrator or 2 times to select User ...

Страница 29: ...led photo in addition to your ID and name after you pass the verification Press F2 q 6 times Press OK once to enroll photo Re enter the password to conform Press OK once to save stand naturally in front of the screen For details see 1 1 Standing Position and Posture and Facial Expression Press A B once to save and return to the main menu ...

Страница 30: ...ser information including the user ID name fingerprint face ID card password rights and the group that the user belongs to Add edit or delete the basic information of users Press MENU once Press F4 u once to select User Mgt Press OK once Press MENU once ...

Страница 31: ...onfigured here The function is the same as that of 3 adding a user 4 2 Delete a User On the User Management interface you can delete user information Press F1 p or F2 q to chose user ID to delete Press MENU once Press F2 q once Press OK once Press MENU once Press OK once Press ESC once to return to the main menu ...

Страница 32: ...se performed to add a user You can re enroll your fingerprint and facial image change your password and modify the management rights and photo Press F1 p or F2 q to chose user ID to edit Press MENU once Press F2 q 2 times Press OK once Edit the user information Press A B once to save and return to the main menu ...

Страница 33: ...large number of enrolled users the terminal enables user query by his her User ID Location Search Press F1 p or F2 q to chose user ID to edit Press MENU once Press F2 q 3 times Press OK once Input the user ID The cursor locate the desired user Press A B once to save and return to the main menu For example input 10007 ...

Страница 34: ...g settings IP Address The IP address is 192 168 1 201 by default and can be changed as required the IP address of the terminal and that of the PC cannot be duplicated Subnet Mask The subnet mask is 255 255 255 0 by default and can be changed as required Gateway The gateway is 0 0 0 0 by default If the terminal and the PC are not located in the same network segment you need to set the gateway When ...

Страница 35: ...on is adopted you need to enter the device ID on the software communication interface Comm Key To enhance the security of attendance data you can set a password for the connection between the terminal and PC Once the password is set you can connect the PC with the terminal to access the attendance data only after entering the correct password The default password is 0 that is no password Once a pa...

Страница 36: ...stem related parameters including the basic parameters interface parameters fingerprint facial and attendance parameters to enable the terminal to meet user requirements to the greatest extent in terms of functions and display Press F2 q once to select System Press OK once Press MENU once ...

Страница 37: ...mpts This parameter is used to set whether to play voice prompts during the operation of the terminal Select ON to enable the voice prompt and select OFF to mute Volume This parameter is used to adjust the volume of voice prompts Lock Power Key This parameter is used to set whether to lock the power key Select ON to disable the power key If you select OFF and press the power key the terminal will ...

Страница 38: ... Hide you can manually display or hide the toolbar By selecting Permanent Display you can permanently display the toolbar on the initial interface Default Verify Mode This parameter is used to set the default verification mode that is the Fingerprint or Face verification mode Picture Delay S This parameter is used to set the picture cycle interval value scope 3 999 seconds Sleep Time S This parame...

Страница 39: ...s larger than this threshold the matching is successful otherwise the matching is not successful 1 N Threshold This parameter is used to set the threshold of matching between current fingerprint and the fingerprint template enrolled in the terminal in the 1 N verification mode If the similarity between current fingerprint and the fingerprint template enrolled in the terminal is larger than this th...

Страница 40: ...select the fingerprint algorithm version between 9 0 and 10 0 Please select the algorithm version with caution because the fingerprint templates of these two algorithm versions are incompatible Fingerprint Image This parameter is used to set whether to display the fingerprint image on the screen during fingerprint enrollment or comparison It has two values Permanent Display and No Display ...

Страница 41: ...e is 55 120 The higher the threshold the lower the FAR and the higher the FRR and vice versa 1 N Threshold This parameter is used to set the threshold of matching between current face and the facial template enrolled in the terminal in the 1 N verification mode If the similarity between current face and the facial template enrolled in the terminal is larger than this threshold the matching is succ...

Страница 42: ...ial images obtained The terminal accepts the facial images and processes them by adopting the facial algorithm when their quality is higher than the threshold otherwise it filters these facial images Algorithm Version Face Algorithm can choose 5 0Algorithm or 7 0Algorithm Note Improper adjustment of the Exposure Gain and Quality parameters may severely affect the performance of the terminal Please...

Страница 43: ...ndance record already exists and the user punches in again within the specified period unit minute his her second attendance record will not be stored Value scope 1 60 minutes Card Only If this parameter is set to YES you pass the verification only after card verification If this parameter is set to NO you need to verify your face or fingerprint after card verification Press F2 q 4 times Press OK ...

Страница 44: ...ss corresponding keys and the attendance status will be displayed or the function interface will be rapidly displayed Press F2 q 5 times Press OK once You can set the functions of attendance status shortcut key or Undefine Press OK once Press OK once Press OK once When the functions is set as status Press F2 q 5 times Press OK once Press F2 q to select the attendance status Press OK once ...

Страница 45: ... keys include Check In Check Out Leave Back Overtime Check In and Overtime Check Out Auto Switch When setting the attendance status shortcut keys you can also set the Auto Switch parameter When Auto Switch is enabled the terminal automatically switches the attendance status at the specified time Press F2 q to set the Auto Switch Press OK once Set the Auto Switch Press A B 2 times to save and retur...

Страница 46: ... upgrade the firmware program of the terminal by using the upgrade file in the USB disk through this parameter If you need the firmware upgrade file please contact our technical support personnel Generally the firmware upgrade is not recommended ...

Страница 47: ...ata Delete all the information of enrolled personnel including their fingerprints facial images and attendance records Clear Administrator Change all administrators to ordinary users Restore to Factory Settings Restore all parameter settings on the terminal to factory settings Record Query the attendance records of employees within a specified time range Press F2 q once and F4 u once to select Dat...

Страница 48: ...f all the employees If you enter a user ID you can query the attendance record of the employee with this user ID Query Time Period Select a time period to query including the customized time period yesterday this week last week this month last month and all time periods Start and End When you select a customized time period you need to input a start time and an end time When you select other optio...

Страница 49: ...iFace100 Series Product User Manual 45 You can query the detailed information of this record Press ESC 2 times to return to the main menu Press Þ to page up Or press to page down ...

Страница 50: ... to ensure the accuracy of attendance time Date Time Set the date and time value Date format Set the date format which displayed on the initial interface of the terminal The terminal supports ten date formats Select your desired date format Press F2 q once and F4 u once to select Data Mgt Press OK once Press MENU once ...

Страница 51: ...bells to signal the start and end of work shifts and they usually manually ring their bells or use electric bells To lower costs and facilitate management we integrate the time bell function into the terminal You can set the alarm time and duration for ringing the bell based on your requirements so that the terminal will automatically play the selected ring tone and trigger the relay at the alarm ...

Страница 52: ... Volume This parameter is used to set the volume of ring tone Repeat This parameter is used to set the alarm times State This parameter is used to set whether to enable the bell Bell Type You can select between internal ringing or external ringing For internal ringing the ring tone is played by the loudspeaker of the terminal For external ringing the ring tone is played by an external electric bel...

Страница 53: ...ll Press F2 q 2 times to select Edit Press OK once Edit the bell parameter like Add a bell Press A B once to save and exit Press F2 q once to select Delete Press OK once Press YES to delete the current bell and NO to cancel the deletion Press A B once to save and exit ...

Страница 54: ...ching the screen or exit it by pressing Auto Test Test Fingerprint The terminal automatically tests whether the fingerprint collector works properly by checking whether the fingerprint images are clear and acceptable When the user places his her finger in the fingered guide the collected fingerprint image is displayed on the screen in real time Press Auto Test to exit the test Test Voice The termi...

Страница 55: ... terminal tests whether every key on the keyboard works normally Press any key on the Keyboard Test interface to check whether the pressed key matches the key displayed on screen The keys are dark gray before pressed and turn blue after pressed Press Auto Test to exit the test Test Time The terminal tests whether its clock works properly by checking the stopwatch of the clock Touch the screen to s...

Страница 56: ...data from the terminal to a USB disk Download User Import all the user information fingerprints and facial images from the terminal to a USB disk Download user photos Import the employees photos from the terminal to a USB disk Upload User Upload the user information fingerprints and facial images stored in Only several types of the terminals support the download of user photos Press F2 q 2 times a...

Страница 57: ...sk to the terminal Upload User Photo Upload the JPG documents that are named after the user IDs and stored in a USB disk to the terminal so that user photos can be displayed after the employees pass the verification See Appendix 4 Photo ID Function ...

Страница 58: ...the terminal through the System Information option Press F2 q 2 times and F4 u 2 times to select Sys Info Press OK once Press MENU once Press OK to Device interface or Press ESC to return main menu Press OK to Records interface or Press ESC to return main menu Tip Only some models have the FP Algorithm information ...

Страница 59: ...on the Records interface the total fingerprint storage capacity and occupied capacity as well as the total attendance storage capacity and occupied capacity are graphically displayed respectively Device The device name serial number version information vendor and date of manufacture are displayed on the Device interface ...

Страница 60: ... example press Name to display the text input interface as shown in the figure Press OK once Press ESC to exit the T9 Input Press A B to save and return to the main menu Press 5 and select 5 for latter L Press 4 and select 2 for latter i Repeat the process to input the other letters nda Tip Press Þ to change the T9 Input from English and symbols ...

Страница 61: ... verification 2 To use a photo stored in a USB disk proceed as follows 1 Create a folder with the name of photo in the USB disk and store users photos under this folder 2 The user photos must be in JPG format and named after their IDs For example for the user with the user ID of 154 the photo name must be 154 jpg 3 Insert the USB disk into USB slot on the device and select USB Disk Management Uplo...

Страница 62: ... user photo will overwrite the existing photo in related to the user ID 4 To download user photos select USB Disk Management Download Download User Photos A folder with the name of photo will be automatically created on the USB disk and all downloaded user photos are stored under this folder ...

Страница 63: ...ollected by our products cannot be used to restore the original fingerprint images and therefore no privacy issues are involved 3 We as the equipment provider shall not be held legally accountable directly or indirectly for any consequences arising due to the use of our products 4 For any dispute involving the human rights or privacy when using our products please contact your employer directly Ou...

Страница 64: ... inviolable 4 The freedom and privacy of correspondence of citizens of the People s Republic of China are protected by law At last we stress once again that biometrics as an advanced recognition technology will be applied in a lot of sectors including e commerce banking insurance and legal affairs Every year people around the globe suffer from great loss due to the insecurity of passwords The biom...

Страница 65: ...ments Toxic and Hazardous Substances or Elements Parts Name Pb Hg Cd Cr6 PBB PBDE Chip resistor Chip capacitor Chip inductor Chip diode ESD components Buzzer Adapter Screws Indicates that this toxic or hazardous substance contained in all of the homogeneous materials for this part is below the limit requirement in SJ T11363 2006 Indicates that this toxic or hazardous substance contained in at leas...

Страница 66: ...MultiBio700 User Manual 1 0 62 ...

Отзывы: