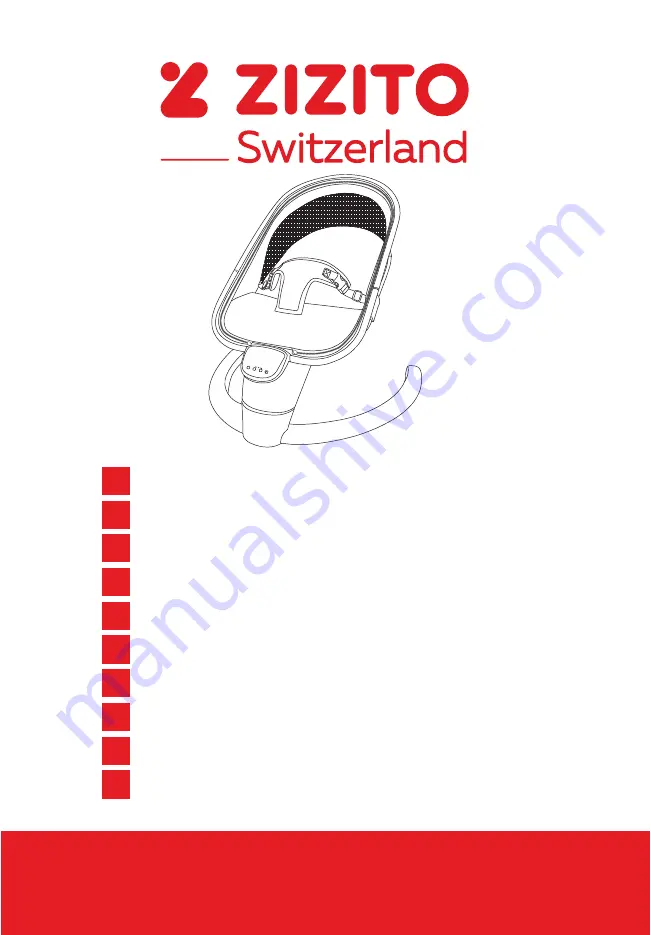
background image

1

PAOLO

BY055D

DE

 AUTO BABY SWING ........................................2

EN

 AUTO BABY SWING  .....................................10

FR

 BALANÇOIRE AUTO BÉBÉ ..........................18

ES

 COLUMPIO AUTOMÁTICO PARA BEBÉ ......26

IT

 AUTO BABY SWING  .....................................34

NL

 AUTO BABY SWING  .....................................42

RO

 AUTO BALANSOAR PENTRU BEBELUȘI

 ....50

GR

 ΑΥΤΟΜΑΤΗ ΒΡΕΦΙΚΗ ΚΟΥΝΙΑ

 .....................58

SRB

 AUTOMATSKA  BEBI LJULJAŠKA ...............66

BG

 АВТОМАТИЧЕН БЕБЕШКИ ШЕЗЛОНГ

 ........ 74

档位

音�

定�

Содержание PAOLO BY055D

Страница 1: ...BABY SWING 2 EN AUTO BABY SWING 10 FR BALAN OIRE AUTO B B 18 ES COLUMPIO AUTOM TICO PARA BEB 26 IT AUTO BABY SWING 34 NL AUTO BABY SWING 42 RO AUTO BALANSOAR PENTRU BEBELU I 50 GR 58 SRB AUTOMATSKA B...

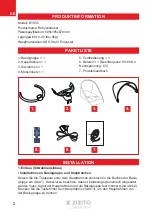
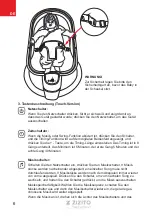
Страница 2: ...est montiert sind Abb 2 Dr cken Sie die Taste hinter dem Hauptrahmen Abb 3 um den Hauptrahmen von der Basisgruppe zu trennen Modell BY055 Produktname Babyschaukel Paketspezifikation 505x195x670mm Lage...

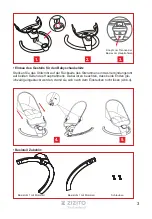
Страница 3: ...s Verbindungsrohr auf beiden Seiten des Hauptrahmens Dabei ist zu beachten dass beide Enden gle ichzeitig eingesteckt werden damit sie sich nach dem Einstecken nicht l sen Abb 4 Basisteil Zubeh r 1 2...

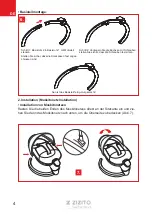
Страница 4: ...Sie dann das Moskitonetz nach unten um die Oberseite zu bedecken Abb 7 Basisteilmontage DE 6 Schritt 1 Basisrohr 2 in Basisrohr 1 mit Motorteil stecken Stellen Sie sicher dass die Steckdosen fest ange...

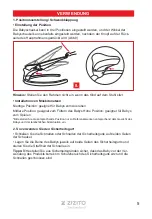
Страница 5: ...et zum F ttern des Babys Hohe Position geeignet f r Babys zum Spielen Bitte stellen Sie die entsprechende Position nur zu Referenzzwecken entsprechend dem Gewicht des Babys und der tats chlichen Sitzs...

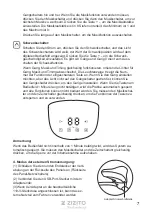
Страница 6: ...Minimum ist 5 Minuten der erste Gang 5 Minuten und der achte Gang 40 Minuten Musikschalter Schalten Sie den Netzschalter ein dr cken Sie den Musikschalter 9 Musik st cke werden nacheinander abgespielt...

Страница 7: ...er Funktion der eingeschalteten Taste an Wenn Sie den Gang einstellen m chten aber das Licht nicht auf den Gangschalter gedreht ist k nnen Sie den Gangschalter dr cken um den Gang einzustellen Wenn Si...

Страница 8: ...0 Bei Verwendung der Fernbedienung ist es erforderlich den Senderkopf der Fernbedienung mit dem Netzschalterende des Produktbedienfelds auszurichten Hinweis Ziehen Sie die transparente PVC Folie am E...

Страница 9: ...erioden geeignet 13 Verwenden Sie dieses Produkt niemals auf einer erh hten Fl che z B einem Tisch 14 Benutzen Sie immer das R ckhaltesystem 15 Um Verletzungen zu vermeiden achten Sie darauf dass Kind...

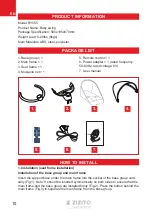
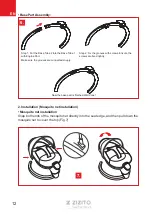
Страница 10: ...are installed firmly Fig 2 Press the button behind the main frame Fig 3 to separate the main frame from the base group Model BY055 Product Name Baby swing Package Specification 505x195x670mm Weight Lo...

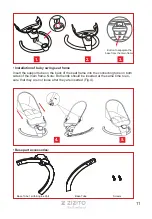
Страница 11: ...to the connecting tube on both sides of the main frame Note Both ends should be inserted at the same time to en sure that they are not loose after they are inserted Fig 4 Base part accessories 1 2 3 B...

Страница 12: ...the seat edge and then pull down the mosquito net to cover the top Fig 7 Base Part Assembly EN 6 Step 1 Put the Base Tube 2 into the Base Tube 1 with Engine Part Make sure the grooves are connected s...

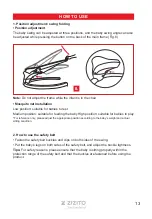
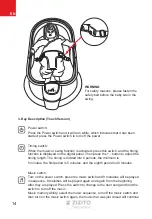
Страница 13: ...ium position suitable for feeding the baby High position suitable for babies to play For reference only please adjust the appropriate position according to the baby s weight and actual sitting conditi...

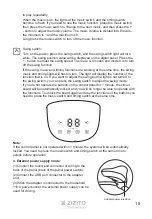
Страница 14: ...the timing length The timing is divided into 8 periods the minimum is 5 minutes the first period is 5 minutes and the eighth period is 40 minutes Music switch Turn on the power switch press the music...

Страница 15: ...ght will display the number of the function that is on If you want to adjust the swing but the light is not turned to the swing switch you can press the swing switch to adjust the swing mode If you do...

Страница 16: ...the music Press to play the previous next music When the power is on press once to increase or decrease the swing speed with one mode 8 modes in total swing function is off at mode 0 When using the r...

Страница 17: ...tended 11 Do not use this product once your child can sit up unaided or weighs more than 9 kg 12 This product is not intended for prolonged periods of sleeping 13 Never use this product on an elevated...

Страница 18: ...s Fig 2 Appuyez sur le bouton derri re le cadre principal Fig 3 pour s parer le cadre principal du groupe de base Mod le BY055 Nom du produit Balan oire b b Sp cification de l emballage 505x195x670mm...

Страница 19: ...onnexion des deux c t s du cadre principal Il convient de noter que les deux extr mit s doivent tre ins r es en m me temps pour s assurer qu elles ne se desserrent pas apr s leur insertion Fig 4 Acces...

Страница 20: ...ez la moustiquaire vers le bas pour couvrir le dessus Fig 7 Assemblage de la pi ce de base FR 6 tape 1 placez le tube de base 2 dans le tube de base 1 avec la partie moteur Assurez vous que les prises...

Страница 21: ...b s t ter Position haute convient aux b b s jouer Pour r f rence seulement veuillez ajuster la position appropri e en fonction du poids du b b et de sa position assise r elle 2 Comment utiliser la ce...

Страница 22: ...ivis e en 8 vitesses le minimum est 5 minutes le premier rapport est de 5 minutes et le huiti me rapport est de 40 minutes Interrupteur de musique Allumez l interrupteur d alimentation appuyez sur l i...

Страница 23: ...tion de la touche qui est allum e Si vous souhaitez r gler la vitesse mais que la lumi re n est pas tourn e vers le commutateur de vitesse vous pouvez appuyer sur le commutateur de vitesse pour r gler...

Страница 24: ...minuer la vitesse de rotation d une vitesse 8 vitesses au total le mode de rotation est d sactiv la vitesse 0 Lors de l utilisation de la t l commande il est n cessaire d aligner la t te mettrice de l...

Страница 25: ...asseoir sans aide ou p se plus de 9 kg 12 Ce produit n est pas destin des p riodes de sommeil prolong es 13 N utilisez jamais ce produit sur une surface sur lev e par exemple une table 14 Utilisez tou...

Страница 26: ...2 Presione el bot n detr s de la estructura principal Fig 3 para separar la estructura principal de la base Modelo BY055 Nombre del producto Columpio para beb Especificaci n del paquete 505x195x670mm...

Страница 27: ...en el tubo de conexi n en ambos lados de la estructura principal Cabe se alar que ambos extremos deben insertarse al mismo tiempo para asegurarse de que no se aflojen despu s de insertarlos Fig 4 Acce...

Страница 28: ...uego baje la mosquitera para cubrir la parte superior Fig 7 Esamblaje de la base ES 6 Paso 1 coloque el tubo de la base 2 en el tubo de la base 1 con la pieza del motor Aseg rese de que los enchufes e...

Страница 29: ...apta para que los beb s alimenten Posici n alta apta para que los beb s jueguen Solo como referencia ajuste la posici n adecuada de acuerdo con el peso del beb y la condici n actual de capacidad para...

Страница 30: ...ide en 8 intervalos el m nimo es de 5 minutos la primera fase es de 5 minutos y el octavo intervalo es de 40 minutos Interruptor de m sica Encienda el interruptor de encendido pulse el interruptor de...

Страница 31: ...te La luz que muestra el 8 mostrar el n mero de la funci n de la tecla que est encendida Si quiere ajustar la marcha pero la luz no est girada hacia el interruptor de marcha puede pulsar el interrupto...

Страница 32: ...esactivado en la marcha 0 Al usar el control remoto es necesario alinear la cabeza del transmisor del control remoto con el extremo del interruptor de encendido del panel de control del producto Aviso...

Страница 33: ...riodos prolongados 13 No utilice nunca este producto sobre una superficie elevada por ejemplo una mesa 14 Utilice siempre el sistema de retenci n 15 Para evitar lesiones aseg rese de que los ni os se...

Страница 34: ...main frame and the base group are installed firmly Fig 2 Press the button behind the main frame Fig 3 to separate the main frame from the base group Modello BY055 Nome del prodotto Baby swing Specific...

Страница 35: ...di connessione su entrambi I lati del telaio principale Ci si assicuri che entrambe le estremit devono essere inserite nello stesso stante per assicurarne la tenuta Fig 4 Componenti per la base 1 2 3...

Страница 36: ...ivamente tira gi la rete per coprire la parte superiore Fig 7 Assemblaggio della parte di base IT 6 Passaggio 1 posizionare il tubo di base 2 nel complesso tubo di base 1 e parte motrice Assicurati ch...

Страница 37: ...adatta durante i pasti Posizione alta adatta durante il gioco Per informazione impostare la posizione appropriate secondo il peso del bambino e le condizioni di seduta 2 Come usare la cintura di sicur...

Страница 38: ...ulsante per regolare la durata del tempo Il tempo diviso in 8 intervalli il minimo 5 minuti e l ottava marcia di 40 minuti Pulsante musica Accendere l interruttore premere il pulsante della musica 9 p...

Страница 39: ...ica e del tempo ruoteranno a turno La luce che visualizza 8 mostrer il numero della funzione del tasto che acceso Se volete regolare la marcia ma la luce non girata verso l interruttore della marcia p...

Страница 40: ...ecedente successivo Quando l interruttore acceso premi una volta per incrementare o ridurre la velocit del dondolo di una velocit 8 velocit in totale il dondolio spento quando la velocit 0 Quando si u...

Страница 41: ...to prodotto se il bambino in grado di stare seduto da solo o pesa pi di 9 kg 12 Questo prodotto non adatto per periodi prolungati di sonno 13 Non usare mai questo prodotto su una superficie elevata ad...

Страница 42: ...vig worden ge nstalleerd Fig 2 Druk op de knop achteraan het hoofdframe Fig 3 om het hoofdframe van de basisgroep te verwijderen Model BY055 Productnaam Baby swingl Pakketspecificatie 505x195x670mm Dr...

Страница 43: ...zijden van het basisframe Opgemerkt moet worden dat beide uiteinden tegeli jkertijd moeten worden ingebracht om ervoor te zorgen dat ze niet los zitten nadat ze zijn ingebracht Fig 4 Accessoires voor...

Страница 44: ...en trek het muggen net naar beneden om de bovenkant te bedekken Fig 7 Basis deel montage NL 6 Stap 1 Plaats basisbuis 2 in basisbuis 1 met monteerdeel Zorg ervoor dat de delen goed zijn aangesloten St...

Страница 45: ...t om baby s te voeden Hoge positie geschikt voor baby s om te spelen Alleen ter referentie pas de juiste positie aan op basis van het gewicht van de baby en de werkelijke zitsituatie 2 Hoe gebruikt u...

Страница 46: ...sduren het minimum is 5 minuten de eerste tijdsduur is 5 minuten en de achtste tijdsduur is 40 minuten Muziek schakelaar Zet de aan uit schakelaar aan druk op de muziekschakelaar 9 muziekstuk ken word...

Страница 47: ...nctie van de ingeschakelde toets weer Als u de snelheid wilt afstellen maar het licht niet naar de snelheidsschakelaar is gedraaid kunt u op de snelheidsschakelaar drukken om de snelheid aan te passen...

Страница 48: ...lingen in totaal swing modus is uitgeschakeld in versnelling 0 Bij gebruik van de afstandsbediening is het noodzakelijk om de zenderkop van de afstandsbediening uit te lijnen met het uiteinde van de a...

Страница 49: ...roduct is niet bedoeld om de baby gedurende langere tijd in te laten slapen 13 Gebruik dit product nooit op een verhoogd oppervlak bijv een tafel 14 Gebruik altijd het beveiligingssysteem 15 Om letsel...

Страница 50: ...Fig 2 Ap sa i butonul din spatele cadrului principal Fig 3 pentru a separa cadrul principal de ansamblul bazei Model BY055 Nume produs Balansoar pentru copii Specifica ii pachet 505x195x670mm Greutat...

Страница 51: ...onectare de pe ambele p r i ale cadrului principal Trebuie remarcat faptul c ambele capete trebuie introduse n acela i timp pentru a fi siguri c nu sunt sl bite dup ce sunt introduse Fig 4 Accesorii p...

Страница 52: ...i n jos plasa de n ari pentru a acoperi partea superioar Fig 7 Ansamblare piese pentru baz RO 6 Pasul 1 Pune i tubul pentru baz 2 n tubul pentru baz 1 cu partea motorului Asigura i v c sunt bine cone...

Страница 53: ...ntru hr nirea bebelu ilor Pozi ie nalt potrivit pentru joaca bebelu ilor Doar pentru referin v rug m s ajusta i pozi ia corespunz toare n func ie de greutatea bebelu ului i de capacitatea de a sta a e...

Страница 54: ...Cronometrarea este mp r it n 8 trepte minimul este 5 minute Prima treapt de vitez este de 5 minute iar treapta a opta este de 40 de minute Comutator muzical Ap sa i butonul de pornire ap sa i butonul...

Страница 55: ...i pe r nd Lumina care afi eaz 8 va afi a num rul func iei tastei care este aprins Dac dori i s regla i treapta de vitez dar lumina nu este ndreptat c tre butonul de vitez pute i ap sa butonul de vitez...

Страница 56: ...ii Ap sa i pentru a reda muzica anterioar urm toare C nd alimentarea este pornit ap sa i o dat pentru a cre te sau a reduce viteza de balansare a unei trepte 8 trepte n total modul de balansare este d...

Страница 57: ...at copilul nesupravegheat 11 Nu utiliza i acest produs atunci c nd copilul poate s stea singur n ezut sau dac are mai mult de 9 kg 12 Acest produs nu este destinat utiliz rii pentru perioade ndelungat...

Страница 58: ...58 GR 1 1 2 3 BY055 505x195x670mm 0 20 9 ABS 1 1 2 1 3 1 4 1 5 1 6 1 50 60Hz 6V 7 Timing Switch Swing Swing 1 5 6 7 2 3 4...

Страница 59: ...59 4 1 2 3 4 5 1 2...

Страница 60: ...60 2 7 GR 6 1 2 1 2 7...

Страница 61: ...61 1 8 8 2...

Страница 62: ...62 GR 8 5 5 40 9 9 3...

Страница 63: ...63 8 1 8 0 8 0 8 1 1 4 1 2 USB 3 110 V...

Страница 64: ...64 GR 5 8 5 5 40 8 0 PVC 3V 1 2...

Страница 65: ...65 3 4 0 20 5 6 7 8 9 10 11 9 kg 12 13 14 15 16 17 18 19 20 21 22 23 24 25...

Страница 66: ...dugme iza glavnog okvira Sl 3 ako elite da odvojite glavni okvir od baznog dela Model BY055 Naziv proizvoda Ljulja ka za bebe Specifikacija paketa 505x195x670mm Te ina koju podnosi 0 20 lbs 9 kg Glav...

Страница 67: ...ojnu cev sa obe strane glavnog okvira Treba napomenuti da oba kraja treba da budu umetnuta u isto vreme kako bi se osiguralo da nisu labave nakon to su povezane Sl 4 Delovi baze ljulja ke 1 2 3 Dugme...

Страница 68: ...iv komaraca direktno u ivicu sedi ta a zatim povucite mre u protiv komaraca da pokrijete gornji deo Sl 7 Sklapanje baznog dela SRB 6 Korak 1 Stavite osnovnu cev 2 u osnovnu cev 1 sa delom mehanizma Uv...

Страница 69: ...a pogodna za odmor beba Srednja pozicija pogodna za hranjenje beba Visoka pozicija pogodna za igru beba Napomena podesite odgovaraju i polo aj prema te ini bebe i realnim uslovima sedenja 2 Kako koris...

Страница 70: ...ekvenci minimum je 5 minuta prva sekvenca traje 5 minuta a osma sekvenca traje 40 minuta Prekida za muziku Uklju ite prekida za napajanje pritisnite prekida za muziku 9 melodija e se reprodukovati u n...

Страница 71: ...ni no Svetlosni prikaz 8 e prikazati nivo funkcije za prekida koji je trenutno uklju en Ako elite da podesite brzinu ali svetlo nije upaljeno na prekida u za brzinu ljuljanja mo ete pritisnuti prekida...

Страница 72: ...prethodnu slede u melodiju Kada je napajanje uklju eno pritisnite jednom da pove ate ili smanjite brzinu ljuljanja za jednu brzinu ukupno ima 8 brzina re im ljuljanja je isklju en u brzini 0 Kada kori...

Страница 73: ...adzora 11 Nemojte koristiti ovaj proizvod kada va e dete mo e da sedi samostalno ili kada te i vi e od 9 kg 12 Ovaj proizvod nije namenjen za du e periode spavanja 13 Nikada ne koristite ovaj proizvod...

Страница 74: ...74 BG 1 1 2 3 BY055 505x195x670 0 9 ABS 1 1 2 1 3 1 4 1 5 1 6 1 50 60Hz 6V 7 Timing Switch Swing Swing 1 5 6 7 2 3 4...

Страница 75: ...75 4 5 1 2 3 4 5 O 1 2...

Страница 76: ...76 2 7 BG 6 1 2 1 2 7...

Страница 77: ...77 1 8 8 2...

Страница 78: ...78 BG 8 5 40 9 3...

Страница 79: ...79 8 1 8 8 0 1 4 1 2 USB 3 110 V...

Страница 80: ...80 BG 5 8 5 40 8 0 PVC 3V...

Страница 81: ...81 1 2 3 4 5 6 9 7 8 9 10 11 12 13 9 kg 14 15 16 17 18 19 20 21 22 23 24 25...

Страница 82: ...www zizito com info zizito com ZIZITO SA Rue Du Centre 8 Villars Sur Gl ne Fribourg 1752 Switzerland...

Отзывы: