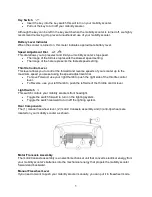
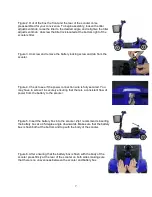
Zip'r Roo 3 Скачать руководство пользователя страница 6


Key Switch    


Insert the key into the key switch this will turn on your mobility scooter.   


Pull out the key to turn off your mobility scooter. 


Although the key can be left in the key switch when the mobility scooter is turned off, we highly 
recommend removing it to prevent unauthorized use of your mobility scooter.


Battery Level Indicator 


When the scooter is turned on, this meter indicates approximate battery level. 


Speed Adjustment Dial     


This dial allows you to preselect and limit your mobility scooter’s top speed.


The image of the tortoise represents the slowest speed setting. 


The image of the hare represents the fastest speed setting.


Throttle Control Lever


This lever allows you to control the forward and reverse speeds of your scooter up to the 
maximum speed you preset using the speed adjustment dial.


To move Forward, use your right thumb to push the right side of the throttle control 
lever.  


To Reverse, use your left thumb to push the left side of the throttle control lever. 


Light Switch   

This switch controls your mobility scooters front headlight. 


Toggle the switch forward to turn on the lighting system. 


Toggle the switch rearward to turn off the lighting system. 
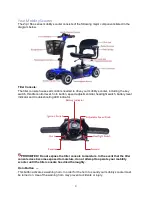
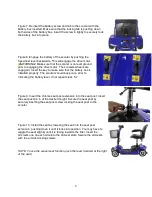
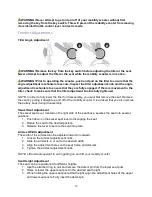
 

Rear Components


The (1) manual freewheel lever, (2) motor/ transaxle assembly and (3) anti-tip wheels are 
located on your mobility scooter as shown.  


Motor/Transaxle Assembly


The motor/transaxle assembly is an electromechanical unit that converts electrical energy from 

your mobility scooter’s batteries into the mechanica

l energy that propels the mobility scooter 

forward and backward.


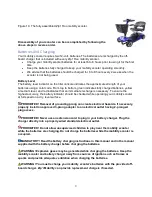
Manual Freewheel Lever 


If you need or want to push your mobility scooter manually, you can put it in freewheel mode. 

Содержание Roo 3

Страница 1: ......

Страница 2: ...nformation available at the time of publication Zip r Mobility reserves the right to make changes and alterations as they become necessary Any changes to our products may cause slight variations betwe...

Страница 3: ...ilure to follow designated procedures can cause either personal injury component damage or malfunction On the product this icon is represented as a black symbol on an orange triangle with a black bord...

Страница 4: ...you will need some practice Simply take your time and you will soon be in full and confident control as you maneuver through doorways on and off elevators up and down ramps Provided below are some pre...

Страница 5: ...troubleshooting LED indicator PROHIBITED Do not expose the tiller console to moisture In the event that the tiller console does become exposed to moisture do not attempt to operate your mobility scoo...

Страница 6: ...scooter up to the maximum speed you preset using the speed adjustment dial To move Forward use your right thumb to push the right side of the throttle control lever To Reverse use your left thumb to...

Страница 7: ...ers toward the front of the mobility scooter to disengage the drive motors freewheel mode WARNING Do not use the freewheel lever as a tie down point to secure this product Anti Tip Wheels The anti tip...

Страница 8: ...o see if the power connection wire is fully secured You may have to screw it in securely ensuring that there is a consistent flow of power from the battery to the scooter Figure 5 Insert the battery b...

Страница 9: ...is installed properly The scooter should beep once prior to indicating the battery level If not repeat steps 5 7 Figure 9 Insert the chrome seat post extension into the seat post Insert the seat post...

Страница 10: ...ttery indicator should be checked while operating your mobility scooter at full speed on a dry level surface PROHIBITED Removal of grounding prong can create electrical hazards If necessary properly i...

Страница 11: ...authorized provider or a qualified technician PROHIBITED Keep tools and other metal objects away from battery terminals Contact with tools can cause electrical shock WARNING Do not lift beyond your p...

Страница 12: ...n the appropriate side of the throttle control lever Pull on the left handgrip to steer your mobility scooter to the left Pull on the right handgrip to steer your mobility scooter to the right Move th...

Страница 13: ...ht up and off of the mobility scooter It is advised that you also remove the battery back during disassembly Swivel Seat Adjustment The swivel seat lever located on the right side of the seat base sec...

Страница 14: ...its high gloss PROHIBITED Do not apply rubber conditioner on the tire tread this may cause the tires to become dangerously slippery PROHIBITED Do not use a rubber or vinal conditioner on the scooters...

Страница 15: ...cator Your scooter is equipped with a Self Diagnostic Warning Light also called the Troubleshooting Indicator Light which is located on the control stack of your mobility scooter To check the Self Dia...

Страница 16: ...e Year Limited Warranty Three years warranty on all structural frame components including platform fork seat post and frame Zip r will replace the defective scooter and or electric wheelchairs or mail...

Страница 17: ...Any and all implied warranties are excluded This is the exclusive remedy Liabilities for consequential damages under any and all warranties are excluded Some states do not allow limitations on how lo...

Отзывы: