background image


56 


Rozm

ě

ry špalku(Fig. 3) 

Vyberte své pracovišt

ě

. Špalky skladujte v blízkosti. 

Maximální délka špalku nesmí p

ř

ekro

č

it 104cm. M

ů

žete 

použít t

ř

i r

ů

zné polohy štípacího stolku. 

(Fig. 3)

: 52 

cm, 78 cm a 104 cm. Zvolte odpovídající délku podle 

špalku. St

ů

l dob

ř

e zajist

ě

te. Stroj nikdy nezat

ě

žujte 

déle než 5 s. 

3.28


Použití (Figs. 4 – 7) 


Namažte kluzné desti

č

ky b

ě

žnou vazelínou, 

abyste prodloužili jejich životnost. 

(Fig. 5)

13.


Prodlužovací kabel položte vždy tak, aby 

nemohlo dojít k jeho poškození. 

14.


P

ř

ed použitím povolte odvzduš

ň

ovací 

šroub. Po práci šroub op

ě

t dotáhn

ě

te.  

15.


Zkontrolujte správné otá

č

ení motoru. Po 

startu motoru klín vyjede do horní polohy. Pokud je klín naho

ř

e, stiskn

ě

te ovládací páky sm

ě

rem 

dol

ů

, abyste aktivovali pohyb dol

ů

. Klín se tím dá do pohybu dol

ů

. Pokud se klín nerozjede po 

zapnutí nahoru, ihned stroj vypn

ě

te. 

Šroubovákem zm

ěň

te po

ř

adí fází motoru 

(Fig. 6)

. Pokud je vaše kvalifikace 

nedostate

č

ná, kontaktujte oprávn

ě

ného 

elektromechanika. 

16.


Pokud chcete stroj používat p

ř

nízkých teplotách, nechte stroj naprázdno po dobu 15 min. b

ě

žet naprázdno, aby se olej zah

ř

ál.  


17.


P

ř

ed za

č

átkem práce prove

ď

te následující kontroly, abyste prov

ěř

ili stav stroje: 

a.


 Stla

č

te ob

ě

 ovládací páky dol

ů

. To musí p

ř

ivést štípací klín k pohybu sm

ě

rem dol

ů

. Štípací 

klín se musí asi 5 cm nad stolem zastavit.  

b.


  Pokud jednu páku uvolníte, štípací klin se zastaví 

c.


  Pokud uvolníte ob

ě

 páky, klín se vrátí zp

ě

t do horní polohy 


18.


K nastavení výšky štípacího klínu postupujte následovn

ě

(Fig. 7)


a.


  Nastavte štípací klín do zvolené polohy 5 cm nad polenem. 

b.


 Uvoln

ě

te ovládací páky. 

c.


 Uvoln

ě

te r

ů

žici (A). Nastavte výšku ovládací ty

č

e tak, aby vedla k dosažení pot

ř

ebné 

pozice. Potom r

ů

žici (A) op

ě

t dotáhn

ě

te. 

d.


 Uvoln

ě

te ovládací páku nebo stroj znovu zapn

ě

te.  

e.


 Zkontrolujte nov

ě

 nastavenou polohu. 


19.


Nyní špalek svisle rozštípn

ě

te. Ujist

ě

te se, že je špalek zajišt

ě

n a nem

ů

že se zvrtnout. Nikdy 

neštípejte šikmo u

ř

íznuté špalky. 

20.


Nastavte ovládací páky podle pr

ů

m

ě

ru 

špalku. 


21.


Špalek p

ř

idržujte ob

ě

ma pákami, abyste 

zajistili stabilní polohu špalku. Potom stla

č

te 

ob

ě

 páky sm

ě

rem dol

ů

, abyste špalek rozštípli. 

Uvoln

ě

ní jedné páky má za následek zastavení 


P O K Y N  

Nikdy neštípejte mokré d

ř

evo. Suché 

d

ř

evo se štípe mnohem snadn

ě

ji. 


P O K Y N  

Na p

ř

ední stran

ě

 olejové nádrže se 

nachází odvzduš

ň

ovací ventil (Fig. 4). 

P

ř

ed každým použitím tento ventil 

uvoln

ě

te, aby byla zajišt

ě

na cirkulace 

vzduchu v nádrži. P

ř

ed transportem 

stroje tento ventil uzav

ř

ete, abyste 

zamezili úniku oleje. 


    P O Z O R  

Pokud má motor opa

č

né otá

č

ení, dojde k 

poškození 

č

erpadla. Na toto poškození se 

záruka nevztahuje! 


P O K Y N  

D

ř

evo vždy štípejte „po letech“ Nikdy 

d

ř

evo neštípejte nap

ř

í

č

,  

abyste zamezili poškození stroje. 

Содержание ZI-HS7H

Страница 1: ...tentamente antes de usar la máquina FR Lisez attentivement ce manuel avant d utiliser la machine CZ Před použitím si přečtěte návod k použití a dodržujte bezpečnostní pokyny 02 04 2013 Revision 02 DE EN ES FR CZ DE Original Betriebsanleitung Holzspalter EN Operation Manual Log splitter ES Manual de instrucciones Hendedora de Madera FR Mode d emploi Fendeur de bûches CZ Návod k použití Štípač ...

Страница 2: ...es et même entraîner la mort CZ POZOR Dbejte na bezpečnostní symboly Nedodržování pokynů a předpisů k použití štípač může vést ke škodám a zraněním nebo smrti DE ANLEITUNG LESEN Lesen Sie die Betriebs und Wartungsanleitung Ihrer Maschine aufmerksam durch und machen Sie sich mit den Bedien elementen der Maschine gut vertraut um die Maschine ordnungsgemäß zu bedienen und so Schäden an Mensch und Mas...

Страница 3: ...des protecteurs d oreille lunettes de sécurité et des chaussures de sécurité CZ OCHRANNÉ PROSTŘEDKY Používejte ochranu sluchu och ranné brýle a bezpečnostní obuv DE SICHERHEITSABSTAND Personen von dem Arbeitsbereich fernhal ten Tiere auf 5 Meter Entfernung halten EN SAFEDISTANCE Do not allow any persons to stay within your work ing area Any persons or animals around must be at least 5 m away from ...

Страница 4: ...4 Fig 1 Fig 1 1 ...

Страница 5: ...5 Fig 1 2 Fig 1 3 ...

Страница 6: ...6 Fig 8 ...

Страница 7: ... geringfügig ab weichen Sollten Sie jedoch Fehler feststellen informieren Sie uns bitte Achtung Technische Änderungen vorbehalten Urheberrecht 2013 Diese Dokumentation ist urheberrechtlich geschützt Die dadurch verfassungsmäßigen Rechte bleiben vorbehalten Insbesondere der Nachdruck die Übersetzung und die Entnahme von Fotos und Abbildungen werden gerichtlich verfolgt Gerichtsstand ist Wels Kunden...

Страница 8: ...ung wie Sicherheitsschuhe und spezielle Handschuhe sind Pflicht Tragen Sie immer ein Haarnetz wenn Sie lange Haare haben 5 Tragen Sie immer eine Schutzbrille Beachten Sie dass eine normale Brille keinen ausreichenden Schutz bietet da sie selbst dazu führen kann schwere Verletzungen durch Glasbruch zu verursa chen 6 Den Holzspalter immer auf trockener ebener und dabei nicht gefroren Fläche verwende...

Страница 9: ...es unter Druck stehenden Öl führen Das kann zu folgeschäden an der Ma schine führen Wenn sie merken dass sich das Holzteil nicht spalten lässt brechen sie bitte den Spaltvorgang ab 18 Drücken Sie nicht das Spaltmesser gegen das Holzstück Dies kann zu Bruch der Klinge führen 19 Verwenden sie den Holzspalter nicht wenn sie unter Alkohol oder Drogeneinfluss stehen 20 Diese Maschine darf niemals in fe...

Страница 10: ...t Schwerhörigkeit nach der Arbeit aufgrund von Missachtung der Gehörschutzvorschriften Restgefahren können minimiert werden wenn Sie den Anweisungen in den Kapiteln Bestimmungsgemä ße Benutzung und Allgemeine Sicherheitshinweise sowie diesem Handbuch in der Regel folge leisten 1 6 Betriebsbedingungen Dieser Holzspalter ist für Außentemperaturen zwischen 5 C und 40 C ausgelegt Die Luftfeuchtigkeit ...

Страница 11: ...che Holzlängen spalten zu können Führen Sie den Tisch in eine der drei dafür vorgesehenen Vorrichtungen E ein und fixieren Sie diesen beidseitig durch ein 90 Drehung der vorgesehenen Haken D Der Transport der Holzspalter auf die Arbeitsfläche Fig 2 Zur einfacheren Handhabung ist dieser Holzspalter mit zwei kleinen Rädern versehen Um den Holzspalter zu halten am Transportgriff A nehmen und vorsicht...

Страница 12: ...löcke sollte nicht mehr als 104cm betragen Sie können drei ver schiedene Tischhöhen Fig 3 52 cm 78 cm und 104 cm auswählen Wählen Sie immer die passende Höhe für den jeweiligen Stammlänge Verwenden Sie immer die Verriege lungseinrichtung um den Tisch an der gewünschten Position zu sichern Den Holzspalter unter Volllast nie mehr als 5 Sekunden betreiben 1 11 Anwendung Figs 4 7 1 Um eine längere Leb...

Страница 13: ... gesichert ist und nicht umfallen kann Versuchen Sie niemals verkantete Holzblöcke zu spalten 9 Richten sie die beiden Hebel je nach Stamm durchmesser aus 10 Halten Sie den Holzblock mit den beiden Hebeln um eine stabile stehende Position der Holzblocks zu garantieren Dann bewegen Sie beide Hebel nach unten um den Holzblock zu teilen Loslassen einer der beiden Hebel wird induzieren die Spalt messe...

Страница 14: ...cher Art Die Hydraulikanlage ist ein geschlossenes System bestehend aus einem Öltank Ölpumpe und der Regel ventile Eine zu geringer Ölstand kann die Pumpe beschädigen Der Ölstand sollte nicht kleiner sein als 1 bis 2 cm oberhalb der unteren Fläche des Öltanks Wechseln Sie das Öl vollständig einmal pro Jahr Stellen Sie sicher dass keine Fremdkörper in den Öltank kommen Entsorgen Sie das Altöl nach ...

Страница 15: ...lsche Drehrichtung Falsche Polarität Ändern sie die Polarität mit einem Schraubendreher Motor läuft aber Spalter bewegt sich nicht Ventil nicht geöffnet verursacht durch lo sen Anschluss Festigen sie lose Teile Ölstand zu niedrig Öl nachfüllen Spalter arbeitet jedoch mit untypischen Geräuschen und Vibrationen Ölstand zu niedrig Öl nachfüllen 1 14 Entsorgung Entsorgen sie Ihre ZI HS7H nicht im Rest...

Страница 16: ...16 1 15 Spare part drawings and spare part lists ...

Страница 17: ...rrgriff 6 76 Ausrichtscheibe 20 2 77 Bolzen M10X35 6 78 Zylinder 1 79 Unteres Rutschbrett 4 80 Messerrohr 1 81 Pumpenabdeckung 1 Pos Name Pcs 1 Arbeitstisch 1 2 Drehscheibe 2 3 Armschutz Abdeckung 4 4 Handgriff 2 5 Rechte Spaltklemme 1 6 Rechter Armschutz 1 7 Sternrad 2 8 Linke Spaltklemme 1 9 Linker Armschutz 1 10 Sicherungsmutter M8 2 11 Scheibe 8 12 Stift für Armschutz 2 13 Dünne Mutter M8 2 14...

Страница 18: ...opyright law all rights reserved Especially the reprinting as well as the translation and depiction of pictures will be prosecuted by law Court of jurisdiction is WELS Austria Customer Support Z I P P E R MASCHINEN GmbH Gewerbepark 8 A 4707 Schlüsslberg Tel 0043 0 7248 61116 700 Fax 0043 0 7248 61116 720 info zipper maschinen at 2 1 COMPONENTS Fig 1 1 Transport handle 2 Stroke adjusting rod 3 Spli...

Страница 19: ...ge of 16 years may only work on this machine under supervision 4 Never wear any jewellery rings necklaces watches etc or wide clothes such as oversized overalls gloves or shoes as these could be caught by moving parts Specific protective clothing such as safety shoes and special gloves are mandatory Always wear a hair net if you have longer or long hair 5 Always wear safety goggles Bear in mind th...

Страница 20: ... for example or if you want to split a hard log This would result in quick overheating of the pressurized oil causing consequential damage to the machine It is advisable to turn the log 90 and to try to split it at this position If it is still impossible to split such log please dispose of it instead of subjecting it to any further splitting process to avoid damage to the machine 18 Do not press t...

Страница 21: ...amage resulting therefrom and the risk of it shall solely be borne by the user 2 6 Residual Risks Even proper usage can still involve the following residual risks Injuries to your fingers and hands caused by the splitting tool Injuries by workpieces and parts coming off as a result of improper holding and guiding Injuries by contact with live parts when electric components are opened or defective ...

Страница 22: ...l Fasten wedge C under the lifted box to prevent the latter from slipping off After that you can remove the packing carton from the log splitter Assembly Fig 1 3 IMPORTANT Make sure that the electric circuit is fused and that the power voltage and frequency of the motor is supported by your mains supply Also make sure that your power supply is earthed Connect your log splitter to earth Nev er open...

Страница 23: ...ave been properly tightened Always make sure before each starting that the hydraulic oil level is sufficient This machine must never be used when it is in an inoperable condition or needs some mainten ance Before using this log splitter get familiar with its controls and safety elements and with how they work Make sure that the data indicated on the type label conform with your mains data before y...

Страница 24: ...ating levers down This must bring the splitting blade down The splitting blade must then come to a standstill some 5 cm above the topmost table position b If you release one of the two levers the splitting blade will stop at its current posi tion c Releasing both levers will induce the splitting blade to automatically return to the top 7 To set the splitting blade follow the steps described below ...

Страница 25: ...ve the split log parts from your working area and pile them up if neces sary Thus you can reduce the riskof working accidents 12 After you have finished your work allow the splitting blade and the arm move to their top most positions parking positions Then stop the motor and unplug the machine from your power supply source Allow the machine to cool down After that you should clean and if ne cessar...

Страница 26: ... not be lower than 1 2 cm above the lower surface of the oil tank Change the oil completely once per year Ensure that no foreign particles will get into the oil tank Properly dispose of the waste oil after each oil change Allow your log splitter to run idle for a few minutes after each oil change before you place it into operation again The following oil grades are suitable for this log splitter S...

Страница 27: ...ion Wrong polarity Change polarity using a screwdriver electrician Change polarity electrician Splitter not movIng al though motor is running Valve not opened caused by loose connection Tighten loose parts Oil level too low Replenish oil Splitter working however with untypical noise and vibration Oil level too low Replenish oil 2 15 Disposal Do not dispose your ZI HS7H in the residual waste Contac...

Страница 28: ...28 2 16 Spare part drawings and spare part lists ...

Страница 29: ...er 20 2 77 Bolt M10X35 6 78 Cylinder 1 79 Down slip plank 4 80 Knife rest pipe 1 81 Pump cover 1 Pos Name Pcs 1 Worktable 1 2 Circulate stem 2 3 Armguard cover 22 4 4 Manipulative handle 2 5 Right log clamp 1 6 Right armguard hold assembly 1 7 Star model knob 2 8 Left log clamp 1 9 Left armguard hold assembly 1 10 Locknut M8 2 11 Washer 8 8 12 Armguard handle pin 2 13 Thin nut M8 2 14 Bolt M8x40 2...

Страница 30: ...ucciones de seguridad Debido al desarrollo continuo de nuestros productos las ilustraciones las imágenes pueden variar ligeramente Si encuentra algún error por favor háganoslo saber Atención Sujeto a modificaciones técnicas Copyright 2013 Este documento está protegido por la ley internacional de derechos de autor Todos los derechos reservados Especialmente la reimpresión así como la traducción y l...

Страница 31: ...nos 10 Ruedas 1x mesa frontal desmontable 11 Soporte 1x Manual de instrucciones 2 18 Ficha técnica Voltaje Frequencia 230V 50Hz Potencia del motor 3 0 kW Corriente nominal 10 0 A Fuerza máx de hendidura 7 T Recorrido de la cuña 470 mm Diámetro min máx de tronco 70 400 mm Largo máx de tronco 580 770 1060 mm Capacidad de aceite hidráulico 4 litros Presión hidráulica 14 15 MPa Velocidad de avance 4 5...

Страница 32: ...es rotos 6 Siempre use la hendidora de troncos en suelo seco firme y bien nivelado El lugar elegido debe estar libre de hierbas altas arbustos o cualquier otro obstáculo 7 Mantenga la postura y el equilibrio en todo momento Asegúrese de que la hendedora está bi en puesta en el suelo y no hay posibilidad de que se caiga incline Esto puede evitar graves le siones 8 Mantenga bastante distancia de la ...

Страница 33: ...omo tener en cuenta los valores indicados en las especificaciones técnicas y los requisitos Las normas aplicables de preven ción de accidentes y todas las demás disposiciones aceptadas en materia de seguridad deben ser cum plidas Cualquier modificación no autorizada de la máquina anulará la responsabilidad del fabricante Esta hendedora de troncos puede utilizarse sólo jun to con los accesorios ori...

Страница 34: ...ición final deseada C Ahora encaje la palanca de bloqueo B y el muelle A Realice el mismo procedimiento con el otro brazo 7 Puede elegir entre tres posiciones diferentes de la mesa por lo que puede ajustar la altura de la mesa en función del tamaño del tronco Transporte de la hendedora al lugar de trabajo Fig 2 La hendedora está equipada con dos ruedas para movimientos menores Para mover la hended...

Страница 35: ...je Abra el tapón de llenado de aceite hidráulico con unas cuantas vueltas Después del trabajo cierre el tapón completamente 11 Compruebe la dirección de funcionamiento del motor Encienda el motor el pistón de la cuña debe subir hasta la posición más alta de forma automática Si la cuña de separación ya se encuentra en su posición más alta presione las dos palancas para activar el mecanismo de divis...

Страница 36: ... Apile el material a medida que trabaja Esto proporcionará un área de trabajo más seguro man teniéndolo ordenado y evitará el peligro de tropezarse 27 Una vez que haya terminado su trabajo mueva la cuña a la posición más alta posición de alma cenamiento Detener el motor desconecte el cable de alimentación de la fuente de alimentación Deje que la máquina se enfríe Después debe limpiar la máquina y ...

Страница 37: ...e aceite debe medir aprox 1 2 cm más ba jo que la superficie superior del tanque de aceite El aceite debe ser cambiado por completo una vez al año Asegúrese de que la máquina se ha parado completamente y está desconectado Asegúrese de que no llegue ninguna partícula extraña al depósito de aceite Recoja el aceite usado y recíclelo Tras un cambio de aceite activar la hendidora un par de veces pero s...

Страница 38: ...otor con un destornillador El motor funciona pero la cuña no se mueve La válvula no se abre debido a partes aflojadas Compruebe y apriete las partes suel tas Bajo nivel de aceite hidráulico Comprobar y reponer aceite hidráuli co La hendidora trabaja pero con sonidos inusuales y vibraciones Bajo nivel de aceite hidráulico Comprobar y reponer aceite hidráuli co 2 31 Reciclaje NO se deshaga de su ZI ...

Страница 39: ...39 2 32 Despiece ...

Страница 40: ...rrgriff 6 76 Ausrichtscheibe 20 2 77 Bolzen M10X35 6 78 Zylinder 1 79 Unteres Rutschbrett 4 80 Messerrohr 1 81 Pumpenabdeckung 1 Pos Name Pcs 1 Arbeitstisch 1 2 Drehscheibe 2 3 Armschutz Abdeckung 4 4 Handgriff 2 5 Rechte Spaltklemme 1 6 Rechter Armschutz 1 7 Sternrad 2 8 Linke Spaltklemme 1 9 Linker Armschutz 1 10 Sicherungsmutter M8 2 11 Scheibe 8 12 Stift für Armschutz 2 13 Dünne Mutter M8 2 14...

Страница 41: ... consignes de sécurité En raison du développement constant de nos produits des illustrations des images peuvent va rier légèrement Si vous trouvez des variations nous vous remercions de nous les faire con naitre Attention Sous réserve de modifications techniques Copyright 2013 Ce document est protégé par le droit international des droits d auteur Tous droits réservés Surtout la réimpression la tra...

Страница 42: ...es 1x Table frontale amovible 11 Support 1x Mode d emploi 3 2 Fiche technique Tension Fréquence 230V 50Hz Puissance moteur 3 0 kW Courant nominal 10 0 A Pression maxi de travail 7 T Course de la cale 470 mm Diamètre min max de la bûche 70 400 mm Longueur maxi de la bûche 580 770 1060 mm Capacité du réservoir d huile 4 litres Pression hydraulique 14 15 MPa Vitesse d avance 4 5 cm s Vitesse de retou...

Страница 43: ...tes normales ne fournissent pas une protection adéquate et peuvent même causer de graves blessures par des éclats de verre 6 Toujours utiliser le fendeur sur sol sec ferme et bien nivelé L emplacement doit être exempt de hautes herbes les buissons ou d autres obstacles 7 Toujours rester stable et en bon équilibre à tout moment Assurez vous que le fendeur est bien positionné sur le sol et qu il n y...

Страница 44: ...dans le sens du grain Vous devez respecter les instructions de sécurité de fonctionnement et d entretien et prendre en considération les valeurs indiquées dans les spécifications techniques et les exigences Les règles de prévention des accidents et toutes les autres dispositions relatives à la sécurité doivent être respectées Toute modification non autorisée de la machine an nule la responsabilité...

Страница 45: ...t le ressort A Faites de même avec l autre bras 2 Vous pouvez choisir entre trois positions différen tes de la table de sorte qu il est possible de régler la hauteur de la table en fonction de la taille de la bûche Transport du fendeur au lieu de travail Fig 2 Le fendeur est équipé de deux roues pour des déplacements mineurs Pour déplacer le fendeur dans le lieu de travail saisir la poignée A pour...

Страница 46: ...e hydraulique de quelques tours Après le travail fermez le bouchon complètement 4 Vérifier le sens de fonctionnement du mo teur Démarrez le moteur Le piston du cou teau fendeur doit s élever automatiquement à la plus haute position Si le couteau divi seur est déjà à sa position la plus haute appuyez sur les deux leviers pour activer le mécanisme de division Ainsi le couteau fendeur se déplace vers...

Страница 47: ... stabilité verticale du tronc Puis déplacez les deux leviers vers le bas pour divis er la bûche La libération d un des deux leviers arrête le mouvement du couteau fendeur Rela chez les deux leviers pour libérer le couteau fendeur vers la position haute Ver Fig 8 8 Empilez les bûches fendues Cela fournira une zone de travail plus sûre en la gardant propre et évitera le risque de trébucher 9 Une foi...

Страница 48: ... d huile avec la jauge Un niveau d huile faible peut endom mager la pompe à huile Le niveau d huile doit être environ 1 à 2 cm en dessous de la surface supérieure du réservoir d huile L huile doit être complètement changée une fois par an Assurez vous que la machine est complètement arrêtée et débranchée Assurez vous qu aucune particule étrangère ne pénètre dans le réservoir d huile Collectez et r...

Страница 49: ...is Le moteur tourne mais le couteau fendeur ne se déplace pas La vanne ne s ouvre pas à cause de pièces des serrées Vérifiez et serrez les pièces desser rées Faible niveau d huile hydraulique Vérifiez et au besoin remplacez l huile hydraulique Le fendeur fonctionne mais avec des sons et des vibra tions anormales Faible niveau d huile hydraulique Vérifiez et au besoin remplacer l huile hydraulique ...

Страница 50: ...50 3 16 Vue éclatée ...

Страница 51: ...er 20 2 77 Bolt M10X35 6 78 Cylinder 1 79 Down slip plank 4 80 Knife rest pipe 1 81 Pump cover 1 Pos Name Pcs 1 Worktable 1 2 Circulate stem 2 3 Armguard cover 22 4 4 Manipulative handle 2 5 Right log clamp 1 6 Right armguard hold assembly 1 7 Star model knob 2 8 Left log clamp 1 9 Left armguard hold assembly 1 10 Locknut M8 2 11 Washer 8 8 12 Armguard handle pin 2 13 Thin nut M8 2 14 Bolt M8x40 2...

Страница 52: ...2013 Tato dokumentace je chráněna autorským právem Všechna práva vyhrazena Zvláště nedovolený tisk překlady použití fotografií a vyobrazení budou trestně stíhány soudním místem je Wels Adresa zákaznického servisu Z I P P E R MASCHINEN GmbH Gewerbepark 8 A 4707 Schlüsslberg Tel 0043 0 7248 61116 700 Fax 0043 0 7248 61116 720 info zipper maschinen at 3 17 Přehled prvků stroje Fig 1 1 Transportní ruk...

Страница 53: ...ploše Pokud používáte stroj na louce dbejte na to aby byla tráva řádně posekaná 7 Zajistěte si při štípání jistý postoj Zajistěte aby štípač měl pevný podklad a nehrozí jeho převrácení To by mohlo vést k těžkým zraněním 8 Nedotýkejte se štípacího klínu abyste zamezili zranění třískami 9 Zabezpečte aby se nepřibližovali nepovolané osoby Při práci se žádné nepovolané osoby nebo zvířata nesmí přiblíž...

Страница 54: ...tmi Stroj provozujte v prostorech nepřístupných dětem Také ostatní nepovolané osoby nesmí mít ke stroji přístup 3 21 Správné použití Stroj odpovídá platným směrnicím EU Špalky se smí štípat pouze po letech Je nutné dodržovat všechny pracovní a bezpečnostní předpisy Je nutné dodržovat I všeobecné zásady předcházení úrazům Jakékoliv změny na štípači mají za následek ztrátu záruky Pro tento štípač se...

Страница 55: ... je uzávěr olejové nádrže pevně dotažen 3 27 Uvedení do provozu Stroj musí být umístěn tak aby nedošlo k jeho převrácení Zabezpečte dostatek místa kolem stroje Před zahájením práce musí být všechny kryty a bezpečnostní prvky namontovány Zkontrolujte dotažení všech šroubů čepů a hydraulických vedení Dbejte na správnou hladinu hydraulického oleje Před použitím se seznamte s bezpečnostními a ovládací...

Страница 56: ...k pohybu směrem dolů Štípací klín se musí asi 5 cm nad stolem zastavit b Pokud jednu páku uvolníte štípací klin se zastaví c Pokud uvolníte obě páky klín se vrátí zpět do horní polohy 18 K nastavení výšky štípacího klínu postupujte následovně Fig 7 a Nastavte štípací klín do zvolené polohy 5 cm nad polenem b Uvolněte ovládací páky c Uvolněte růžici A Nastavte výšku ovládací tyče tak aby vedla k do...

Страница 57: ... olejem všechny pohyblivé součástky Výměny hydraulického oleje Olejová nádrž je z výroby naplněna kvalitním hydraulickým olejem třídy 20 Starý olej likvidujte v souladu s platnými předpisy V žádném případě olej nevylévejte do kanalizace půdy nebo vody Hydraulický systém je je uzavřený složený z nádrže čerpadla a regulačního ventilu Nízký stav oleje může zapříčinit poškození čerpadla Hladina oleje ...

Страница 58: ...nikem Opačné otáčení motoru Obrácené pořadí fází Změňte pořadí fází šroubovákem v zástrčce Změňte pořadí fází šroubovákem v zástrčce Motor se točí klín se nepo hybuje Ventil není dostatečně otevřen ovládacími pákami Dotáhněte ovládací páky Nízký stav oleje Doplňte olej Štípač pracuje ale s nety pickým zvukem a vibracemi Nízký stav oleje Doplňte olej 3 31 Likvidace Nelikvidujte váš stroj ZI HS7H do...

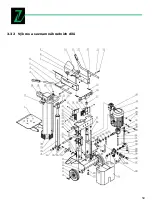
Страница 59: ...59 3 32 Výkres a seznam náhradních dílů ...

Страница 60: ...rrgriff 6 76 Ausrichtscheibe 20 2 77 Bolzen M10X35 6 78 Zylinder 1 79 Unteres Rutschbrett 4 80 Messerrohr 1 81 Pumpenabdeckung 1 Pos Name Pcs 1 Arbeitstisch 1 2 Drehscheibe 2 3 Armschutz Abdeckung 4 4 Handgriff 2 5 Rechte Spaltklemme 1 6 Rechter Armschutz 1 7 Sternrad 2 8 Linke Spaltklemme 1 9 Linker Armschutz 1 10 Sicherungsmutter M8 2 11 Scheibe 8 12 Stift für Armschutz 2 13 Dünne Mutter M8 2 14...

Страница 61: ...N 55014 1 A1 2009 EN 55014 2 A2 2008 EN 61000 3 2 A2 2009 EN 61000 3 11 2000 Hiermit erklären wir dass die oben genannte Maschine den maßgeblichen Anforderungen des deutschen Produktsicherheitsgesetzes entspricht Diese Erklärung verliert ihre Gültigkeit wenn Veränderungen an der Maschine vorgenommen werden die nicht ausdrücklich schriftlich im Vorfeld mit uns abgestimmt wurden The above mentioned ...

Страница 62: ...N 609 1 A2 2009 EN 55014 1 A1 2009 EN 55014 2 A2 2008 EN 61000 3 2 A2 2009 EN 61000 3 11 2000 Por la presente declaramos que la máquina mencionada cumple todos los requisitos de seguridad y sanidad de las Directivas mencionadas Cualquier cambio realizado en la máquina sin nuestra permisión resultará en la rescisión de este documento Nous déclarons que la machine mentionnée sur ce document est aux ...

Страница 63: ...55014 2 A2 2008 EN 61000 3 2 A2 2009 EN 61000 3 11 2000 Hiermit erklären wir dass die oben genannte Maschine den maßgeblichen Anforderungen des deutschen Produktsicherheitsgesetzes entspricht Diese Erklärung verliert ihre Gültigkeit wenn Veränderungen an der Maschine vorgenommen werden die nicht ausdrücklich schriftlich im Vorfeld mit uns abgestimmt wurden Týmto vyhlasujeme že zhora uvedený stroj ...

Страница 64: ...behältern Treibstoff über Winter im Benzintank des Gerätes c Ausgeschlossen sind Defekte an Verschleißteilen wie Kohlebürsten Fangsäcke Messer Walzen Schneidep latten Schneideeinrichtungen Führungen Kupplungen Dichtungen Laufräder Sageblätter Spaltkreuze Spalt keile Spaltkeilverlängerungen Hydrauliköle Öl Luft u Benzinfilter Ketten Zündkerzen Gleitbacken usw d Ausgeschlossen sind Schäden an den Ge...

Страница 65: ...g the winter etc c Defects on wear parts are excluded e g carbon brushes collection bags knives cylinders cutting blades clutches sealings wheels saw blades splitting crosses riving knives riving knife extensions hydraulic oils oil air fuel filters chains spark plugs sliding blocks etc d Also excluded are damages on the machine caused by incorrect or inappropriate usage if it was used for a purpos...

Страница 66: ... policy Um einen ständigen Verbesserungsprozess gewährleisten zu können sind wir von Ihnen und Ihren Eindrücken beim Umgang mit un seren Produkten abhängig Your opinion is essential for further product de velopment and product choice Please let us know about your Probleme die beim Gebrauch des Pro duktes auftreten Impressions and suggestions for im provement Fehlfunktionen die in bestimmten Be tri...

Страница 67: ...67 ...

Отзывы: