background image

FUNCIONAMIENTO 

ZIPPER MASCHINEN GmbH     www.Zipper-Maschinen.at




44   


             ZI-KGS255DS 

22.2.4


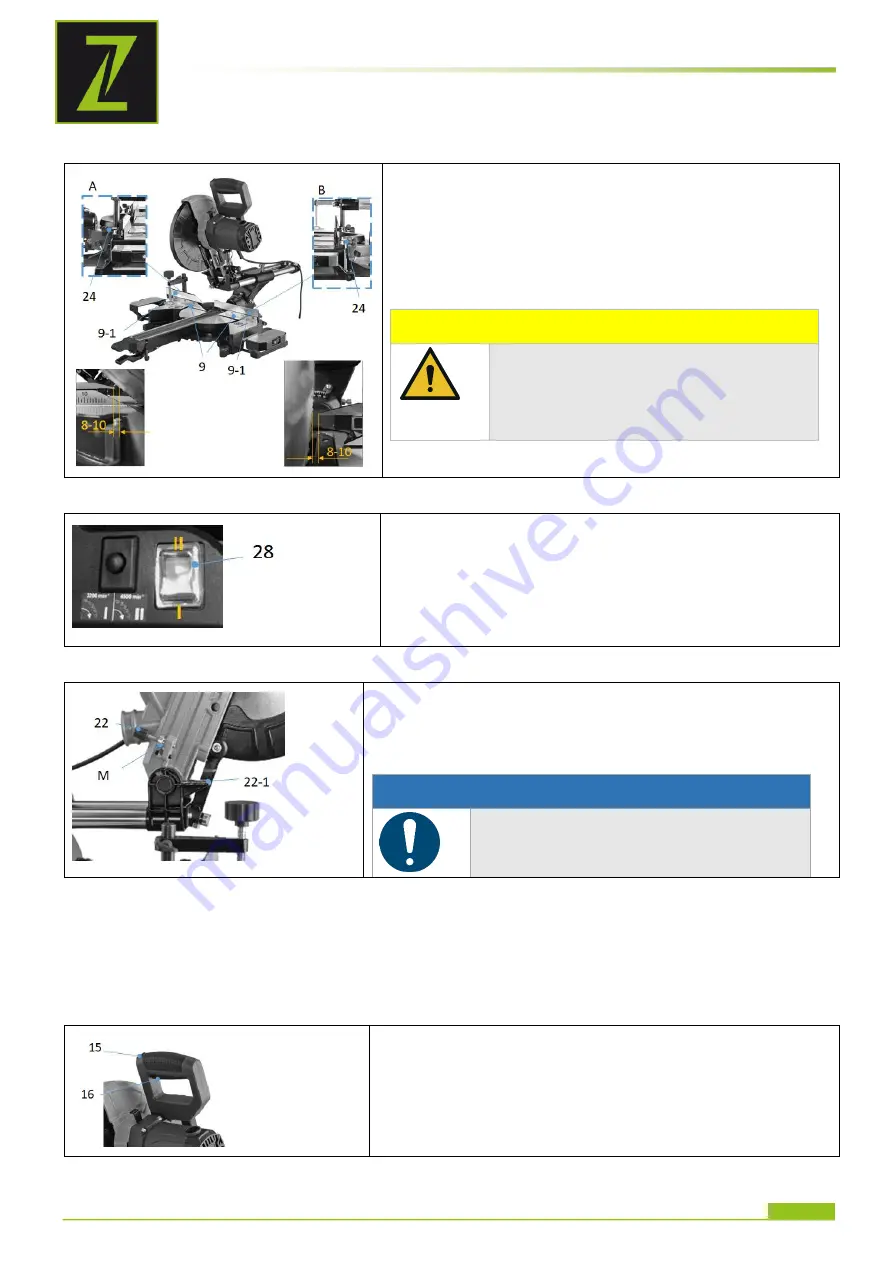
Ajuste de los topes.  


Los dos topes ajustables (9-1) se deben ajustar cada vez 
que se modifique el ángulo del cabezal de la máquina 
(90-45°). Para ello, afloje los tornillos de fijación (24) y 
ajuste los topes, de modo que entre la hoja de la sierra y 
el tope haya una distancia de 8-10 mm. A continuación, 
vuelva a apretar los tornillos de fijación (24) para fijar los 
topes (9-1).   
 

ATENCIÓN 


Antes del proceso de corte, 

compruebe que los carriles de los 

topes y la hoja de la sierra no pueden 

chocar. (Corte simulado con la 

máquina apagada)


22.2.5


Ajuste de la velocidad de la hoja de la sierra 


Ponga el interruptor selector (28) en  
Pos I : 3200 min-1 
Pos II: 4500 min-1 
en función de la velocidad requerida.  
 

22.2.6


Ajuste del límite de la profundidad de corte 


La profundidad de corte se puede ajustar gradualmente con 
el tornillo (22). Para ello, afloje la tuerca moleteada (M) del 
tornillo (22). Enrosque o desenrosque el tornillo (22) para 
ajustar la profundidad de corte requerida. A continuación, 
vuelva a apretar la tuerca moleteada (M). 

AVISO 


Compruebe el ajuste haciendo un corte 

de prueba.


22.2.7


Conexión a un sistema de aspiración 

Para aspirar el polvo en estancias cerradas, conecte una manguera de aspiración a la boquilla del 

sistema de aspiración de polvo y fíjela con una abrazadera para mangueras. Dimensiones de la 

conexión según los Datos Técnicos 

22.2.8


Encendido / apagado de la máquina 


Encendido de la máquina: 
Pulse el interruptor de bloqueo (15) y pulse el interruptor 
ON/OFF (16) del mango. 
 
Apagado de la máquina: 
Suelte el interruptor ON/OFF 
 

Содержание 9120039234052

Страница 1: ... Revision 00 RAR DE EN ES Originalfassung DE BETRIEBSANLEITUNG KAPP GEHRUNGSSÄGE Übersetzung Translation EN USER MANUAL MITER SAW ES INSTRUCCIONES DE SERVICIO SIERRA TRONZADORA E INGLETADORA ZI KGS255DS EAN 9120039234052 ...

Страница 2: ...le vor der Inbetriebnahme 15 8 2 Bedienung 15 8 2 1 Transportposition Maschinenkopf einrasten entriegeln 15 8 2 2 Winkellage Arbeitstisch einstellen 15 8 2 3 Winkellage Sägearm Maschinenkopf einstellen 15 8 2 4 Anschläge einstellen 16 8 2 5 Sägeblattgeschwindigkeit einstellen 16 8 2 6 Schnitttiefenbegrenzung einstellen 16 8 2 7 Anschluss an eine Absauganlage 16 8 2 8 Maschine EIN AUS schalten 16 8...

Страница 3: ...ng cuts 31 15 3 3 Slot cuts 32 16 CLEANING MAINTENANCE STORAGE DISPOSAL 32 16 1 Cleaning 32 16 2 Maintenance 32 16 2 1 Maintenance schedule 32 16 2 2 Adjusting the angular position by means of stop angle 33 16 2 3 Saw blade change 34 16 2 4 Setting the Laser 34 16 2 5 Emptying changing the chip bag 35 16 2 6 Checking changing carbon brusher 35 16 2 7 Exchange table insert 35 16 3 Storage 35 16 4 D...

Страница 4: ...3 1 Limpieza 46 23 2 Mantenimiento 46 23 2 1 Programa de conservación y de mantenimiento 46 23 2 2 Ajuste de la posición angular con el ángulo del tope 47 23 2 3 Sustitución de la hoja de la sierra 48 23 2 4 Ajuste del láser 48 23 2 5 Vaciado sustitución de la bolsa colectora de virutas 49 23 2 6 Comprobación sustitución de las escobillas de carbón 49 23 2 7 Sustitución del suplemento de la mesa 4...

Страница 5: ...CIONES Lea atentamente las instrucciones de servicio y familiarícese con los elementos de mando de la máquina para poder manejarla correctamente y llevar a cabo debidamente los trabajos de mantenimiento de la misma y de este modo evitar que se produzcan daños personales y en la máquina DE Maschine vor Wartung und Pausen ausschalten und Netzstecker ziehen EN Switch off the machine before maintenanc...

Страница 6: ...ra 2 Neigungsbegrenzung tilt protection Tope de inclinación 21 Absauganschluss Dust collection port Conexión del sistema de aspiración 3 Feststellschraube Tischverlängerung fixation screw table extension Tornillo de fijación de la extensión de la mesa 22 Schnitttiefeneinstellschraube screw for cutting depth limiting Tornillo de ajuste de la profundidad de corte 4 Tischverlängerung table extension ...

Страница 7: ...n cover carbon brush Cubierta de escobillas de carbón 33 Zeiger Winkellage Maschinenkopf pointer angle adjustment machine head Indicador posición angular del cabezal de la máquina 14 Handgriff handle Mango 34 Maschinenkopf machine head Cabezal de la máquina 15 Verriegelungsknopf START lock switch start Botón de bloqueo de ARRANQUE 35 Sägeblatt saw blade Hoja de la sierra 16 EIN AUS Schalter Säge O...

Страница 8: ...egeln gibt kann daraus nicht zuverlässig abgeleitet werden ob zusätzliche Vorsichtsmaßnahmen notwendig sind oder nicht Faktoren welche den am Arbeitsplatz tatsächlich vorhandenen Immissionspegel beeinflussen beinhalten die Eigenart des Arbeitsraumes und andere Geräuschquellen d h die Zahl der Maschinen und anderer benachbarter Arbeitsvorgänge Die zulässigen Arbeitsplatzwerte können ebenso von Land...

Страница 9: ...halte geringfügig abweichen Sollten Sie Fehler feststellen informieren Sie uns bitte Technische Änderungen vorbehalten Kontrollieren Sie die Ware nach Erhalt unverzüglich und vermerken Sie etwaige Beanstandungen bei der Übernahme durch den Zusteller auf dem Frachtbrief Transportschäden sind innerhalb von 24 Stunden separat an uns zu melden Für nicht vermerkte Transportschäden kann ZIPPER Maschinen...

Страница 10: ...iben der Maschine in explosionsgefährdeter Umgebung Maschine kann beim Betrieb Zündfunken erzeugen Betrieb der Maschine in geschlossenen Räumen ohne Späne und Staubabsaugung Betreiben der Maschine außerhalb der in dieser Anleitung angegebenen Grenzen Entfernen der an der Maschine angebrachten Sicherheitskennzeichnungen Verändern umgehen oder außer Kraft setzen der Sicherheitseinrichtungen der Masc...

Страница 11: ...st Entfernen Sie Einstellwerkzeuge vor dem Einschalten von der Maschine Halten Sie den Bereich rund um die Maschine frei von Hindernissen z B Staub Späne abgeschnittene Werkstückteile etc Überprüfen Sie die Verbindungen der Maschine vor jeder Verwendung auf ihre Festigkeit Lassen Sie die laufende Maschine niemals unbeaufsichtigt Die Maschine muss stillgesetzt werden falls diese unbeaufsichtigt ist...

Страница 12: ...heitshinweise für diese Maschine Die Arbeit mit Handschuhen an rotierenden Teilen ist nicht zulässig Beim Betrieb der Maschine wird Holzstaub erzeugt Schließen Sie die Maschine deshalb bei der Installation an eine geeignete Absauganlage für Staub und Späne an oder betreiben sie diese nur in gut durchlüfteter Umgebung mit Staubmaske Schalten Sie die Staubabsaugungseinrichtung immer an bevor Sie mit...

Страница 13: ...lassen bevor sich der Maschinenkopf vollständig in der unteren Position befindet Hinweise für die Benützung des LASERS Schauen Sie nicht mit ungeschützten Augen direkt in den Laserstrahl Richten Sie den Laserstrahl niemals auf reflektierende Oberflächen und Personen oder Tiere Schon ein Laserstrahl mit geringer Leistung kann zu Augenschäden führen Öffnen Sie niemals das Lasermodul Unerwartete Einw...

Страница 14: ...e die Abmessungen der Maschine Der gewählte Platz muss einen passenden Anschluss an das elektrische Netz gewährleisten als auch die Möglichkeit für den Anschluss an eine Absauganlage Vergewissern Sie sich dass der gewählte Arbeitsplatz Maschinenständer Arbeitsplatte die Last der Maschine tragen kann und die Maschine an dieser mittels Schrauben Schrauben sind nicht im Lieferumfang inkludiert befest...

Страница 15: ... Hinweis Bitte halten sie den Griff fest und führen sie den Maschinenkopf langsam nach oben bis dieser die oberste Position erreicht hat Falls Griff losgelassen würde schnellt der Maschinenkopf wegen der Federvorspannung hoch Zum Einrasten Maschinenkopf 34 nach unten drücken und den Verriegelungsbolzen 11 wieder anbringen 8 2 2 Winkellage Arbeitstisch einstellen Lösen Sie den Verriegelungsgriff 6 ...

Страница 16: ...l den Wahlschalter 28 auf Pos I 3200 min 1 Pos II 4500 min 1 legen 8 2 6 Schnitttiefenbegrenzung einstellen Die Schnitttiefe kann mit der Schraube 22 stufenlos eingestellt werden Dazu die Rändelmutter M an der Schraube 22 lösen Drehen Sie die Schraube 22 ein oder aus um die gewünschte Schnitttiefe einzustellen Anschließend die Rändelmutter M wieder anziehen HINWEIS Überprüfen Sie die Einstellung i...

Страница 17: ... Schalter loslassen warten bis das Kreissägeblatt still steht Werkstück entfernen 8 3 2 Zugschnitte Zugschnitte sind geeignet für lange Schnitte Für die Schnitte wird die Zugeinrichtung entriegelt durch lösen der Zugverriegelung 23 sodass während dem Schnitt das Sägeaggregat nach vorne bzw hinten gleiten kann Die Winkeleinstellung je nach gewünschtem Arbeitsvorgang einstellen und Anschläge dements...

Страница 18: ...Bürste oder ähnlichem Werkzeug 9 2 Wartung Die Maschine ist wartungsarm und nur wenige Teile müssen gewartet werden Ungeachtet dessen sind Störungen oder Defekte die geeignet sind die Sicherheit des Benutzers zu beeinträchtigen umgehend zu beseitigen Vergewissern Sie sich vor jeder Inbetriebnahme vom einwandfreien Zustand und ordnungsgemäßen Funktionieren der Sicherheitseinrichtungen Überprüfen Si...

Страница 19: ... einem Kreuzschlitzschraubendreher lösen und in die Position 0 auf der Skala 10 1 bringen und anschließend wieder fixieren 45 Schnitt Den Maschinenkopf absenken und mit dem Verriegelungsbolzen 11 sichern Drehtisch in 0 Stellung fixieren Lösen Sie die Fixierschraube 1 und winkeln Sie den Maschinenkopf mit dem Griff 45 nach links 45 Winkelanschlag zwischen Sägeblatt und Drehtisch positionieren Konte...

Страница 20: ...tieren und befestigen VORSICHT Korrekte Drehrichtung und Dimension des Sägeblattes 6 beachten Max Durchmesser von 255mm und max Stärke von 2 8mm sowie Aufnahmedurchmesser von 30mm Bevor Sie mit Ihrer Arbeit fortfahren stellen Sie sicher dass sich alle Sicherheitseinrichtungen in gutem Betriebszustand befinden Sägeblattschutz Check Wichtig Jedes Mal wenn Sie das Sägeblatt 6 wechseln prüfen ob er si...

Страница 21: ...e alle 10 Betriebsstunden Wenn die Kohle auf eine Länge von 6 mm abgenutzt ist oder wenn die Feder oder der Fahrdraht verbrannt oder beschädigt ist ist es notwendig beide Bürsten auszutauschen Wenn sich herausstellt dass die Bürsten nach dem Ausbau verwendbar sind ist es möglich sie wieder zu montieren Bei der Wartung der Kohlebürsten öffnen Sie die beiden Verriegelungen 13 gegen den Uhrzeigersinn...

Страница 22: ...WARNUNG Gefahr durch elektrische Spannung Das Manipulieren an der Maschine bei aufrechter Spannungsversorgung kann zu schweren Verletzungen oder zum Tod führen Trennen Sie die Maschine vor der Durchführung von Arbeiten zur Fehlerbehebung daher zunächst immer von der Stromversorgung und sichern Sie sie gegen unbeabsichtigte Wiederinbetriebnahme Viele mögliche Fehlerquellen können bei ordnungsgemäße...

Страница 23: ... However if you discover any errors inform us please Technical specifications are subject to changes Please check the product contents immediately after receipt for any eventual transport damage or missing parts Claims from transport damage or missing parts must be placed immediately after initial product receipt and unpacking before putting the product into operation Please understand that later ...

Страница 24: ...y explosive environment machine can generate ignition sparks during operation Operation of the machine in closed rooms without chip and dust extraction a normal household vacuum cleaner is not suitable as an extraction device Operating the machine outside the limits specified in this manual Remove the safety markings attached to the machine Modify circumvent or disable the safety devices of the ma...

Страница 25: ...ropriate safety distance from the machine and in particular keep children away from the machine Wear suitable protective equipment eye protection dust mask respiratory protection ear protection gloves when handling tools as well as close fitting work protective clothing never wear loose clothing ties jewellery etc danger of being drawn in Work with gloves on rotating parts is not permitted Hide lo...

Страница 26: ... cause hearing damage and temporary or permanent hearing loss Wear hearing protection certified to health and safety regulations to limit noise exposure Replace cracked and deformed saw blades immediately they cannot be repaired Use clean and sharpened saw blades which are less sensitive to malfunctions and easier to guide If possible use clamps to hold fix the workpiece If you hold the workpiece ...

Страница 27: ...espite their intended use certain residual risks remain Due to the structure and construction of the machine hazardous situations may occur when handling the machines DANGER A safety instruction designed in this way indicates an imminently hazardous situation which if not avoided will result in death or serious injury WARNING Such a safety instruction indicates a potentially hazardous situation wh...

Страница 28: ...cking Scope of Supply Check the machine immediately after delivery for transport damage and missing parts 14 2 The workplace Choose a suitable place for the machine Pay attention to the safety requirements and the dimensions of the machine The selected location must ensure a suitable connection to the electrical supply as well as the possibility of connection to an extraction system Make sure that...

Страница 29: ... the motor holder the saw is released from the lowest transport position Note Please hold the handle and guide the machine head slowly upwards until it reaches the uppermost position If the handle is released the machine head will jump up due to the spring preload Press the machine head 34 downwards to engage and reattach the locking bolt 11 15 2 2 Setting the angular position of the worktable Rel...

Страница 30: ...itch 28 to the desired speed Pos I 3200 min 1 Pos II 4500 min 1 15 2 6 Setting cutting depth limiting The cutting depth can be adjusted continuously with the screw 22 To do this loosen the thumb nut M on the screw 22 Turn the screw 22 in or out to set the desired cutting depth Then tighten the thumb nut M again NOTE Check the setting by performing a test cut 15 2 7 Connection to a dust collection ...

Страница 31: ... the ON OFF switch and wait until saw blade comes to stand still Remove workpiece 15 3 2 Sliding cuts Sliding cuts are suitable for cutting longer workpieces For that kind of cuts the sliding mechanism is unlocked by releasing the fixation screw 23 so that the saw unit can slide forwards or backwards during the cut Adjust the angle setting according to the desired operation and adjust the stops fe...

Страница 32: ... clean the machine after each use and remove any sawdust with a brush broom or vacuum cleaner 16 2 Maintenance The machine is low maintenance and only a few parts have to be serviced Nevertheless malfunctions or defects which could impair the safety of the user must be rectified immediately Before each operation check that the safety devices are in perfect condition Regularly check that the warnin...

Страница 33: ...sary loosen the pointer 10 with a Phillips screwdriver and move it to the 0 position on the scale 10 1 and then fix it again 45 cut Lower the machine head and secure it with the locking bolt 11 Fix the rotary table in the 0 position Loosen the fixing screw 1 and angle the machine head with the handle 45 to the left Position the 45 angle stop between the saw blade and the turntable Loosen the lock ...

Страница 34: ...AUTION Pay attention to correct direction of rotation and dimension of the saw blade 6 Limits for dimension Max Diameter of 255mm and max thickness of 2 8mm as well as mounting diameter of 30mm Before continuing with your work make sure that all safety devices are in good operating condition Saw blade protection check Important Always when you change the saw blade 6 check that it rotates freely in...

Страница 35: ...roves that the brushes can be used after removal it is possible to reassemble them When servicing the carbon brushes open the two covers 13 counterclockwise Then remove the carbon brushes Replace the carbon brushes in reverse order 16 2 7 Exchange table insert CAUTION If the table insert 19 is damaged there is a risk that small parts may become stucked between the table insert and the saw blade an...

Страница 36: ...death Always disconnect the machine from the power supply before carrying out any troubleshooting work Many possible sources of error can be excluded in advance if the machine is properly connected to the mains If you are unable to carry out necessary repairs properly and or do not have the required training always consult a specialist to correct solve the problem Fault Possible cause Correction M...

Страница 37: ...uníquenoslo Sujeto a modificaciones técnicas Compruebe la mercancía inmediatamente después de la recepción y anote las posibles reclamaciones en la carta de porte al recibir la mercancía del transportista Los daños ocasionados durante el transporte deben notificarse por separado en un plazo de 24 horas ZIPPER Maschinen no podrá asumir ningún tipo de responsabilidad por los daños ocasionados por el...

Страница 38: ...Modificaciones del diseño de la máquina Operar la máquina en entornos con riesgo de explosión la máquina puede generar chispas durante el funcionamiento Operar la máquina en estancias cerradas sin sistema de aspiración de virutas y polvo Operar la máquina fuera de los límites especificados en las presentes instrucciones Retirar las indicaciones de seguridad colocadas en la máquina Modificar puente...

Страница 39: ...uina antes de encenderla Mantenga el área alrededor de la máquina libre de obstáculos p ej polvo virutas piezas de trabajo cortadas etc Compruebe la resistencia de las conexiones de la máquina antes de utilizarla No deje nunca desatendida la máquina cuando esté en marcha La máquina se debe detener si está desatendida El manejo los trabajos de mantenimiento o los de reparación sólo deben ser llevad...

Страница 40: ...a instalación conecte la máquina a un sistema adecuado de aspiración de polvo y virutas o utilícela sólo en entornos bien ventilados con una máscara antipolvo Encienda siempre el sistema de aspiración de polvo antes de comenzar a mecanizar la pieza de trabajo No retire nunca secciones u otras partes de la pieza de trabajo del área de corte con la máquina en marcha Si se utilizan herramientas de fr...

Страница 41: ...Incluso un rayo láser de baja potencia puede causar daños en los ojos No abra nunca el módulo láser Puede producirse una exposición inesperada al rayo El láser no debe reemplazarse por otro tipo de láser El láser sólo debe ser reparado por el fabricante del láser o por un representante autorizado 19 7 Advertencias de peligro A pesar de que se utilice la máquina conforme a las especificaciones sigu...

Страница 42: ...quina El lugar elegido debe garantizar una conexión adecuada a la red eléctrica así como la posibilidad de conectar un sistema de aspiración Asegúrese de que el lugar de trabajo elegido soporte de la máquina superficie de trabajo pueda soportar la carga de la máquina y que la máquina se pueda fijar a éste con tornillos los tornillos no están incluidos en el volumen de suministro La máquina se debe...

Страница 43: ...te del motor Aviso Sujete el mango y mueva lentamente el cabezal de la máquina hacia arriba hasta que haya alcanzado la posición más elevada Si se suelta el mango el cabezal de la máquina saltará hacia arriba debido a la precarga del resorte Para enclavar el cabezal de la máquina 34 presiónelo hacia abajo y vuelva a colocar el perno de bloqueo 11 22 2 2 Ajuste de la posición angular de la mesa de ...

Страница 44: ... 3200 min 1 Pos II 4500 min 1 en función de la velocidad requerida 22 2 6 Ajuste del límite de la profundidad de corte La profundidad de corte se puede ajustar gradualmente con el tornillo 22 Para ello afloje la tuerca moleteada M del tornillo 22 Enrosque o desenrosque el tornillo 22 para ajustar la profundidad de corte requerida A continuación vuelva a apretar la tuerca moleteada M AVISO Comprueb...

Страница 45: ...hoja de la sierra circular se detenga Retire la pieza de trabajo 22 3 2 Corte deslizante Los cortes deslizantes son adecuados para realizar cortes largos Para llevar a cabo el corte el dispositivo deslizante se desbloquea aflojando el dispositivo de bloqueo del dispositivo deslizante 23 de modo que durante el corte el grupo de la sierra pueda deslizarse hacia delante o hacia atrás Ajuste el ángulo...

Страница 46: ...res con un cepillo o una herramienta similar 23 2 Mantenimiento La máquina precisa de poco mantenimiento y únicamente se debe llevar a cabo el mantenimiento de unos pocos componentes Independientemente de esto se deben subsanar inmediatamente los fallos y defectos que puedan afectar a la seguridad del usuario Antes de cada puesta en marcha asegúrese de que los dispositivos de seguridad están en pe...

Страница 47: ... A continuación compruebe la posición del indicador de ángulo Si es necesario afloje el indicador 10 con un destornillador de estrella y colóquelo en la posición de 0 de la escala 10 1 y a continuación vuelva a fijarlo Corte de 45 Baje el cabezal de la máquina y asegúrelo con el perno de bloqueo 11 Fije la mesa giratoria en la posición de 0 Afloje el tornillo de fijación 1 e incline el cabezal de ...

Страница 48: ...a interior Para montar y fijar la nueva hoja de la sierra 35 proceda en orden inverso ATENCIÓN Observe el sentido de rotación y las dimensiones correctas de la hoja de la sierra 6 Diámetro máx de 255 mm y grosor máx de 2 8 mm y diámetro del orificio de montaje 30 mm Antes de continuar con el trabajo asegúrese de que los dispositivos de seguridad están en buen estado de funcionamiento Comprobación ...

Страница 49: ...cionamiento Es necesario sustituir las escobillas cuando el carbón se ha gastado hasta alcanzar los 6 mm de longitud o cuando el resorte o el hilo de contacto se han quemado o dañado Si al desmontar las escobillas se constata que se pueden seguir utilizando se pueden volver a montar Para llevar a cabo el mantenimiento de las escobillas de carbón abra las dos cubiertas 13 girándolas en el sentido c...

Страница 50: ...ENCIA Peligro ocasionado por tensiones eléctricas Manipular la máquina con la alimentación eléctrica encendida puede producir lesiones graves o incluso la muerte Antes de llevar a cabo trabajos para la subsanación de errores desconecte siempre la máquina de la fuente de alimentación y asegúrela contra arranques accidentales Muchas posibles fuentes de errores se pueden excluir si la máquina está co...

Страница 51: ...chines lifespan IMPORTANT The installation of other than original spare parts voids the warranty So you always have to use original spare parts When you place a spare parts order please use the service formular you can find in the last chapter of this manual Always take a note of the machine type spare parts number and partname We recommend to copy the spare parts diagram and mark the spare part y...

Страница 52: ...ERSATZTEILE SPARE PARTS PIEZAS DE RECAMBIO ZIPPER MASCHINEN GmbH www Zipper Maschinen at 52 ZI KGS255DS 26 2 Explosionszeichnung exploded view Vista de despiece ...

Страница 53: ...ERSATZTEILE SPARE PARTS PIEZAS DE RECAMBIO ZIPPER MASCHINEN GmbH www Zipper Maschinen at 53 ZI KGS255DS ...

Страница 54: ...auart in der von uns in Verkehr gebrachten Version den grundlegenden Sicherheits und Gesundheitsanforderungen der angeführten EG Richtlinien entsprechen Diese Erklärung verliert ihre Gültigkeit wenn Veränderungen an der Maschine vorgenommen werden die nicht mit uns abgestimmt wurden EN Hereby we declare that the above mentioned machines meet the essential safety and health requirements of the abov...

Страница 55: ...chem Treibstoffen Frostschäden in Wasserbehältern Treibstoff über Winter im Benzintank des Gerätes c Ausgeschlossen sind Defekte an Verschleißteilen wie Kohlebürsten Fangsäcke Messer Walzen Schneideplatten Schneideeinrichtungen Führungen Kupplungen Dichtungen Laufräder Sageblätter Spaltkreuze Spaltkeile Spaltkeilverlängerungen Hydrauliköle Öl Luft u Benzinfilter Ketten Zündkerzen Gleitbacken usw d...

Страница 56: ...n water tanks leaving fuel in the tank during the winter etc c Defects on wear parts are excluded e g carbon brushes collection bags knives cylinders cutting blades clutches sealings wheels saw blades splitting crosses riving knives riving knife extensions hydraulic oils oil air fuel filters chains spark plugs sliding blocks etc d Also excluded are damages on the machine caused by incorrect or ina...

Страница 57: ... ejemplo escobillas de carbón bolsas colectoras cuchillas rodillos placas de corte dispositivos de corte guías acoplamientos juntas impulsores hojas de sierra cuñas en cruz cuñas de separación extensiones para cuñas de separación aceites hidráulicos filtros de aceite de aire y de gasolina cadenas bujías mordazas deslizantes etc d Quedan excluidos los daños en los aparatos ocasionados por uso inade...

Страница 58: ... Quality Management policy Your opinion is essential for further product development and product choice Please let us know about your Impressions and suggestions for improvement experiences that may be useful for other users and for product design Experiences with malfunctions that occur in specific operation modes We would like to ask you to note down your experiences and observations and send th...

Страница 59: ...PRODUKTBEOBACHTUNG PRODUCT MONITORING ZIPPER MASCHINEN GmbH www Zipper Maschinen at 59 ZI KGS255DS ...

Отзывы: