background image

Chapter 1   Introduction

Important Notices

Product Functions

Package Contents

Chapter 2 Installation

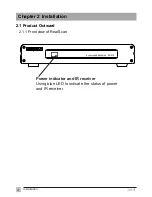
Product Outward

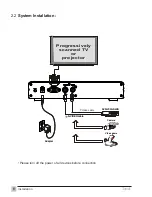
System Installation

Chapter 3   Operation Instruction

Chapter 4   Other Information

1.1

 ...............................................................................................

1.2

 ..............................................................................................

1.3

 ..............................................................................................

2.1

 ................................................................................................


2.1.1


.

...............................................................................


2.1.2


..

.............................................................................

2.2

 .............................................................................................

3.1

 .......................................................................................................

3.2


I

............................................................................................................

3.3

 ...............................................................................................


3.3.1


3.3.2


4.1


Troubleshooting

..................................................................................................

Front view of Real Scan

Rear view of Real Scan

Initial Setting

R Control

Advanced Setting

MAIN MENU

..................................................................................................

PICTURE setting

..........................................................................................


3.3.3


OSD setting

...................................................................................................


3.3.4


PREFERENCE setting

.................................................................................

4.2


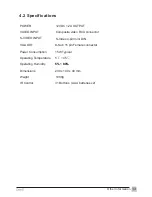
Specifications

......................................................................................................

2

2

3

4

4

5

6

7

8

11

9

9

9

10

12

13

1

Table of Contents

Table of Contents

Содержание Real Scan PV-310 series

Страница 1: ...NWELL ZINWELL ZINWELL ZINWELL ZINWELL ZINWELL ZINWELL ZINWELL ZINWELL ZINWELL ZINWELL ZINWELL ZINWELL ZINWELL ZINWELL ZINWELL ZINWELL ZINWELL ZINWELL ZINWELL ZINWELL ZINWELL ZINWELL ZINWELL ZINWELL ZINWELL ZINWELL ZINWELL ZINWELL ZINWELL ZINWELL ZINWELL ZINWELL ZINWELL ZINWELL ZINWELL ZINWELL ZINWELL ZINWELL ZINWELL ZINWELL ZINWELL ZINWELL ZINWELL ZINWELL ZINWELL ZINWELL ZINWELL ZINWELL ZINWELL ZI...

Страница 2: ...ction Chapter 4 Other Information 1 1 1 2 1 3 2 1 2 1 1 2 1 2 2 2 3 1 3 2 I 3 3 3 3 1 3 3 2 4 1 Troubleshooting Front view of Real Scan Rear view of Real Scan Initial Setting R Control Advanced Setting MAIN MENU PICTURE setting 3 3 3 OSD setting 3 3 4 PREFERENCE setting 4 2 Specifications 2 2 3 4 4 5 6 7 8 11 9 9 9 10 12 13 1 Table of Contents Table of Contents ...

Страница 3: ...Product Functions With the advanced video processing technology to improve video quality Double scan conversion 15 75 KHz to 31 5 KHz and 3 2 pull down technology Full screen true color display Easy operation With one button to switch signals coming from composite VIDEO S VIDEO On screen display operation with IR remote controller 2 Chapter 1 Introduction Thanks for your purchase of Zinwell Real S...

Страница 4: ...WELL ZINWELL ZINWELL ZINWELL ZINWELL ZINWELL ZINWELL ZINWELL ZINWELL ZINWELL ZINWELL ZINWELL ZINWELL ZINWELL ZINWELL ZINWELL ZINWELL ZINWELL ZINWELL ZINWELL ZINWELL ZINWELL ZINWELL ZINWELL ZINWELL ZINWELL ZINWELL ZINWELL ZINWELL ZINWELL ZINWELL ZINWELL ZINWELL ZINWELL ZINWELL ZINWELL ZINWELL ZINWELL ZINWELL ZINWELL ZINWELL ZINWELL ZINWELL ZINWELL ZINWELL ZINWELL ZINWELL ZINWELL ZINWELL ZINWELL ZIN...

Страница 5: ...ter 2 Installation 2 1 1 Front view of Real Scan 2 1 Product Outward 4 Installation Power indicator and IR receiver Using blue LED to indicate the status of power and IR receiver RealScan PROGRESSIVE PV 310 ...

Страница 6: ...DEO INPUT of box S VIDEO INPUT If the external video is s video please connect to the S VIDEO INPUT of box VGA OUTPUT Please use the VGA OUTPUT to your progressively scanned TV or projector DC IN Please connect to your 12V power supply POWER Switch between power on and power off 5 1 2 3 4 5 Installation 1 2 3 4 5 ...

Страница 7: ... off the power of all devices before connection 6 Installation DVD VCR LD IRD Camera Video game Adapter S VIDEO cable Big Screen TV DVD VCR LD IRD Camera Video game Adapter Video cable S VIDEO cable Progressively scanned TV or projector ...

Страница 8: ...e IR control please refer to the following instructions of IR control and start the system setting Steps 1 Please install 2 AAA batteries into IR control 2 Please refer to p6 for your configuration 3 Turn on the power 4 Press the C Video or S Video button to select signal source 3 1 Initial Setting 7 Operation Instruction ...

Страница 9: ...n Instruction Res Select resolution of 1024x768 800x600 and 640x480 Menu Display the main menu Select Select the currently highlighted menu item Exit Exit the current menu selection and return to the parent menu Press this key repeatedly to close all menus POWER Switch between power on S video S Video select C video Composite Video select 8 6 ...

Страница 10: ... or button To adjust selected item press or button When you are finished making all picture adjustments press Exit button back to main menu Select RESET to return adjustments back to factory settings PICTURE Sub Menu provides BRIGHTNESS CONTRAST SATURATION SHARPNESS HUE adjustment modes and RESET BRIGHTNESS CONTRAST SATURATION SHARPNESS PICTURE 100 HUE 1 2 3 4 3 3 2 PICTURE setting Operation Instr...

Страница 11: ...ou want on the screen When you are finished making OSD POSITION adjustment press Exit button back to main menu Select RESET to return adjustments back to factory settings OSD POSITION EXIT SEL OSD POSITION RESET OSD EXIT SEL OSD Sub Menu provides OSD POSITION selected mode and RESET 1 2 3 10 Operation Instruction ...

Страница 12: ...of them and press Select button to confirm setting and return to Sub Menu simultaneously When you are finished making all selections press Exit button back to main menu RECOMMENDED RESOLUTION The 1024x768 800x600 640x480 for NTSC The 1024x768 800x600 for PAL PREFERENCE Sub Menu provides RESOLUTION and INPUT SIGNAL modes 3 3 4 PREFERENCE setting 1 2 3 1024x768 800x600 RESOLUTION EXIT SEL 640x480 RE...

Страница 13: ...al To reset the Real Scan unplug the DC IN adapter from the unit and then plug it back in again The remote control can t control the Real Scan Make sure batteries are installed Check remaining battery life Video is distorted Check all of the connection If you still have difficulties that you can t resolve using the tips described above please unplug and plug in the AC cord to reset your Real Scan ...

Страница 14: ...A connector VGA OUT D Sub 15 pin Female connector Operating Temperature 5 45 5 80 Operating Humidity Dimensions 230 x 140 x 40 mm Weight 1080g IR Control 31 Buttons AAA batteries x2 S VIDEO INPUT S Video 4 pin mini DIN 5 80 Power Consumption 15W Typical 13 Other Information ...

Страница 15: ...14 Operation Instruction ...

Страница 16: ...NWELL ZINWELL ZINWELL ZINWELL ZINWELL ZINWELL ZINWELL ZINWELL ZINWELL ZINWELL ZINWELL ZINWELL ZINWELL ZINWELL ZINWELL ZINWELL ZINWELL ZINWELL ZINWELL ZINWELL ZINWELL ZINWELL ZINWELL ZINWELL ZINWELL ZINWELL ZINWELL ZINWELL ZINWELL ZINWELL ZINWELL ZINWELL ZINWELL ZINWELL ZINWELL ZINWELL ZINWELL ZINWELL ZINWELL ZINWELL ZINWELL ZINWELL Headquarters 7F 512 Yuan Shan Rd Chung Ho City T aipei Hsien 235 T...

Отзывы: