background image

Account management

Administrator Passcode

Default administrator passcode is ‘123456’. If you wish to set a new 

passcode, it should be 4-8 digits. Make sure to set a new code as 

soon as you finish installing the lock.  

Change Administrator Passcode

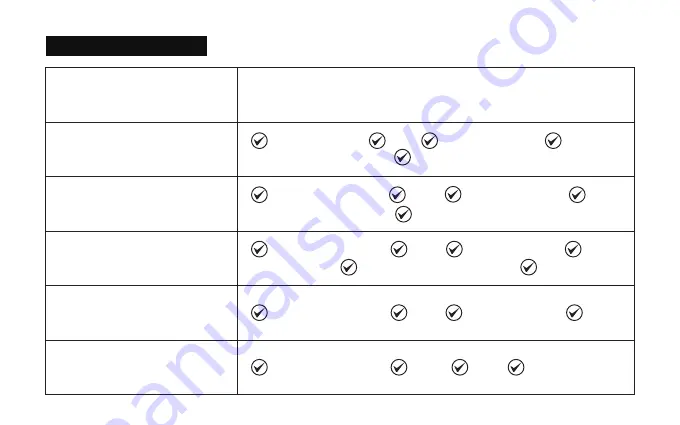
      > admin. passcode >       > 1 >       > new passcode >       > 
new passcode (confirm) > 

Add a User Passcode

Change a User Passcode

Delete a User Passcode

Clear all users

      > admin. passcode >       > 3 >       > old passcode > 

      > admin. passcode >       > 99 >       >99> 

      > admin. passcode >       > 2 >       > old passcode >      > 

new passcode >      >  new passcode (confirm) > 

      > old passcode >      > 0 >       > new passcode >      > 

new passcode (confirm) > 

17

Содержание VAULTA K1

Страница 1: ...Electronic Door Knob ...

Страница 2: ...ening up multiple possibilities for various use cases In addition settings such as Passage Mode Autolock and Anti Prying passcode deliver ultimate convenience for day to day use With our power saving technologies 4 AA batteries are able to provide up to 2 years of battery life You may finally be able to put your key aways and use them as backup For now please be sure to explore all of its features...

Страница 3: ...Exterior Assembly USB C Port Rod Bolts Square Spindle Cable Wire Latch Assembly Strike Plate Battery Compartment Interior Cover Interior Assembly Screw What s in the Box 2 ...

Страница 4: ...a long beep and the keypad will illuminate green Phillips Screwdriver Drill Hole Saw Drill Chisel Hammer Tape Measure Pencil Tools Additional Exterior Assembly Interior Assembly Latch Assembly Key x 2 Strike Plate Parts DO NOT mix new batteries with used batteries when the product is in use M4 Screws x 2 1 1 2 40mm For door thickness 35 45mm Strike Plate Screws x 4 3 4 19mm M4 Screws x 1 1 2 12mm ...

Страница 5: ... place on door 36 915mm from the ground as marked Figure 1b 2 Mark the door for drilling a Mark center hole on door edge through guide on template for 1 25mm latch bolt Figure 2a b Mark center hole on door face through guide on template for 2 3 8 60mm or 2 3 4 70mm backset Figure 2b 1a 1 For installation on new doors 1b 2a 2b 4 ...

Страница 6: ...a 3b 3c 4a 4b 4c 4d 4e 3d a Mark center hole on edge of jamb even with the center of the Latch Bolt on door edge Figure 4a b Drill a hole in door jamb on center mark Check if the strike plate measure can perfectly fits in Figure 4b c Outline outside edges of Strike Plate Figure 4c d Chisel 1 8 3mm deep for Strike Plate or until flush Figure 4d e Install Strike Plate using two 3 4 19mm screws provi...

Страница 7: ...1 Check door compatibility Remove existing door knob if applicable OR For installation on doors with pre drilled holes 6 ...

Страница 8: ...7 ...

Страница 9: ...her 2 3 8 or 2 3 4 60 or 70mm Thickness measure to confirm that the door is between 1 3 8 to 2 5 35mm to 65mm thick Hole in the door measure to confirm that the hole in the door is 2 1 8 54mm Hole in the door edge measure to confirm that the hole in the door edge is 1 25mm 1 2 3 4 8 ...

Страница 10: ...9 DO NOT use an electric screwdriver only hand tighten screws with Phillips screwdriver DO NOT install this product if your door thickness is out of range DO NOT over tighten screws ...

Страница 11: ...hole with the latch face flush against the door edge Make sure the square shaped hole is centered For 2 3 4 70mm backset pull to extend the latch in order to center the squared shaped hole Install the latch and strike plate 2 10 60mm 70mm ...

Страница 12: ...he existing strike plate is ready to be used You may store the strike plate in box for future use If not please make sure the bolt is aligned correctly with the strike plate Install the latch using screws Facing door Jamb ...

Страница 13: ...g through the round holes on the latch and the square spindle and the control wire going through the square shaped center hole Forcing the control wire into any other place than specified above will damage the connector making the door knob unusable The UP mark on the spindle should face upward Install the Exterior Assembly 3 1 2 4 12 3 UP ...

Страница 14: ...ing through the square shaped center hole Secure both exterior and interior knobs to the door using the 2 1 3 60mm or 1 1 2 40mm screws Tighten them with a Phillips Screwdriver DO NOT over tighten Plug the control wire male plug to the female socket located on the battery compartment Install the batteries into the compartment Press and hold the reset button until you hear a long beep 1 4 5 6 Insta...

Страница 15: ...st with door open Enter admin passcode 123456 default and test the exterior knob The bolt should move smoothly in and out Use keys to test the exterior knob The bolt should move smoothly in and out Test the interior knob The bolt should move smoothly in and out Congratulations Vaulta is ready for use 14 Close the door to make sure the bolt fits in the hole on jamb Make sure the door knob has been ...

Страница 16: ...r a long beep and the keypad will illuminate green If the batteries die due to long idle time use type C cable with a power source such as a power bank for emergency power As soon as unlocking is successful immediately replace with new batteries Enter button USB C Port Using door knob 6 Indicator light Green Indicates a setting is successful and activated Unlocking successful Red Indicates a setti...

Страница 17: ... Silent mode on Silent Stays green for a while Silent mode off Long beep Stays green for a while Passage mode on Long beep Stays green for a while Passage mode off Long beep Stays green for a while Auto Lock completed Silent Inactive Immediate Lock completed Silent Stays green for a while Resetting successful Long beep Stays green for a while Press a button when keys are locked up Operation failed...

Страница 18: ...as soon as you finish installing the lock Change Administrator Passcode admin passcode 1 new passcode new passcode confirm Add a User Passcode Change a User Passcode Delete a User Passcode Clear all users admin passcode 3 old passcode admin passcode 99 99 admin passcode 2 old passcode new passcode new passcode confirm old passcode 0 new passcode new passcode confirm 17 ...

Страница 19: ...essful Passage Mode Anti Prying The anti prying technology is used for protecting your passcode from prying eyes You may enter up to 20 digits including your passcode to unlock the door knob Turn on passage mode the door will stay unlocked until you turn it off Turn on passage mode Turn off passage mode Standard Settings Shortcut Once succeeded green light stays for a while along with a long beep ...

Страница 20: ...y lock after 5s NOTE Turning on Passage Mode will automatically disable the Auto Lock feature As soon as Passage Mode is off Auto Lock will resume automatically Press to lock immediately Turn on off Silent Mode Buzzer Immediate locking 19 admin passcode 5 SAVE THESE IMPORTANT INSTRUCTIONS FOR EASY REFERENCE ...

Страница 21: ...re is securely attached If not remove the connector and then plug in again 2 Make sure the batteries are inserted properly correct polarity 3 Make sure the batteries have enough power 4 Check if the door knob is in Silent Mode If you are stuck outside and not able to access battery compartment use USB C emergency power to power on the door knob 20 ...

Страница 22: ...olt is not able to go through the strike plate 1 Make sure the bolt aligns with the strike plate 2 Make sure the bolt edge can slide into the strike plate 3 Make sure depth of the hole in door jamb fits the bolt Failed to unlock using a passcode 1 Failed to unlock using administrator passcode reset the door knob 2 Failed to unlock using a user passcode use administrator passcode to modify the user...

Страница 23: ... they have not been altered without your knowledge WARNING This Manufacturer advises that no lock can provide complete security by itself This lock may be defeated by forcible or technical means or evaded by entry elsewhere on the property No lock can substitute for caution awareness of your environment and common sense Builder s hardware is available in multiple performance grades to suit the app...

Отзывы: