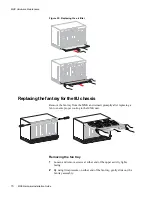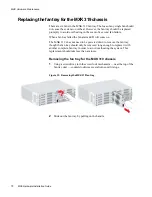
Replacing the fan tray for the 8U chassis
MXK Hardware Installation Guide
71
Replacing the fan tray
1
Insert tray in the upper fan tray cavity.
2
By using firm pressure on either end of the fan tray, gently push the tray
back in an even manner, so the power connector of the fan tray seats
securely in the MXK chassis power connector.
Securely seat the fan tray to ensure proper cooling to the MXK unit.
3
Reinsert screws on either end of the upper activity lights facing and gently
tighten.
4
Verify the fans.
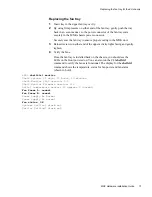
Once the fan tray is installed back on the chassis, you should see the
LEDs on the front powered on. You can also run the CLI
shelfctrl
command to verify the fans are functional. The display for the
shelfctrl
command shows the temperature, status for fan power and fan status
(shown in bold).
zSH>
shelfctrl monitor
Shelf uptime: 32 days, 23 hours, 53 minutes
Shelf Monitor CPLD version: 0.5
Shelf Monitor Firmware version: 0.5
Outlet temperature sensor: 23 degrees C (normal)
Fan Power A: normal
Fan Power B: normal
Power Supply A: normal
Power Supply B: normal
Fan status: OK.
System: Critical alarm set.
Card a: Critical alarm set.
Содержание MXK
Страница 1: ...MXK Hardware Installation Guide For software version 2 1 July 2010 Document Part Number 830 01734 10 ...
Страница 10: ...About This Guide 10 MXK Hardware Installation Guide ...
Страница 54: ...Install the MXK 54 MXK Hardware Installation Guide ...
Страница 74: ...MXK Hardware Maintenance 74 MXK Hardware Installation Guide ...
Страница 78: ...Index 78 MALC Hardware Installation Guide ...

