background image

This device complies with Part 15 of the FCC Rules. Operation is subject to the following two 

conditions: (1) this device may not cause harmful interference, and (2) this device must accept 

any interference received, including interference that may cause undesired operation. 

The authority to operate this equipment is conditioned by the requirement that no modifications 

will be made to the equipment unless the changes or modifications are expressly approved by the 

responsible party. 

This equipment has been tested and found to comply with the limits for a Class B digital device, 

pursuant to Part 15 of the FCC Rules. These limits are designed to provide reasonable protection 

against harmful interference in a residential installation. This equipment generates, uses, and can 

radiate radio frequency energy and, if not installed and used in accordance with the instructions, 

may cause harmful interference to radio communications. However, there is no guarantee that 

interference will not occur in a particular installation. If this equipment does cause harmful 

interference to radio or television reception, which can be determined by turning the equipment 

off and on, the user is encouraged to try to correct the interference by one or more of the 

following measures: 

—  Reorient or relocate the receiving antenna. 

—  Increase the separation between the equipment and receiver. 

—  Connect the equipment into an outlet on a circuit different from that to which the receiver is 

connected. 

—  Consult the dealer or an experienced radio/TV technician for help. 

Notice to Users of the United States Telephone Network 

The following notice applies to versions of the modem that have been FCC Part 68 approved. 

This equipment complies with Part 68 of the FCC rules and the requirements adopted by the 

Administrative Council for Terminal Attachment (ACTA). On the bottom side of this equipment is a 

label that contains, among other information, a product identifier in the format 

US:AAAEQ##TXXXX. If requested, this number must be provided to the Telephone Company. 

This equipment is intended to connect to the Public Switched Telephone Network through a 

Universal Service Order Code (USOC) type RJ11C jack. A plug and jack used to connect this 

equipment to the premises wiring and telephone network must comply with the applicable FCC 

Part 68 rules and requirements adopted by the ACTA. A compliant telephone cord and modular 

plug is provided with this product. It has been designed to be connected to a compatible modular 

jack that is also compliant. 

If the modem causes harm to the telephone network, the Telephone Company will notify you in 

advance that temporary discontinuance of service may be required. But if advance notice is not 

practical, the Telephone Company will notify the customer as soon as possible. Also, you will be 

advised of your right to file a complaint with the FCC if you believe it is necessary. 

The Telephone Company may make changes in its facilities, equipment, operations or 

procedures that could affect the operation of the equipment. If this happens, the Telephone 

Company will provide advance notice in order for you to make necessary modifications to 

maintain uninterrupted service. If trouble is experienced with the modem, refer to the repair and 

warranty information in this document. 

If the equipment is causing harm to the telephone network, the Telephone Company may request 

that you disconnect the equipment until the problem is resolved. 


6219-X1 Router Users Guide

 4 

Содержание 6219-X1

Страница 1: ...6219 X1 ADSL2 4 Port Router Users Guide Document Part Number 830 02072 02 February 2010...

Страница 2: ...trademarks of Zhone Technologies Inc Zhone Technologies makes no representation or warranties with respect to the contents hereof and specifically disclaims any implied warranties of merchantability n...

Страница 3: ...dings are interconnected the voltage potential may cause a hazardous condition Consult a qualified electrical consultant to determine whether or not this phenomenon exists and if necessary implement c...

Страница 4: ...s of the modem that have been FCC Part 68 approved This equipment complies with Part 68 of the FCC rules and the requirements adopted by the Administrative Council for Terminal Attachment ACTA On the...

Страница 5: ...ephone Company or a qualified installer Notice to Users of the Canadian Telephone Network NOTICE This equipment meets the applicable Industry Canada Terminal Equipment Technical Specifications This is...

Страница 6: ...glement sur le mat rial brouilleur du Canada Japan Notices This is a Class B product based on the standard of the Voluntary Control Council for Interference from Information Technology Equipment VCCI...

Страница 7: ...Safety Instructions 16 Front Panel 17 Back Panel 18 Chapter 2 Hardware Installation and PC Setup 19 Overview 19 Connecting your hardware 19 Mounting the Router 20 Standing the Router Vertically 20 Co...

Страница 8: ...nish Function 47 LAN Local Area Network LAN Setup 48 Ethernet Mode 50 NAT 51 Virtual Servers 51 Port Triggering 53 DMZ Host 54 MAC Filtering 55 Parental Control 57 URL Filter 58 Quality of Service 59...

Страница 9: ...m Log 90 SNMP 91 TR 069 Client 91 Access Control 92 Services 92 IP Addresses 93 Passwords 94 Update Software 95 Reboot Router 96 Chapter 6 Troubleshooting 97 The Router Is Not Functional 97 You Cannot...

Страница 10: ......

Страница 11: ...damage to system equipment or data and warns of potential injury or death Carefully read and follow the instructions included in this document Caution A caution alerts users to conditions or actions...

Страница 12: ...les chapter titles file path names notes in body text requiring special attention section titles emphasized terms and variables PLAIN UPPER CASE Used for environment variables Command Syntax Brackets...

Страница 13: ...NMP Simple Network Management Protocol TFTP Trivial File Transfer Protocol VoIP Voice over IP VoWi Fi Voice over Wifi VPN Virtual Private Network WEP Wired Equivalent Privacy Wi Fi Wireless Fidelity I...

Страница 14: ...Contacting Customer Service and Technical Support Customer service and technical support for this Zhone device are provided by your Internet Service Provider 6219 X1 Router Users Guide 14...

Страница 15: ...ible through a standard web browser This User Guide will show you how to connect your 6219 X1 and how to customize its configuration to get the most out of your new product System Requirements In orde...

Страница 16: ...of the device Plug the device into a surge protector to reduce the risk of damage from power surges and lightning strikes Operate this equipment only from an electrical outlet with the correct power s...

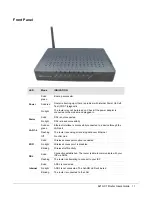
Страница 17: ...successfully connected to a device through the LAN port Flashing The router is sending or receiving data over Ethernet LAN 1 4 Off No LAN Link Solid Wireless access point option is enabled No light W...

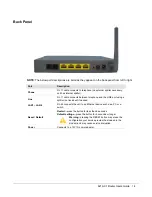
Страница 18: ...the LINE port using a splitter not included if needed LAN1 LAN4 RJ 45 connects the unit to an Ethernet device such as a PC or a switch Reset Default Restart press the button for less than 4 seconds D...

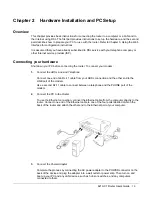
Страница 19: ...d Telephone Connect one end of an RJ 11 cable from your ADSL connection and the other end to the LINE port of the modem Use a second RJ 11 cable to connect between a telephone and the PHONE port of th...

Страница 20: ...tions or any possible interference Make sure the cables can be easily attached to the router without strain The illustration below shows how to mount the router horizontally on a wall Standing the Rou...

Страница 21: ...st includes Internet Protocol TCP IP then the protocol has already been enabled and you can skip to Step 10 4 If Internet Protocol TCP IP does not appear as an installed component then click Install 5...

Страница 22: ...w are the installed network components Make sure the box for Internet Protocol TCP IP is checked and then click Properties 4 In the Internet Protocol TCP IP Properties dialog box click the radio butto...

Страница 23: ...g in to the router Note Before configuring your router make sure you have followed the instructions in Chapter 2 Hardware Installation and PC Setup You should have your PCs configured for DHCP mode if...

Страница 24: ...er by clicking Summary under Device Info This screen shows details of the router such as the version of the software bootloader LAN IP address etc It also displays the current status of your DSL conne...

Страница 25: ...he graphic below shows the screen when a WAN connection is set up LAN Statistics Display LAN statistics by clicking LAN under Statistics The reset statistics button zeros out the counters so that you...

Страница 26: ...N under Statistics The reset statistics button zeros out the counters so that you can more easily determine if the errors are still occurring ATM Interface Statistics Display ATM statistics by clickin...

Страница 27: ...Statistics Display ADSL statistics by clicking ADSL under Statistics Information contained in this screen is useful for troubleshooting and diagnostics of connection problems 6219 X1 Router Users Guid...

Страница 28: ...t reflects the ratio of error bits to the total number transmitted If you click on the ADSL BER Test button at the bottom of the ADSL Statistics page the following pop up screen will appear allowing y...

Страница 29: ...oute under Device Info ARP Display the ARP status report by clicking ARP under Device Info ARP Address Resolution Protocol maps the IP address to the physical address labeled HW Address the MAC addres...

Страница 30: ...clicking DHCP under Statistics This page shows the computers identified by the hostname and MAC address that have acquired IP addresses by the DHCP server with the time that the lease for the IP addre...

Страница 31: ...C identifier The PVC is made up of a Virtual Path Identifier VPI and Virtual Channel Identifier VCI The default settings for the 6219 X1 has a bridge configured If you are not going to use the bridge...

Страница 32: ...saging distribution and retrieval and also for remote terminal applications such as telecommuting o UBR With PCR Unspecified Bit Rate with Peak Cell Rate o CBR Constant Bit Rate used by applications t...

Страница 33: ...er 5 AAL5 PPPoA offers authentication encryption and compression 1 Select the type of network protocol and encapsulation mode over the ATM PVC that your ISP has instructed you to use then click Next 2...

Страница 34: ...nslation Settings page make changes as directed by your ISP and then click Next When the settings are complete the next screen shows a WAN Setup Summary screen displaying the WAN configurations made 6...

Страница 35: ...if not click Back to make any modifications If you want to change any item after saving click Edit to make any modifications 6 Click Save to save the settings After the settings are saved the below sc...

Страница 36: ...and encapsulation mode over the ATM PVC that your ISP has instructed you to use then click Next 2 In the Connection Type page select PPP over Ethernet PPPoE then click Next 3 In the PPP Username and...

Страница 37: ...nslation Settings page make changes as directed by your ISP and then click Next When the settings are complete the next screen shows a WAN Setup Summary screen displaying the WAN configurations made 6...

Страница 38: ...if not click Back to make any modifications If you want to change any item after saving click Edit to make any modifications 6 Click Save to save the settings After the settings are saved the below sc...

Страница 39: ...ion to the ISP 1 Select the type of network protocol and encapsulation mode over the ATM PVC that your ISP has instructed you to use then click Next 2 In the Connection Type page select MAC Encapsulat...

Страница 40: ...mary screen match the settings provided by your ISP If all settings are correct click Save to save these settings if not click Back to make any modifications If you want to change any item after savin...

Страница 41: ...6219 X1 Router Users Guide 41...

Страница 42: ...forwarding 1 Select the type of network protocol and encapsulation mode over the ATM PVC that your ISP has instructed you to use then click Next 2 In the Connection Type page select IP over ATM IPoA...

Страница 43: ...mary screen match the settings provided by your ISP If all settings are correct click Save to save these settings if not click Back to make any modifications If you want to change any item after savin...

Страница 44: ...1 Select the type of network protocol and encapsulation mode over the ATM PVC that your ISP has instructed you to use then click Next 2 In the Connection Type page select Bridging then click Next 6219...

Страница 45: ...u disable bridge service if desired 3 Check or uncheck Enable Bridge Service and then click Next When the settings are complete the next screen shows a WAN Setup Summary screen displaying the WAN conf...

Страница 46: ...ow displaying the WAN settings that you made with the option to Add or Remove any of the connections that you have made Remove Function If you want to delete a connection from the listed WAN setup cli...

Страница 47: ...n When satisfied with the settings click Finish After selecting the Finish button the DSL Router Reboot screen will appear At this point the router will reboot to save the changes made 6219 X1 Router...

Страница 48: ...nable the DHCP server and enter the range of IP addresses that the DHCP server can assign to your computers Disable the DHCP server if you would like to manually assign IP addresses The Save button on...

Страница 49: ...The following DSL Router Reboot screen appears after Save Reboot is clicked 6219 X1 Router Users Guide 49...

Страница 50: ...elect the speed of your Ethernet connection Modes include auto 100 full 100 half 10 full and 10 half If you select auto then the router will use the common mode with which all the connected interfaces...

Страница 51: ...virtual server allows you to direct incoming traffic from the WAN side to a specific IP address on the LAN side The following figure shows the screen that allows you to configure your virtual server...

Страница 52: ...or make a new one 3 Enter the IP address of the LAN side PC in the Server IP Address text box 4 Click Save Apply to submit the configuration The NAT Virtual Servers Setup screen appears after you save...

Страница 53: ...g you to select the application that you want to set the port settings for After a selection has been made click Save Apply to save your settings The NAT Port Triggering Setup screen appears after you...

Страница 54: ...DMZ Host You can define the IP address of the DMZ Host on this screen Enter the IP address and click Save Apply 6219 X1 Router Users Guide 54...

Страница 55: ...ble in the MAC Filtering Setup screen If you click Change Policy a confirmation dialog allows you to verify your change To add a setting to the MAC filtering table enter the Source and Destination MAC...

Страница 56: ...ears The MAC Filtering Setup screen lists the MAC filters including filters which were added from the previous screen You can view add or delete MAC filters The Remove button appears only when you hav...

Страница 57: ...2 Enter a User Name to identify the target of the restrictions 3 Enter the MAC address of the network adapter to be restricted and optionally another MAC address 4 Select the days of the week the rest...

Страница 58: ...ist 1 Click Add to continue to the next screen to enter the URL address 2 In URL Address enter the URL address in Port Number enter the port number and click Save Apply If no port number is entered th...

Страница 59: ...k interface Each interface associated with QoS is allocated three queues Lower Queue Precedence values denote a higher priority for the queue so 1 has higher priority than 2 To associate an interface...

Страница 60: ...the Queue Precedence drop down 5 Click Save Apply QoS Classification You can configure the Quality of Service to apply different priorities to traffic on the router The Add Network Traffic Class Rule...

Страница 61: ...m and high to this traffic class 4 Select an IP precedence from the 0 7 range 5 Enter an IP Type of Service from the following selections Normal Service Minimize Cost Maximize Reliability Maximize Thr...

Страница 62: ...d default gateway on the Routing Default Gateway screen By default the Enable Automatic Assigned Default Gateway checkbox is checked To enable Automatic Assigned Default Gateway leave the checkbox che...

Страница 63: ...oute To add a routing table use the Static Route page A maximum of 32 entries can be configured Click Add Enter the route information and then save and apply your configurations 6219 X1 Router Users G...

Страница 64: ...e IP packets according to their Source Interface Source Destination IP address subnets IP Protocols Source Destination Ports to specific Gateway address and or Gateway Interfaces To add a policy routi...

Страница 65: ...ons modulation and capability that should be specified by your ISP Consult with your ISP to select the correct settings for each Click Save Apply if you are finished or click on Advanced Settings if y...

Страница 66: ...ced Settings page There are five test modes between the router and your ISP Normal test Puts the router in a test mode in which it only sends a Normal signal Reverb test Puts the router in a test mode...

Страница 67: ...d 4 3125 kHz apart With each tone carrying separate data the technique operates as if 256 separate modems were running in parallel The tone range is from 0 to 31 for upstream and from 32 to 255 for do...

Страница 68: ...ide to pass through the firewall and enter your LAN To use this feature mapping groups should be created To create a new mapping group 1 Click Add button If you need to edit an entry then click Edit f...

Страница 69: ...p name 3 Select interfaces from the available interface list and add them to the grouped interface list using the arrow buttons to create the required mapping of the ports 4 Click Save Apply 6219 X1 R...

Страница 70: ...P addresses Encryption and key exchange make this a secure way to access remote networks Contact your ISP for the necessary information to correctly configure this connection Click Add New Connection...

Страница 71: ...The Show Advanced Settings button at the bottom of the screen provides additional encryption settings 6219 X1 Router Users Guide 71...

Страница 72: ...one or importing an existing one from a location where one is stored Note Certificates are used with TR 069 Firmware that does not support TR 069 will not support certificates Local A local certificat...

Страница 73: ...at appear to configure a new certificate 3 Click Apply to submit the request If you have a certificate already you can simply import the certificate by pasting the certificate content and private key...

Страница 74: ...Authority Certificates screen also allows you to view certificates You can store up to 4 certificates To Import a certificate 1 Click on Import Certificate 2 Enter the certificate name in the Certific...

Страница 75: ...rk name and select the country that you are in If you select Wireless disabled is DSL link is down which is disabled by default when Enable Wireless is selected the wireless connection will automatica...

Страница 76: ...on is unchecked the access point sends out WPA PSK information for WiFi handsets When you enable a wireless bridge you can also see the other wireless bridges by SSID and BSSID MAC address 6219 X1 Rou...

Страница 77: ...or the specific authentication method Network authentication methods include the following Open anyone can access the network The default is a disabled WEP encryption setting Shared WEP encryption is...

Страница 78: ...d Access usually used for the larger Enterprise environment it uses a RADIUS server and TKIP Temporal Key Integrity Protocol encryption instead of WEP encryption which is disabled TKIP uses128 bit dyn...

Страница 79: ...is also required WPA2 Wi Fi Protected Access 2 second generation WPA which uses AES Advanced Encryption Standard instead of TKIP as its encryption method Network re authorization interval is the time...

Страница 80: ...nterval time Mixed WPA2 WPA useful during transitional times for upgrades in the enterprise environment this mixed authentication method allows upgraded and users not yet upgraded to access the networ...

Страница 81: ...used MAC Filter The MAC filter screen allows you to manage MAC address filters Add the MAC addresses that you want to manage and then select the mode that you want to use to manage them You can disabl...

Страница 82: ...can select the mode for the router either access point or wireless bridge If you enable the bridge restrict option then proceed to enter the MAC addresses of the remote bridges To restrict a wireless...

Страница 83: ...f you have chosen to enable access point in the Remote Bridges MAC Address text box es MAC address es for the bridge s 4 If you have chosen access point Refresh only allowed 6219 X1 Router Users Guide...

Страница 84: ...all the stations will be capable of using to receive frames from a wireless medium Fragmentation Threshold used to fragment packets which help improve performance in the presence of radio frequency RF...

Страница 85: ...mmunication based Transmit Power select from 20 40 60 80 and 100 The default value is 100 but can be changed WMM Wi Fi Multimedia prioritizes traffic from different applications such as voice audio an...

Страница 86: ...me will show test results of three connections Connection to your local network Connection to your DSL service provider Connection to your Internet service provider There are two buttons at the bottom...

Страница 87: ...ons under Settings provide you with the ability to save configurations to a file restore configurations from a file and to restore the factory default configuration Backup Settings To save a copy of t...

Страница 88: ...r computer 2 Click Update Settings The router will restore settings and reboot to activate the restored settings Restore Default Restore Default will delete all current settings and restore the router...

Страница 89: ...oot System Log The System Log dialog allows you to view the System Log and configure the System Log options To view the System Log click View System Log to check the log file The System Log page shows...

Страница 90: ...ts above or equal to the selected log level will be logged and displayed If the selected mode is Remote or Both events will be sent to the specified IP address and UDP port of a remote system log serv...

Страница 91: ...les a management station to configure monitor and receive trap messages from network devices TR 069 Client The router includes a TR 069 client WAN management protocol with default values configured To...

Страница 92: ...me services of your router by LAN or WAN If no WAN connection is defined only the LAN side can be configured Services Services that can be enabled or disabled on the LAN WAN are FTP HTTP ICMP SNMP SSH...

Страница 93: ...o the IP address list 1 Click Add 2 Select Enabled to enable Access Control Mode 3 To assign the IP address of the management station that is permitted to access the local management services enter th...

Страница 94: ...the Passwords screen under the Access Control section to change a password Select an account and enter the current password and the new password and then click on the Save Apply button 6219 X1 Router...

Страница 95: ...eps to perform an upgrade 1 Obtain an updated software image file from your ISP 2 Enter the path to the image file location or click on the Browse button to locate the image file 3 Click Update Softwa...

Страница 96: ...Reboot Router Clicking Save Reboot saves all the configurations you have made then reboots the router using the new configuration information 6219 X1 Router Users Guide 96...

Страница 97: ...ter 1 Check to see that the power LED is green and that the network cables are installed correctly 2 Make sure you are not connecting the USB and the Ethernet port to the same PC at the same time 3 Ma...

Страница 98: ...On Windows based computers you can execute a ping command from the Start menu 3 Click the Start button and then click Run In the Open text box type a statement such as the following ping 192 168 1 1 o...

Страница 99: ...nslookup command from the Start menu 5 Click the Start button and then click Run In the Open text box type the following Nslookup 6 Click OK A Command Prompt window displays with a bracket prompt At...

Страница 100: ......
Страница 101: ...gnal The voice component in DSL is an analog signal See digital ATM Asynchronous Transfer Mode A standard for high speed transmission of data text voice and video widely used within the Internet ATM d...

Страница 102: ...yahoo com is the domain name associated with IP address 216 115 108 243 When you start to access a web site a DNS server looks up the requested domain name to find its corresponding IP address If the...
Страница 103: ...unication to pass between the networked devices ICMP Internet Control Message Protocol An Internet protocol used to report errors and other network related information The ping command makes use of IC...

Страница 104: ...bit and 128 bit encryption keys used in WEP wireless security schemes The keys encrypt data over the WLAN and only wireless PCs configured with WEP keys that correspond to the keys configured on the...

Страница 105: ...rt It is a 6 pin connector usually containing four wires RJ 45 Registered Jack Standard 45 The 8 pin plug used in transmitting data over phone lines Ethernet cabling usually uses this type of connecto...

Страница 106: ...ted pair The ordinary copper telephone wiring used by telephone companies It contains one or more wire pairs twisted together to reduce inductance and noise Each telephone line uses one pair In homes...

Страница 107: ...rs with access to a private network key Each PC on your wireless network must be manually configured with the same key as your device in order to allow wireless encrypted data transmissions Eavesdropp...

Отзывы: