background image

Port Mapping

6212-A2-ZB83-20

 6212-I3 4-Port Router User’s Guide

55

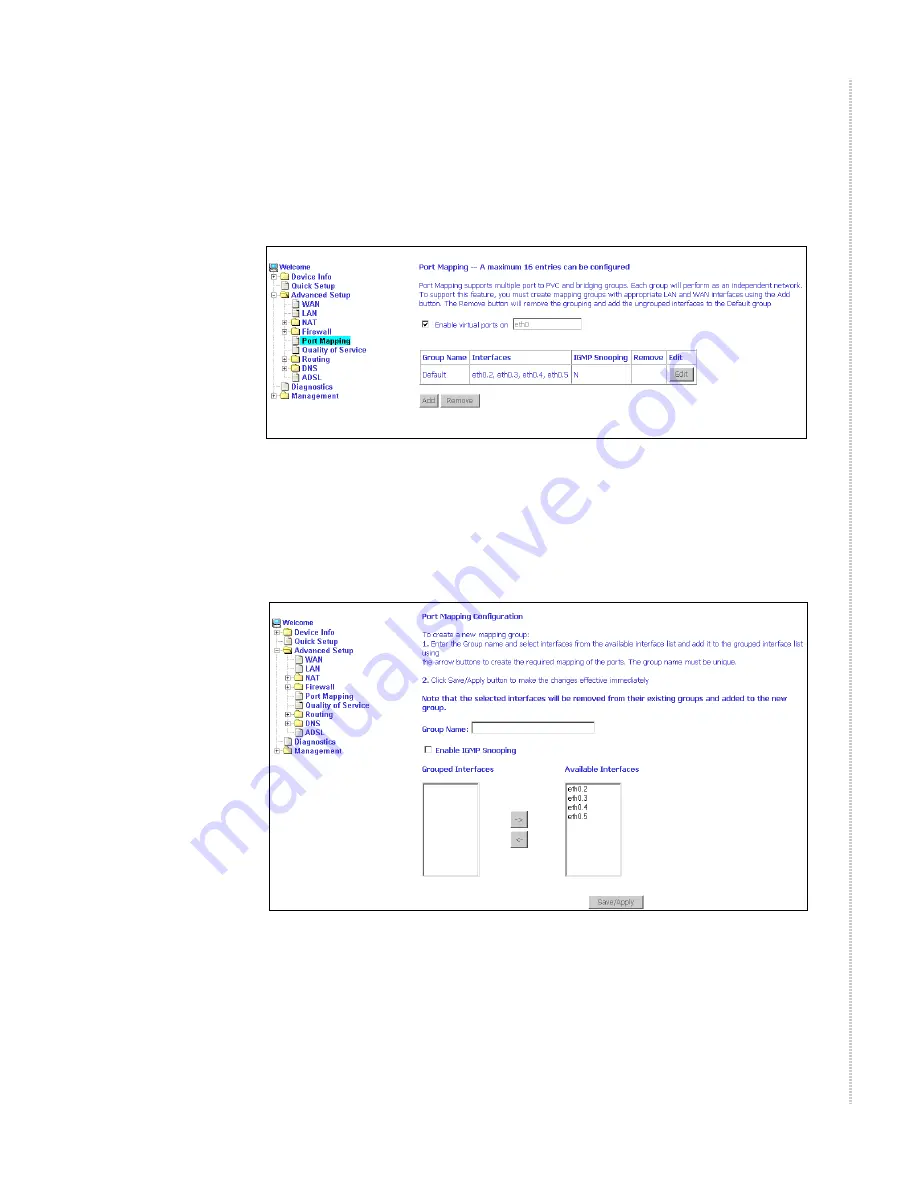
Port Mapping

Use the Port Mapping screen to map multiple ports to a PVC and create 
bridging groups. Each group will perform as an independent network.


Figure 57: Port Mapping

To create a new mapping group: 

1

Click on Add. The Port Mapping Configuration screen appears.


Figure 58: Creating a Port Mapping Entry

2

Enter a unique Group name.

3

Select interfaces from the available interface list and add them to the 

grouped interface list using the arrow buttons to create the required 

mapping of the ports. 

4

Click on Save/Apply.

Содержание 6212

Страница 1: ...6212 I3 4 Port Router User s Guide May 2006 Document Part Number 6212 A2 ZB83 20...

Страница 2: ...are registered trademarks of Zhone Technologies Inc BAN Connect to Success GigMux Hotwire Connected JetFusion JetVision MALC MicroBurst PacketSurfer Quick Channel Raptor Reverse Gateway SLMS Spectrum...

Страница 3: ...ncies and inspection authorities to ensure compliance 7 A rare phenomenon can create a voltage potential between the earth grounds of two or more buildings If products installed in separate buildings...

Страница 4: ...ipment generates uses and can radiate radio frequency energy and if not installed and used in accordance with the instructions may cause harmful interference to radio communications However there is n...

Страница 5: ...sible Also you will be advised of your right to file a complaint with the FCC if you believe it is necessary The Telephone Company may make changes in its facilities equipment operations or procedures...

Страница 6: ...ent is in need of repair contact your local sales representative service representative or distributor directly CANADA EMI NOTICE This Class B digital apparatus meets all requirements of the Canadian...

Страница 7: ...r 2 Hardware Installation and PC Setup 17 Overview 17 Connecting the Hardware 17 Configuring Your Computer 19 Windows XP 20 Windows 2000 22 Windows ME 23 Windows 95 and Windows 98 24 Windows NT 4 0 24...

Страница 8: ...7 DMZ Host 48 Firewall 49 IP Filtering Outgoing 49 IP Filtering Incoming 50 Firewall MAC Filtering 52 Parental Control 53 Port Mapping 55 Quality of Service 56 Routing Default Gateway 57 Routing Stati...

Страница 9: ...Guide 9 View System Log 72 Configure System Log 72 TR 069 Client 74 Internet Time 74 Access Control Services 75 Access Control IP Addresses 75 Access Control Passwords 76 Update Software 77 Reboot Rou...

Страница 10: ...10 6212 I3 4 Port Router User s Guide 6212 A2 ZB83 20...

Страница 11: ...lains how to use the web interface to obtain statistics and other information about the router Chapter 4 Quick Setup Describes the Quick Setup configuration process Chapter 5 Advanced Setup Describes...

Страница 12: ...12 6212 I3 4 Port Router User s Guide 6212 A2 ZB83 20...

Страница 13: ...sy to use configuration program accessible through a standard web browser System Requirements In order to use the 6212 ADSL router for Internet access you must have the following z ADSL service subscr...

Страница 14: ...dicators that show the status of the unit Figure 1 Front Panel LEDs Table 1 Front Panel Label and LEDs Sheet 1 of 2 Label Color Function xDSL LNK Green On ADSL link is established Flashing ADSL link i...

Страница 15: ...nnected Off ADSL is connected POWER Green On Unit is powered on Off Unit is powered off Table 1 Front Panel Label and LEDs Sheet 2 of 2 Label Color Function Table 2 Rear Panel Labels and Connectors La...

Страница 16: ...Introduction 16 6212 I3 4 Port Router User s Guide 6212 A2 ZB83 20...

Страница 17: ...r switches are turned off 2 Use the provided modular phone cable to connect the LINE jack of the router to your RJ11 wall jack 3 Use the provided Ethernet cable to connect your computer to the router...

Страница 18: ...Solid green to indicate that the device is turned on If this light is not on check if the power adapter is attached to the router and plugged into an AC power source xDSL ACT Solid green to indicate...

Страница 19: ...192 168 1 1 If you know the version of Windows that you use go to the appropriate section below to learn how to set the IP address of your PC To determine the version of Windows running on your PC cl...

Страница 20: ...e Network Connections icon 3 In the LAN or High Speed Internet window right click on the icon corresponding to your network interface card NIC and select Properties Often this icon is labeled Local Ar...

Страница 21: ...7 Local Area Connection Properties Windows XP 5 In the Internet Protocol TCP IP Properties dialog box click on the radio button labeled Use the following IP address Type an address between 192 168 1 3...

Страница 22: ...operties The Local Area Connection Properties dialog box display a list of currently installed network components If the list includes Internet Protocol TCP IP the protocol has already been enabled sk...

Страница 23: ...n the Network icon and then select Properties The Network Properties dialog box displays a list of currently installed network components If the list includes Internet Protocol TCP IP the protocol has...

Страница 24: ...list box 6 Click on OK to return to the Network dialog box and then click on OK again You may be prompted to install files from your Windows 95 98 installation CD Follow the instructions to install t...

Страница 25: ...n click on OK if prompted to restart your computer 7 After restarting your PC open the Control Panel window and then double click on the Network icon 8 In the Network dialog box click on the Protocols...

Страница 26: ...d in Configuring Your Computer on page 19 2 Enter your user name and password and then click on OK to display the home page of the router s web interface There are two default user name and password c...

Страница 27: ...Logging in to Your Router 6212 A2 ZB83 20 6212 I3 4 Port Router User s Guide 27 Figure 10 Web Interface Home Page...

Страница 28: ...Hardware Installation and PC Setup 28 6212 I3 4 Port Router User s Guide 6212 A2 ZB83 20...

Страница 29: ...INFORMATION Status Summary Display the general status report for the router by clicking on Summary under Device Info Figure 11 Figure 11 Status Summary WAN Display the WAN status report from the by cl...

Страница 30: ...nection is configured the screen looks like Figure 13 Figure 13 WAN Status with WAN Connection LAN Statistics Display LAN statistics by clicking on LAN under Statistics Figure 14 Figure 14 LAN Statist...

Страница 31: ...Router User s Guide 31 Figure 15 WAN Statistics ATM Statistics Display ATM statistics by clicking on ATM under Statistics Figure 16 Figure 16 ATM Statistics ADSL Statistics Display ADSL statistics by...

Страница 32: ...etermines the quality of the ADSL connection The test is performed by transferring idle cells containing a known pattern and comparing the received data with this known pattern to check for any errors...

Страница 33: ...2 A2 ZB83 20 6212 I3 4 Port Router User s Guide 33 Figure 18 ADSL BER Test Start Figure 19 ADSL BER Test Result Route Obtain the Routing status report by clicking on the Route item under Device Info F...

Страница 34: ...evice Information 34 6212 I3 4 Port Router User s Guide 6212 A2 ZB83 20 Figure 20 Route Information ARP Display the ARP status report by clicking on ARP under Device Info Figure 21 Figure 21 ARP Statu...

Страница 35: ...tomatically detect the first usable PVC and automatically detect PPPoE PPPoA and Bridge Protocol with DHCP Server available To use auto connect 1 Select Quick Setup The Quick Setup initial screen appe...

Страница 36: ...etecting available PVC Available PVC Detected Quick Setup with Auto Connect Disabled 1 Select Quick Setup The Quick Setup initial screen appears 2 Verify that DSL Auto Connect is not selected Entry bo...

Страница 37: ...ng VPI and VCI 4 Click on Next The Connection Type screen appears Figure 26 Connection Type 5 Select the protocol and encapsulation type required by your ISP 6 Click on Next Further parameters for the...

Страница 38: ...uide 6212 A2 ZB83 20 Figure 27 PPP Username and Password 7 Click on Next The Network Address Translation Settings screen appears Figure 28 NAT Settings 8 Enter the settings specified by your ISP and c...

Страница 39: ...DHCP server and enter the range of IP addresses that the DHCP server can assign to your computers Disable the DHCP server if you would like to manually assign IP addresses If you have a second IP add...

Страница 40: ...Quick Setup 40 6212 I3 4 Port Router User s Guide 6212 A2 ZB83 20 Figure 30 WAN Setup Summary...

Страница 41: ...y your ISP Figure 31 WAN Setup Screen Add Function ATM PVC Configuration If you want to add a new rule for the WAN interface click on the Add button The ATM PVC Configuration screen appears The ATM PV...

Страница 42: ...h as data transfer messaging distribution and retrieval and remote terminal applications such as telecommuting CBR Constant Bit Rate Used by applications that require a fixed data rate that is continu...

Страница 43: ...TM PVC that your ISP has instructed you to use then click on Next button Figure 33 Connection Type Screen 2 Select a connection type and click on Next In this example the Bridge Service screen appears...

Страница 44: ...n to make any modifications If you want to change any item after saving click on the Edit button to make any modifications Figure 35 WAN Setup Summary 2 Activate this WAN interface by clicking on the...

Страница 45: ...e the DHCP server and enter the range of IP addresses that the DHCP server can assign to your computers Disable the DHCP server if you would like to manually assign IP addresses The Save button only s...

Страница 46: ...u can select a Service or make new one Enter the Server IP Address then click on Save Apply to submit your configuration Figure 39 Virtual Server Add Screen On this screen you can view and delete serv...

Страница 47: ...g Selected Virtual Servers Port Triggering Click the on the Add button to add Port Triggering for your Internet application Figure 41 Port Triggering Setup Page You can select an application every tim...

Страница 48: ...age On this screen you can view and delete applications Click in the check box under Remove and click on the Remove button to delete selected applications Figure 43 Port Triggering List DMZ Host You c...

Страница 49: ...gured only from the LAN side of the router IP Filtering Outgoing The outgoing filter will block the traffic from the LAN side to the WAN side Click on Add to create filters Figure 45 IP Filtering Outg...

Страница 50: ...ering Outgoing Filter Add Page You can view and delete the outgoing filter settings on this screen Figure 47 IP Filtering Outgoing Filter Setup List IP Filtering Incoming Incoming filter filters the t...

Страница 51: ...ilter name information about the source address from the WAN side and information about the destination address to the LAN side Select the protocol and WAN interface Then click on Save Apply to add th...

Страница 52: ...ltering can forward or block traffic by MAC address You can change the policy or add settings to the MAC filtering table using the MAC Filtering Setup screen Figure 51 IP Filtering MAC Filtering Setup...

Страница 53: ...lect protocol type frame direction and WAN interface Then click on Save Apply to save it Figure 53 IP Filtering MAC Filtering Add Page On this screen you can view and delete MAC filtering rules Figure...

Страница 54: ...ontrol Time of Day Restrictions 2 Enter a User Name to identify the target of the restrictions 3 Enter the MAC address of the network adapter to be restricted and optionally another MAC address 4 Sele...

Страница 55: ...an independent network Figure 57 Port Mapping To create a new mapping group 1 Click on Add The Port Mapping Configuration screen appears Figure 58 Creating a Port Mapping Entry 2 Enter a unique Group...

Страница 56: ...reen appears To add a rule 1 Give a name to this traffic class 2 Assign a priority level low medium and high to this traffic class 3 Select an IP precedence from the range of 0 7 4 Enter an IP Type of...

Страница 57: ...er User s Guide 57 Figure 60 Quality of Service Add Screen Routing Default Gateway You can change the Default Gateway on the Routing Default Gateway screen By default the Enable Automatic Assigned Def...

Страница 58: ...l use Click on Save Apply to save the settings If you add or change the default gateway address you must reboot the router to put the new default gateway IP address into effect Figure 62 Default Gatew...

Страница 59: ...e 59 Figure 64 Static Route Add Routing RIP If RIP is enabled the router operation can be configured as Active or Passive Figure 65 RIP Setup DNS Server Use the DNS Server screen to request automatic...

Страница 60: ...er User s Guide 6212 A2 ZB83 20 Figure 66 DNS Setup Dynamic DNS Use the Dynamic DNS screen to alias a dynamic IP address to a static hostname allowing your router to be easily accessed from anywhere o...

Страница 61: ...der from the drop down list 3 Enter the Hostname you have selected for the interface 4 Select the router Interface from the drop down list 5 Enter the information you used to register with the dynamic...

Страница 62: ...ttings unless so directed by your ISP To view the DSL Advanced Settings screen click on the Advanced Settings button on the DSL Settings screen see Figure 69 There are five test modes between the rout...

Страница 63: ...vanced Settings screen see Figure 70 The frequency band of ADSL is split up into 256 separate tones each spaced 4 3125 kHz apart With each tone carrying separate data the technique operates as if 256...

Страница 64: ...s can be stored You can add a certificate either by creating a new one or importing an existing one from a location where one is stored Note Certificates are used with TR 069 Firmware that does not su...

Страница 65: ...ws you to run diagnostic tests to check your DSL connection The screen shows test results for three connections z Connection to your local network z Connection to your DSL service provider z Connectio...

Страница 66: ...Diagnostics 66 6212 I3 4 Port Router User s Guide 6212 A2 ZB83 20...

Страница 67: ...your router can be backed up to a file and also can be restored from a file You can also restore the router to its factory default configuration Backing Up Configuration Settings To back up your sett...

Страница 68: ...anagement 68 6212 I3 4 Port Router User s Guide 6212 A2 ZB83 20 Figure 75 Backup Settings Upload Confirmation Select the location where you want to save the file Figure 76 Backup Settings File Locatio...

Страница 69: ...ettings To restore saved settings select Management Settings Restore User Settings Figure 77 Restore User Settings Screen Select the backup file you want to restore and click on Update Settings Figure...

Страница 70: ...n Restoring Default Settings Restore Default will erase all current settings and restore the router to factory default settings To restore the router to factory default settings select Management Sett...

Страница 71: ...gure 81 Restore Default Confirmation Dialog The router will restore the default settings and reboot Figure 82 Restore Default Settings Reboot System Log The System Log dialog allows you to view the Sy...

Страница 72: ...log selected events Emergency Alert Critical Error Warning Notice Informational and Debugging All events above or equal to the selected log levels will be logged maintained in the system log file and...

Страница 73: ...System Log 6212 A2 ZB83 20 6212 I3 4 Port Router User s Guide 73 Figure 85 System Log Configuration Select the desired values and click on the Save Apply button to configure the system log options...

Страница 74: ...tion You must click on the Save Reboot button for the change to take place Firmware versions that support TR 069 do not support SNMP Internet Time Use the Internet Time screen to specify whether the r...

Страница 75: ...ices You can enable or disable some services of your router by LAN or WAN If no WAN connection is defined only the LAN side can be configured Figure 87 Services Setup Access Control IP Addresses Web a...

Страница 76: ...cal management services enter the IP address in the box and click on the Save Apply button Figure 89 Access Control IP Address Add Screen Access Control Passwords Use Access Control Passwords to chang...

Страница 77: ...ton to locate the image file 3 Click on the Update Software button once to upload the new image file Figure 91 Update Software Note The update process takes about two minutes to complete and your rout...

Страница 78: ...Management 78 6212 I3 4 Port Router User s Guide 6212 A2 ZB83 20...

Страница 79: ...C Storage Temperature 4 F to 149 F 20 C to 65 C Humidity 5 to 95 non condensing Interfaces DSL Line RJ11 Ethernet 10 100BaseT RJ45 Power 100 VAC 50 Hz 110 VAC 60 Hz 220 VAC 50 60 Hz Protocol Support A...

Страница 80: ...Specifications 80 6212 I3 4 Port Router User s Guide 6212 A2 ZB83 20...

Страница 81: ...uring PC 19 System Log 72 Connecting Hardware 17 Connection Type 43 D Default Gateway 57 Default IP Address 19 Definitions 13 Device Information 29 Diagnostics 65 Dimensions 79 DMZ Host 48 DNS 59 Dyna...

Страница 82: ...ephone Network 4 O Operating Environment 79 P Parental Control 53 Parts List 14 Password Access Control 76 Default 26 PC Setup 17 Port Mapping 55 Port Triggering 47 Power Specifications 79 Supply 17 P...

Страница 83: ...irements 13 T Test BER 32 DSL Connection 65 Time 74 Tone Selection 63 U Update Software 77 User Name Default 26 V View System Log 72 Virtual Servers 45 W WAN 29 41 Setup 44 Statistics 30 Status 29 Web...

Страница 84: ...84 6212 I3 4 Port Router User s Guide 6212 A2 ZB83 20...

Отзывы: