background image

23

zhiyun-tech.com

24

zhiyun-tech.com

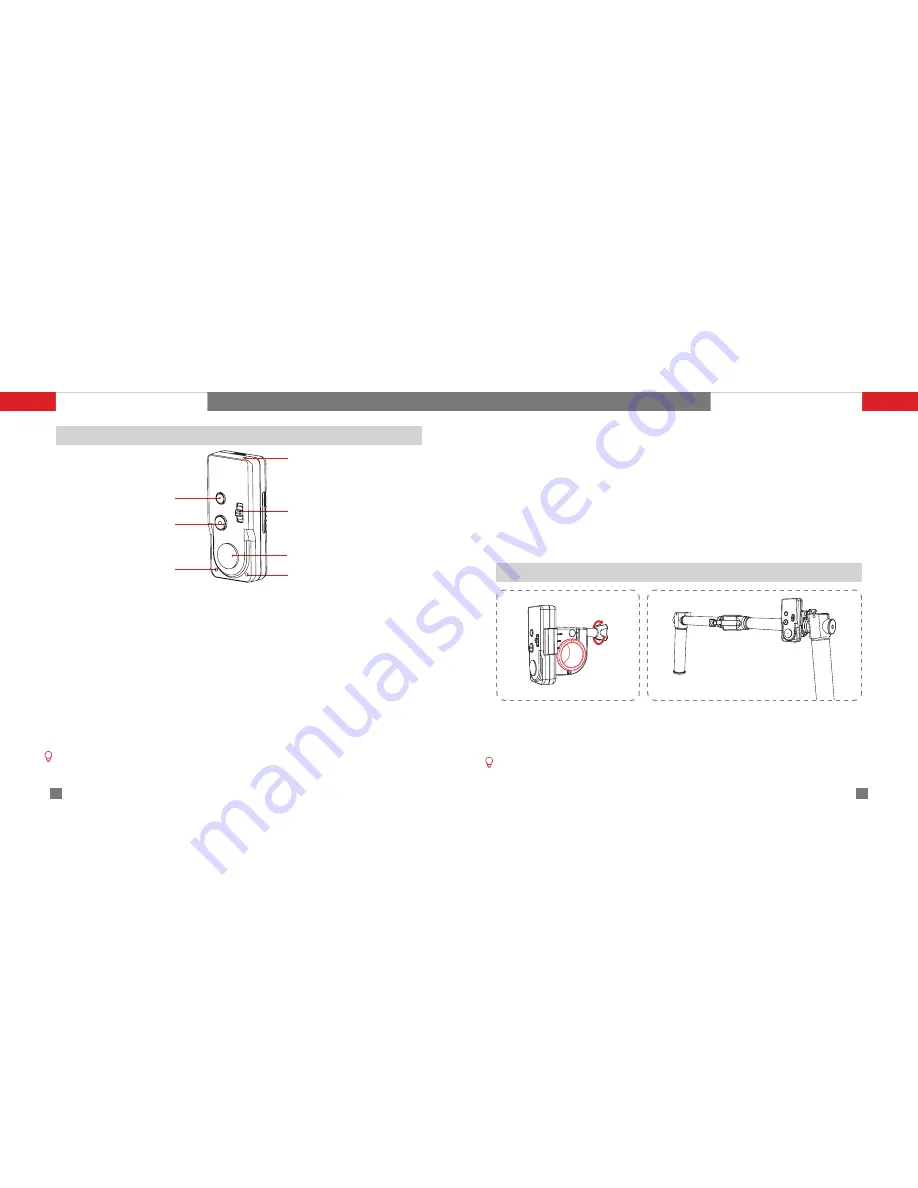
ZW-B02 Wireless Remote Control(purchase separately)

MODE Button

Charging Indicator

Power/Shutter 

(Dual-function button)

Shifter Lever

Bluetooth Indicator

Joystick

Power Level Indicator

Mounting Method

1.  Loosen the thumb screw on the 

back of the remote controller to 
let loose of the rubber case (as 
marked red in the Figure).

2.  Install the remote controller to the extension rod or 

dual handle for convenient operations (as shown in 
the Figure above). Fasten up by tightening the thumb 
screw on the back.

The remote controller turns off automatically when left idle for 2 minutes.

Specifications:

Charging voltage: 5V
Charging current: 100mA

Theoreticalworktime:≥ 30hr.

Built-in Polymer lithium battery capacity: 150mAh
Emission and received current: 11.9mA
Operating current: 4.2mA
Effective control distance: 10m /394 inch
(without blockage)

Bluetooth Indicator

No connection: Continuous flashing.
Connected: Shines solid light.

Power Level Indicator

90%-100%: quick flash for 4 times each second. 
75%-90%: quick flash for3 times each second. 
55%-75%: quick flash for2 times each second. 
30%-55%: quick flash for1 time each second. 
0%-30%: quick flashing.

Charging Indicator

Charging: 

RED light.

Charging complete: 

GREEN light.

ON/OFF & Video (Two-step shutter-release button)

1.  Fully press the button for over 1sec. to turn on the remote control and enter master mode by 

default.

2.  Fully press the button for over 1s, when it is on to turn off the remote control (the indicator 

switches off accordingly)

3.  While stabilizer is connected to the camera: Under Photo mode, press the shutter button 

halfway down to focus then fully press it to take the shot; Quickly double press the button (fully 

press) to switch between Video and Photo mode.

Button Combinations

Power Toggle: While powering on, push the toggle in the W direction to enter into Slave 

mode to upgrade the remote control firmware via the phone (First download the “ZY Play” App 

and then update).

Power  Mode Button: Press the mode button and power button at the same time to pair 

the nearest stabilizer via bluetooth.

Mode button:

 Mode selection (sharing the same feature with gimbal)

Joystick:

 Directional control (sharing the same feature with gimbal)

Toggle:

 To zoom in/out.

Proper camera cable connection is required to control the camera. Some remote control features 

may not be supported for some camera models.

Usage of Main Accessories

Usage of Main Accessories

Содержание CRANE

Страница 1: ...Crane Plus User Guide ...

Страница 2: ...Guilin Zhishen Information Technology Co Ltd ...

Страница 3: ...s 8 Camera Installation 9 Balance Adjustment 11 Start Up 14 Introducing Gimbal Control Modes 16 Initialization and Various Operations 17 APP Operations 19 Usage of Main Accessories 21 Product Specifications 27 Operation guide on motor torque adjustment 28 Warranty Card 29 Contact Card 31 Contents ...

Страница 4: ...ve read this document carefully and that you understand and agree to abide by the terms and conditions herein You agree that you are solely responsible for your own conduct while using this product and for any consequences thereof You agree to use this product only for purposes that are proper and in accordance with all terms precautions practices policies and guidelines ZHIYUN has made and may ma...

Страница 5: ...h water chemical decomposition may occur potentially resulting in the battery catching on fire and may even lead to an explosion 2 If the battery falls into water with the stabilizer during use take it out immediately and put it in a safe and open area Maintain a safe distance from the battery until it is completely dry Never use the battery again and dispose of the battery properly as described i...

Страница 6: ...re batteries in a dry environment 4 Do not leave the battery unused for too long after it has been completely discharged to prevent over discharge of battery which may result in battery damage and permanent failure Battery Maintenance 1 Never use the battery when the temperature is too high or too low 2 Do not store the battery in any environment with a temperature of over 60 C Transportation Noti...

Страница 7: ...ly Status Indicator Light Micro USB Port 5V power input Before using Crane Plus for the first time please fully charge the batteries to activate and ensure normal operation by using the charger that comes in the package Name 26500 Li ion battery charger Model ZC 26500 Input voltage DC 5V 2400mA Output voltage DC 4 2V 1200mA 2 Shines solid RED light when charging Shines BLUE light when fully charge...

Страница 8: ...tain camera models balance should be adjusted after access to Bottom Up mode When the motor arm is pulled to an extreme extent in case of big lens mounting Bottom Up Holding Gesture may not be supported 1 1 2 2 3 4 Mount the camera in parallel with the mounting plate match the 1 4 Threaded Hole at the bottom of the camera with the empty slot of the mounting plate Move the camera as close as possib...

Страница 9: ...balance Once the camera can stay still and almost level with its lens facing front complete this step by tightening up the Camera Mounting Screw Firstly loosen Thumb Screw rotate for 3 times Adjust the Tilt Axis until the camera can stay still with the lens facing up i e the camera stays still and vertical to the ground complete this step by tightening up Thumb Screw Loosen Thumb Screw Adjust the ...

Страница 10: ...hen a SONY camera is connected Push the Shifter Lever in T direction to zoom out and in W direction to zoom in In the event when a Panasonic camera is connected Move the Shifter Lever to either direction for focusing Micro USB Port Connects the stabilizer to a computer through a Micro USB cable for on line Mode Button Press for 1 second to enter or exit standby mode Single press to switch between ...

Страница 11: ...wing mode Single press MODE button in this mode will return to the previous mode 3 Quick press MODE three times and the camera will turn 180 along the pan axis while the active control mode remains unchanged Pan Following Mode Double Press MODE Single Press MODE Single Press MODE Single Press MODE Locking Mode POV Mode Following Mode Single press to return to the previous mode Pan Following Mode T...

Страница 12: ... and long press the Power Button to turn on the stabilizer The motor will generate acting force upon activation hold the camera mounting plate still and long press the Mode Button to enter standby mode 3 Put the stabilizer still on a table surface wait for about 10 sec and the stabilizer will automatically complete initialization If slight deviation can still be found after initialization repeat t...

Страница 13: ......

Страница 14: ...e tilt motor and then connect the other end of the control line to the MULTI port on the camera 4 Power on the stabilizer before turning on the camera otherwise camera remote control may not work How to Use Connection 1 Firstly connect the stabilizer to your PC or smart phone 2 Configure the stabilizer to suits Panasonic in Gimbal Setting Screen then save the settings 3 Connect the Micro USB plug ...

Страница 15: ...ck flash for1 time each second 0 30 quick flashing Charging Indicator Charging RED light Charging complete GREEN light ON OFF Video Two step shutter release button 1 Fully press the button for over 1sec to turn on the remote control and enter master mode by default 2 Fully press the button for over 1s when it is on to turn off the remote control the indicator switches off accordingly 3 While stabi...

Страница 16: ...en the screws on the handles 3 Unscrew the fixing clamp in the middle of the handles take out the protection ring and insert it into the stabilizer 4 Clip the fixing clamp onto the stabilizer with the protection ring and then tighten the screws of the fixing clamp Clip onto the area as marked RED above Top down gesture Bottom up gesture Usage of Main Accessories Usage of Main Accessories ...

Страница 17: ... 1 The motor force of the stabilizer needs to be adjusted 3 levels to adapt the stabilizer to cameras and lens of different weight for ideal use Please refer to the connection way on the APP introduction firstly connect the Crane by ZY PLAY then choose the suitable strength to set up the motor force in ZY PLAY correctly Adjustment method 2 1 Download the calibration upgrade tool and USB driver fro...

Страница 18: ... how long an implied warranty lasts so the above warranty term may not apply to you This warranty does not apply to the followings 1 Products subjected to unauthorized repair misuse collision neglect mishandling soaking accident and unauthorized alteration 2 Products subjected to improper use or whose labels or security tags have been torn off or altered 3 Products whose warranty has expired 4 Pro...

Страница 19: ...est version from www zhiyun tech com This document is subject to change ZHIYUN is a trademark of ZHISHEN Copyright 2017 ZHISHEN All rights reserved Tel 86 773 2320856 Web www zhiyun tech com E mail service zhiyun tech com Address Creative Industrial Park GuiMo Road QiXing District Guilin 541004 Guangxi China Contact Card Youku Youtube Wechat Facebook Google Vimeo Weibo Website ...

Страница 20: ...V1 01 ...

Отзывы: