


TROUBLESHOOTING
Before you contract your local service center, please read the following tips carefully.
NOTE: if the antenna is covered with snow or on the RF signal is weakened by heavy rain,
the quality of audio an video may become temporarily poor. If you experience poor audio
and video quality due to bad weather conditions, please check if your satellite antenna is
oriented in the original direction. And see if it is covered by snow. Also, check if your LNB
is not damaged.
1.No video on TV
Check first if the product is powered on and in operation mode.
Check if the video cable is properly connected between TV and ZGEMMA H9S.
Check if the satellite cable is properly connected to ZGEMMA H9S.
Check if the selected channel is currently on air.
Check if the selected channel is encrypted and if you have a corresponding access smartcard.
2.Problem with audio quality
Check if your audio cable is connected correctly.
Check the volume level of your TV and the product.
Check if the product or TV and the product.
Check if the product or TV is on mute.
Check the audio option if it is correctly selected for the program that you are currently watching.
3.Remote control problem
Check if the batteries are correctly mounted.
If your remote control has been used for long, change the batteries.
Point the remote control directly toward the product.
Make sure that nothing blocks the front panel display.
4.Channel search problem
Make sure if tuner configurations are all correctly made.
Check if the antenna cable(s) are properly connected.
5.Encrypted channel viewing problem
Check if you have the appropriate Smartcard and/or CAM.
Take the Smartcard and CAM out and re-insert them to re-initilize.
Check if your system correctly detects the smartcard and CAM.
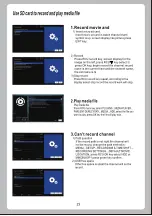
6.Recording problem
Check if the HDD has a sufficient space for recording.
Check if there is a conflict between recording timer.
7.Noise
When HDD is running, you may hear a noise.
26
Содержание H9S
Страница 1: ...BC 4510H10011...
Страница 2: ...ZGEMMA H9S 4K HEVCAdvanced Linux STB MENU INFO H9S 4K UHD...
Страница 3: ......
Страница 4: ...H9S...
Страница 5: ...ZGEMMA H9S...
Страница 6: ...ZGEMMA H9S MENU INFO H9S 4K UHD...
Страница 11: ...Ethernet ZGEMMA H9S ZGEMMA H9S ZGEMMA H9S 1Gbit USB 3 0 HDMI 2 0 output 7...
Страница 12: ...ZGEMMA H9S ZGEMMA H9S ZGEMMA H9S ZGEMMA H9S...
Страница 14: ...o ZGEMMA H9S...
Страница 15: ......
Страница 16: ......
Страница 17: ......
Страница 18: ...ZGEMMA H9S...
Страница 19: ...ZGEMMA H9S...
Страница 20: ...ZGEMMA H9S ZGEMMA H9S ZGEMMA H9S ZGEMMA H9S ZGEMMA H9S ZGEMMA H9S M3U etc...
Страница 21: ...ZGEMMA H9S ZGEMMA H9S ZGEMMA H9S ZGEMMA H9S ZGEMMA H9S ZGEMMA H9S...
Страница 22: ...ZGEMMA H9S ZGEMMA H9S...
Страница 23: ...ZGEMMA H9S ZGEMMA H9S ZGEMMA H9S ZGEMMA H9S ZGEMMA H9S...
Страница 24: ...Scan Tuner A DVB S2X...
Страница 25: ...ZGEMMA H9S Here you have two options between DVB S and DVB S2 5 Modulation Select 64QAM or 256 QAM Auto...
Страница 26: ......
Страница 28: ......
Страница 29: ......
Страница 31: ......
Страница 32: ......
Страница 33: ......


