background image

8

Set Up

Installing a Micro SD Card


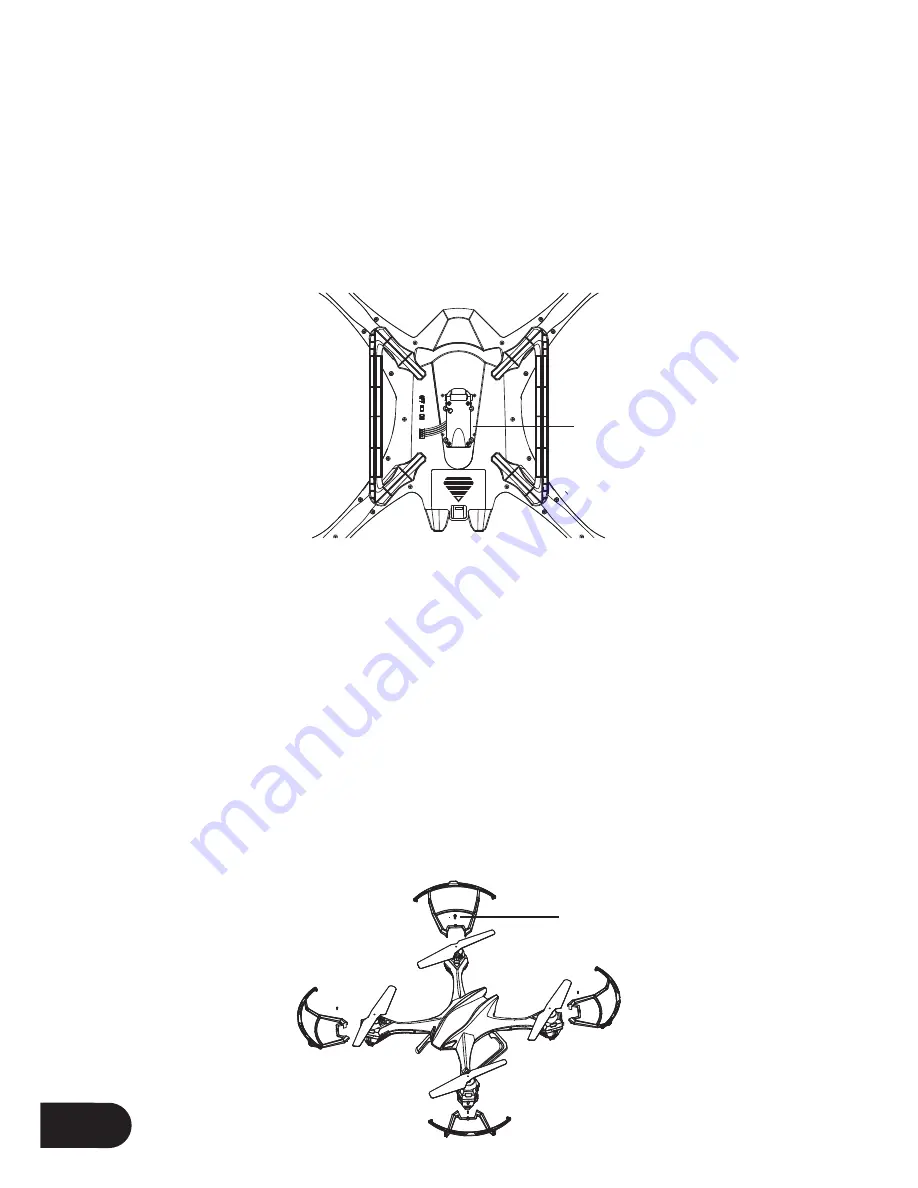
With the Spectre drone upside down and facing away from you, insert the 

    Micro SD Card (Micro SD Card not included) into the side of the camera 
    ensuring that the text side of the Micro SD Card is facing up.


Gently press the card in until you hear the lock click into place.

Rotor Guards


Rotor Guards are an optional itting on the Spectre drone, however for 


    safety reasons we strongly advise you to attach them. Whether Rotor  
    Guards are attached or not, please be very careful when handling the drone.  
    To avoid injury, do not touch the drone while the blades are turning or the 
    remote control is powered on.


Line up the guide pegs on the Rotor Guards with the holes on the arms  

    of the Spectre drone so that the screw in the Rotor Guard matches up  
    with the screw hole in the Spectre drone.


Firmly press the Rotor guard into position inserting one peg at a time.


Insert the included screws into the screw holes and use the included 

    screwdriver tighten the screws making sure not to over tighten.

Micro SD Card Slot

1.7*6PB Screw

Содержание Spectre ZXSPT

Страница 1: ...USER MANUAL PRODUCT CODE ZXSPT www zero x com au www zero x co nz SPECTRE DRONE...

Страница 2: ......

Страница 3: ...your Zero X Spectre drone Included in the package contents of your Zero X Spectre drone are the Australian CASA guidelines please carefully read and understand this information as operating a drone o...

Страница 4: ...iately to any potential problems that may occur Do not charge the battery in temperatures hotter than 40 C or colder than 0 C After each light or crash please check battery for any damage or swelling...

Страница 5: ...3 Package Contents 2 7 8 1 Spectre Drone 2 Remote Control 3 Spare Rotor Blades 4 Drone Battery 5 Drone Charger 6 Rotor Guards 7 Manual 8 Screwdriver 1 4 5 3 6...

Страница 6: ...Drone Diagram 8 5 3 6 6 7 7 6 6 4 3 Battery 4 Camera 5 Micro SD Card Slot 6 LED Lights 7 Feet 8 Power Switch Micro SD Card not included Under Side View 1 1 2 2 1 Front Rotor Blades 2 Rear Rotor Blades...

Страница 7: ...ck Pitch Roll 4 Yaw Trim Controller 5 Roll Trim Controller 6 Pitch Trim Controller 7 Video Button 8 Photo Button 9 Speed Button 10 Flip Button 11 Stunt Mode 12 LED Lights Control 13 Power Indicator 14...

Страница 8: ...6 Remote Control LCD Screen Diagram 1 Connection Strength 2 Yaw Trim Balance 3 Roll Trim Balance 4 Pitch Trim Balance 5 Acceleration 6 Light Indicator 7 Speed Mode 8 Battery 2 3 1 7 8 6 4 5...

Страница 9: ...the Spectre drone low battery will be indicated when the remote control starts beeping and the lights on the Spectre drone start lashing When using a Wall charger please ensure that only an Australian...

Страница 10: ...to attach them Whether Rotor Guards are attached or not please be very careful when handling the drone To avoid injury do not touch the drone while the blades are turning or the remote control is pow...

Страница 11: ...ty Before lying your Spectre drone make sure that you are in a safe setting CASA restrictions regarding lying drones require the drone be no closer than 5 5kms from any airport or airield whilst lying...

Страница 12: ...leration Yaw 2 in the lowest down position power on the remote control The remote control should beep once to indicate power up has been successful 4 To activate the connection between the remote cont...

Страница 13: ...on the Spectre drone does not work after following the launching steps please check the following a The Spectre drone battery is fully charged correctly connected and not damaged b The batteries in th...

Страница 14: ...ly up Push down the Throttle Rudder Stick and the drone will ly down Push the Left Rudder Stick to the left or to the right the drone will rotate in the corresponding direction Push the Right Stick to...

Страница 15: ...rol and ly slowly It is advised that beginners use this mode to learn the basics before moving onto the higher mode HIGH SPEED MODE Push the Speed Button 9 once and the Remote Control will beep once a...

Страница 16: ...which is the small switch on the Remote Control to the left of the Right Thumbstick This will balance the forward and back movement of the Spectre drone To trim the Spectre drones roll use the Roll T...

Страница 17: ...pectre drone forward into a forward lip The Stunt Mode can be used to lip the Spectre drone in any direction by pressing the Stunt Mode button 11 and holding the Right thumbstick Pitch Yaw 3 in the de...

Страница 18: ...ght on the camera does not activate try re inserting the SD Micro Card and restarting the Spectre drone Shooting Video To start recording video push the Video Button 7 on the remote control The Light...

Страница 19: ...ations of blades which are labelled A and B If the incorrect blade is used in the incorrect placement the Spectre drone WILL NOT WORK Diferent colour Rotor Blades are used so it is easy to dentify the...

Страница 20: ...tor Blades for Spectre and Rapture drones Black and Red ZXRBSRVP Rotor Blades for Spectre and Rapture drones Value Pack ZXBATSR1K 1000mAh Battery for Spectre and Rapture drones ZXCHSRDR Battery charge...

Страница 21: ...ging This warranty is only valid where you have used the product in accordance with any recommendations or instructions provided by Zero X This warranty excludes defects resulting from alterations of...

Страница 22: ...20...

Страница 23: ......

Страница 24: ...www zero x com au www zero x co nz...

Отзывы: