background image

24

13.3 

GYROSCOPE CALIBRATION

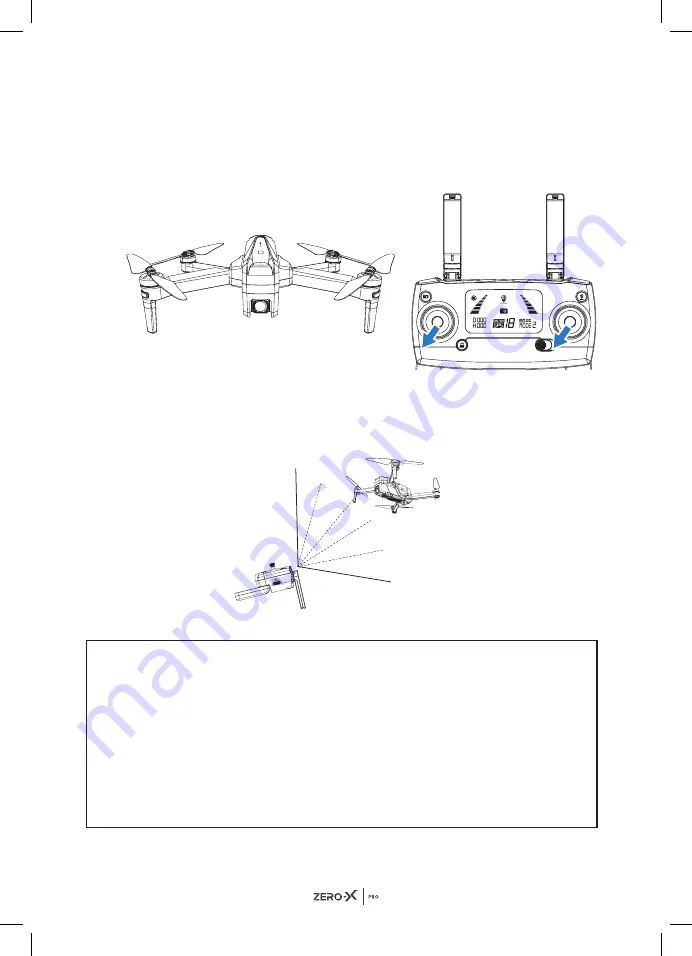
After the drone has finished calibrating, put the drone on flat ground and 
pull both thumb sticks to the bottom left corner together at the same time.
(See picture below for reference). Once the calibration is complete the  
front and rear lights turn from flashing green to solid red at the front and 
yellow at the rear.

13.4 

OPTIMAL TRANSMISSION ZONE

To ensure that your flight experience is as best as possible, make sure that 
your drone is flying in front of your remote control with no obstacles in 
between the drone and remote control. 

NOTE FOR INDOOR FLYING:

•   When flying indoors, please turn off the "GPS switch" of the remote 

control to avoid the drone getting out of control due to the weak GPS 
signal indoors.

•  Optical Flow positioning system is typically activated and useful for  

indoor environments when GPS signal is weak or not available. Optical 
Flow  positioning system works best when the drone is less than 3 
meters from the ground level, as the drone has to continuously scan the 
ground. Please refer to the 

"OPTICAL FLOW"

 part of the manual on 

page 32

.

Содержание Pro Evolved 4K

Страница 1: ...USER MANUAL evolved 4k...

Страница 2: ......

Страница 3: ...1...

Страница 4: ...ETWEEN FLIGHT MODES 14 7 2 LCD SCREEN DISPLAY 14 7 3 CAMERA ANGLE ADJUSTMENT 14 7 4 PHOTO VIDEO CONTROLS 15 7 5 ONE KEY TAKE OFF LANDING 15 7 6 ONE KEY RETURN TO HOME BUTTON 15 7 7 DRONE LOW BATTERY W...

Страница 5: ...3 6 BASIC FLIGHT CONTROLS 25 14 0 BEGINNER MODE 26 15 0 SPEED MODE 27 16 0 HEADLESS MODE 27 17 0 FLY AROUND ME MODE 27 18 0 FOLLOW ME MODE GPS MODE ENABLED 28 19 0 WAY POINT FLIGHT GPS MODE ENABLED 29...

Страница 6: ...takes no responsibility for operation of this product outside of what is legally permissible in your area Do not fly your Evolved 4K Drone any closer than 30 metres from people animals or buildings Ch...

Страница 7: ...5 2 0 PRODUCT CONTENTS 1 Evolved 4K Drone 2 Remote Control 3 Rotor Blades x 4 4 USB AC Wall Charger 5 USB Charging Cable 6 User Manual 7 Small Screw Driver 8 Screws 1 2 6 4 5 3 8 7...

Страница 8: ...amera 9 Rear Light 7 6 8 9 4 3 2 1 5 1 Photo Video 2 Left Thumb Stick Yaw left Right 3 Lock Unlock Button 4 Mobile Phone Holder 5 Return to Home Button 6 Right Thumb Stick Forward Backward left Right...

Страница 9: ...batteries when charging Do not leave batteries in direct sunlight After each flight or crash please check battery for any damage or swelling If the battery is damaged leaking making noise punctured o...

Страница 10: ...ly and charge the battery to avoid unnecessarily losing your drone To keep the battery life as long as possible avoid removing the battery from the charging cable before charging is complete If you ha...

Страница 11: ...Card slot is on the left bottom side of the drone Slot the Micro SD Card into the slot on the left side of the Evolved 4K drone with the Micro SD Card copper contacts facing toward the drone Gently pr...

Страница 12: ...Replace the rotor blade with a replacement blade marking sure to match with motors 4 Firmly press the blade into position making sure that you have aligned the motor stem with the hole in the rotor b...

Страница 13: ...e chipped or broken replace them as this may compromise the flight 5 2 FOLDING UNFOLDING THE EVOLVED 4K DRONE The Evolved 4K can be folded for easy storage and transport The Evolved 4K s arms are desi...

Страница 14: ...oscope calibration mode Front rear lights flash yellow alternatively Drone is in compass horizontal calibration mode Front rear lights flash green alternatively Drone is in compass vertical calibratio...

Страница 15: ...itter needs two charged and working AA batteries to operate Do not mix old and new batteries This may compromise the power of the remote control Do not use a combination of batteries Only use one type...

Страница 16: ...camera within a 90 range by using the gimbal trimmer Adjusting the camera angle can help in obtaining a better aerial experience To tilt the camera upwards scroll the gimbal trimmer to the left in the...

Страница 17: ...de scaled to save space 7 5 ONE KEY TAKE OFF LANDING When you have unlocked your Evolved 4K drone short press the button on the remote control as shown in the picture below The drone will automatical...

Страница 18: ...light glows a solid red and the rear lights are flashing red rapidly this indicates your battery levels are very low you should finish your flight The battery icon on the remote LCD screen will be ac...

Страница 19: ...1 There is too much distance between the drone and the remote control causing the signal to weaken 2 The battery in the drone is removed after connecting to the remote control terminating the connect...

Страница 20: ...K MODE 8 1 THROTTLE MODE SWITCH In Mode 1 the right control stick controls the throttle In Mode 2 the left control stick controls the throttle The factory settings in the remote control are set to Mod...

Страница 21: ...e when it has been completely pulled out This can be found on the top of the remote control between the two antennas 2 Tilt the phone holder towards you about 30 to click in place Note the holder will...

Страница 22: ...rtphone and select the connection named ZXP EVD4K_XXXX XXXX will be your unique drone number Once connected open the ZXP EVD4K App on your smartphone 10 3 CONNECTING TO THE EVOLVED 4K WIFI 1 Go to you...

Страница 23: ...alternative location Tall structures and large metal structures may affect the accuracy of the inbuilt GPS and compass Be sure to fly your drone in appropriate weather conditions it is advised to ref...

Страница 24: ...you turn on the remote control first and then the drone 13 2 CALIBRATING YOUR DRONE To enter into calibration mode you must unlock the drone first To do this pull both thumb sticks to the bottom righ...

Страница 25: ...to solid red on the front lights and yellow on the rear lights NOTE Do not calibrate the drone in an area with strong magnetic fields parking lots or construction sites with underground reinforcement...

Страница 26: ...sure that your drone is flying in front of your remote control with no obstacles in between the drone and remote control NOTE FOR INDOOR FLYING When flying indoors please turn off the GPS switch of t...

Страница 27: ...the strength indicated as on the remote control The drone s front indicator lights will turn solid red and rear indicator lights will turn solid green when the home point is successfully recorded 13 6...

Страница 28: ...o change the orbit radius move the slider to set the desired radius between 5m 50m 4 Return to Home RTH The default factory setting is 15 metres To change this move the slider to set the new RTH altit...

Страница 29: ...is enabled the drone will move in the direction of the remote control regardless of its orientation This makes it easy to bring the drone home when it is far away from you 17 0 FLY AROUND ME MODE Whe...

Страница 30: ...res and maximum 30 metres away from the drone pilot or person who is holding the smartphone that is connected to the drone via GPS 3 Click the follow me icon on your App 4 Swipe right to activate the...

Страница 31: ...rner of the App screen After you have clicked the map a blue circle will appear your location and the drone s current position on the map 2 Please enlarge the map and then press the button on the bott...

Страница 32: ...me button is pressed the drone will gain altitude first and then return home If the drone is not connected with the App Please press the Return to home button on the controller for the drone to safely...

Страница 33: ...on is displayed as on the remote LCD screen a steady beep sound will come from the remote control If your drone is more than 15 metres it will Return to Home automatically If it is within the 15 metre...

Страница 34: ...s weak or not available The vision positioning system works best when the drone is less than 3 metres from the ground 19 3 PHOTO MODE Press the photo button on the remote control or click the photo ic...

Страница 35: ...128GB 20 0 ACTIVATING SEARCH FUNCTION FOR A LOST EVOLVED 4K DRONE 1 Check that your mobile phone has disconnected from the drone s WiFi 2 Click on the Settings button in the app 3 Click on the Flight...

Страница 36: ...s of any spare parts by using the codes in the coupons below There you will be able to find and buy the spare parts listed below Visit www zero x com au www zero x co nz to make your purchase Battery...

Страница 37: ...iler from which it was purchased or if that retailer is part of a National network a store within that chain along with satisfactory proof of purchase The retailer will then return the goods to Direct...

Страница 38: ...free of viruses or other harmful components Zero X also assumes no responsibility for and shall not be liable for any damages caused by viruses that may infect your Zero X drones and accessories compu...

Страница 39: ...goods which pursuant to the Australian consumer law cannot be excluded LIMITATIONS OF ZERO X LIABILITY Under no circumstances will Zero X be liable in any way for any content including but not limited...

Страница 40: ...38 22 0 NOTES...

Страница 41: ...39...

Страница 42: ...40...

Страница 43: ......

Страница 44: ...Capture the skies www zero x com au www zero x co nz Zero X v1 0 2021 All Images Information and Content are Copyright 2021 Directed Electronics Australia Pty Ltd All Rights Reserved...

Отзывы: