Pg 6 of 20
1-800-892-3986
IS2157
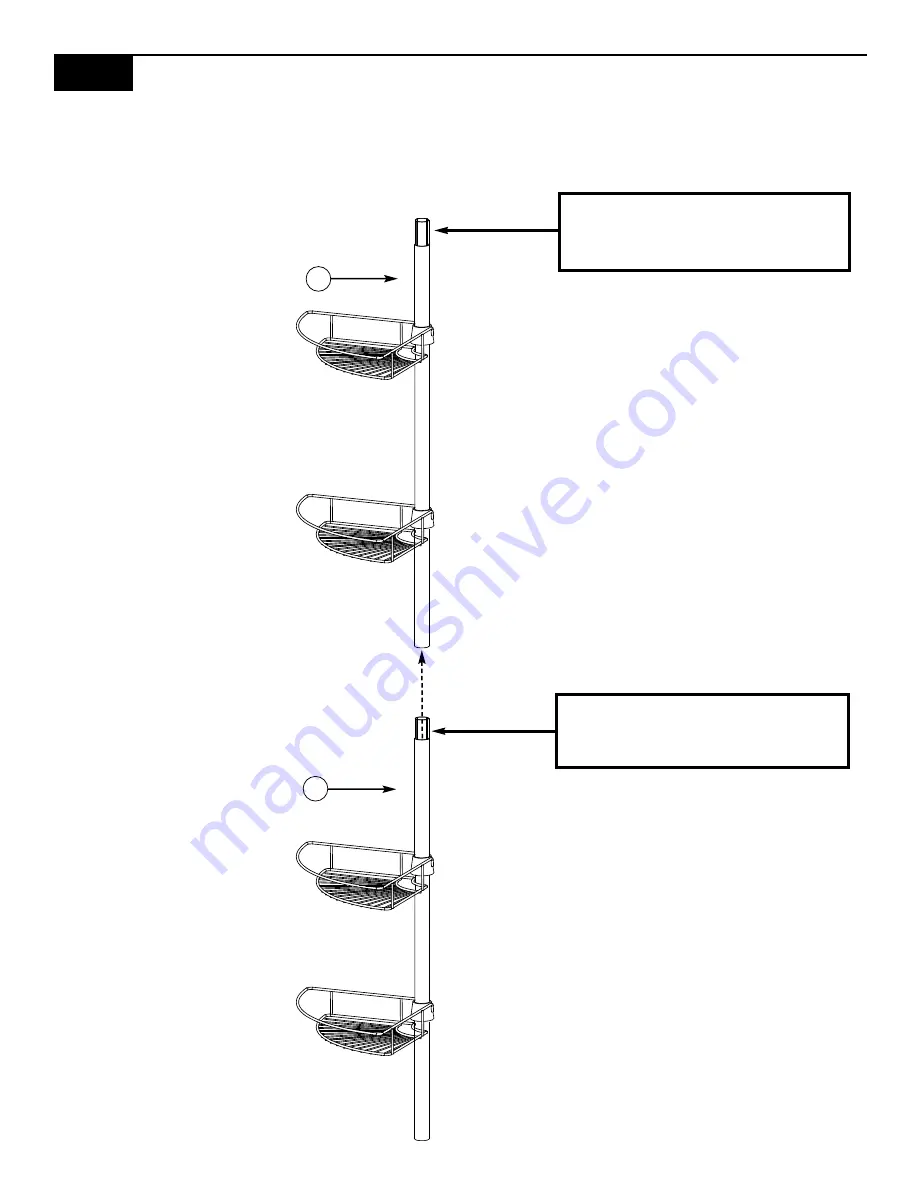
tapered end at the top
1.
Place the tapered end of the medium tube (D) into the untapered end of the long tube (C),as shown.
D
C
STEP 4
Страница 1: ...ETURN TO STORE CALL US FIRST 800 892 3986 customerservice zenith products com SAFETY WARNING Make sure you are installing in a clean dry and safe environment DO NOT STAND ON TUB LEDGE Before You Begin...
Страница 2: ...ls Needed C Long tapered tube x 1 A 3 4 in tube x 1 B Straight tube x 1 spring packed inside J Wedge x 4 G Small end cap x 1 F Spacer x 3 D Medium tapered tube x 1 E Short tapered tube x 1 H Large end...
Страница 3: ...1 800 892 3986 IS2157 fig 1 tub ledge opening height fig 2 shower stall floor opening height 1 Measure the distance between the tub ledge or the shower stall floor to the ceiling to the nearest half i...
Страница 4: ...d Number of Spacers F Used 60 61 5 in D 3 62 64 in C 2 64 5 67 in C 3 67 5 71 in C and E 0 71 5 73 in C and E 1 73 5 75 in C and D 0 75 5 78 in C and D 1 78 5 81 in C and D 2 81 5 84 5 in C and D 3 85...
Страница 5: ...4 1 Place a wedge J tapered or rounded end up on a long tapered tube C approximately half way down 2 Slide a wire shelf I down the tube and fit over the wedge J and repeat the process for another wire...
Страница 6: ...Pg 6 of 20 1 800 892 3986 IS2157 tapered end at the top 1 Place the tapered end of the medium tube D into the untapered end of the long tube C as shown tapered end at the top D C STEP 4...
Страница 7: ...157 1 Place the large end cap H onto the short tapered tube E 2 Place the tapered end of the short tapered tube E into the untapered end of the bottom tube assembly as shown bottom tube assembly taper...
Страница 8: ...ed on your opening height SEE CHART ON PAGE 4 1 Insert the spring stoppers L into the ends of the spring as shown NOTE Spring is packed inside straight tube B 2 Place straight tube B on top of the ass...
Страница 9: ...e straight tube B 3 Slide the 3 4 in tube A through the transition ring K and into the straight tube B as shown 4 Place the tape strips M around the seams of the tubes NOTE After inserting the 3 4 in...
Страница 10: ...ing in a clean dry and safe environment 1 Compress top of the unit against the ceiling in the desired location 2 Move the bottom end into place so that the unit is in a vertical position fig 1 tub led...
Страница 11: ...n piezas llame a nuestro n mero gratuito 1 800 892 3986 entre las 8 00 a m 5 00 p m hora del este de lunes a viernes o cont ctenos a trav s de nuestro sitio web en www zennahome com para solicitar mas...
Страница 12: ...cto x 1 con resorte embutido en su interior tube droit x 1 ressort l int rieur J Cu a x 4 clavettes x 4 G Cubierta terminal peque a x 1 petit embout x 1 F Espaciador x 3 entretoise x 3 D Tubo mediano...
Страница 13: ...pertura plancher de la cabine de douche hauteur de l ouverture 1 Mida la distancia entre el reborde de la ba era o el piso del cub culo de la ducha hasta el cielorraso redondeando a la media pulgada m...
Страница 14: ...5 cm 62 64 po C 2 64 5 67 pulg 164 170 cm 64 5 67 po C 3 67 5 71 pulg 171 5 180 cm 67 5 71 po C y E C et E 0 71 5 73 pulg 181 5 185 5 cm 71 5 73 po C y E C et E 1 73 5 75 pulg 187 190 5 cm 73 5 75 po...
Страница 15: ...NOTA Las repisas se pueden regular desplazando las cu as J hacia arriba o hacia abajo REMARQUE ASSEMBLAGE ILLUSTR POUR L OUVERTURE DE 244 CM 96 PO DE HAUT L assemblage suivant doit tre modifi en fonct...
Страница 16: ...haut 1 Coloque el extremo ahusado del tubo mediano D dentro del extremo no ahusado del tubo largo C como se ilustra 1 Enfilez l extr mit conique du tube moyen D dans l extr mit non conique du tube lon...
Страница 17: ...o est ahusado del ensamble del tubo inferior como se ilustra 1 Enfilez le gros embout H au bout du tube conique court E 2 Enfilez l extr mit conique du tube conique court E dans l extr mit non conique...
Страница 18: ...ciadores F dentro del tubo recto B como se ilustra REMARQUE ASSEMBLAGE ILLUSTR POUR L OUVERTURE DE 244 CM 96 PO L assemblage suivant doit tre modifi en fonction de la hauteur de l ouverture REPORTEZ V...
Страница 19: ...o de 3 4 pulg A dentro del tubo recto B aseg rese de que el aro de transici n K calce con comodidad sobre el tubo recto B 1 Placez le petit embout G sur le tube de 19 mm 3 4 po A 2 Enfilez la bague de...
Страница 20: ...unidad est en posici n vertical REMARQUE assurez vous d installer le produit dans un endroit propre sec et s curis 1 Comprimez le haut de l unit contre le plafond l endroit d sir 2 D placez la sectio...