background image

14 Plasma TV

Installation

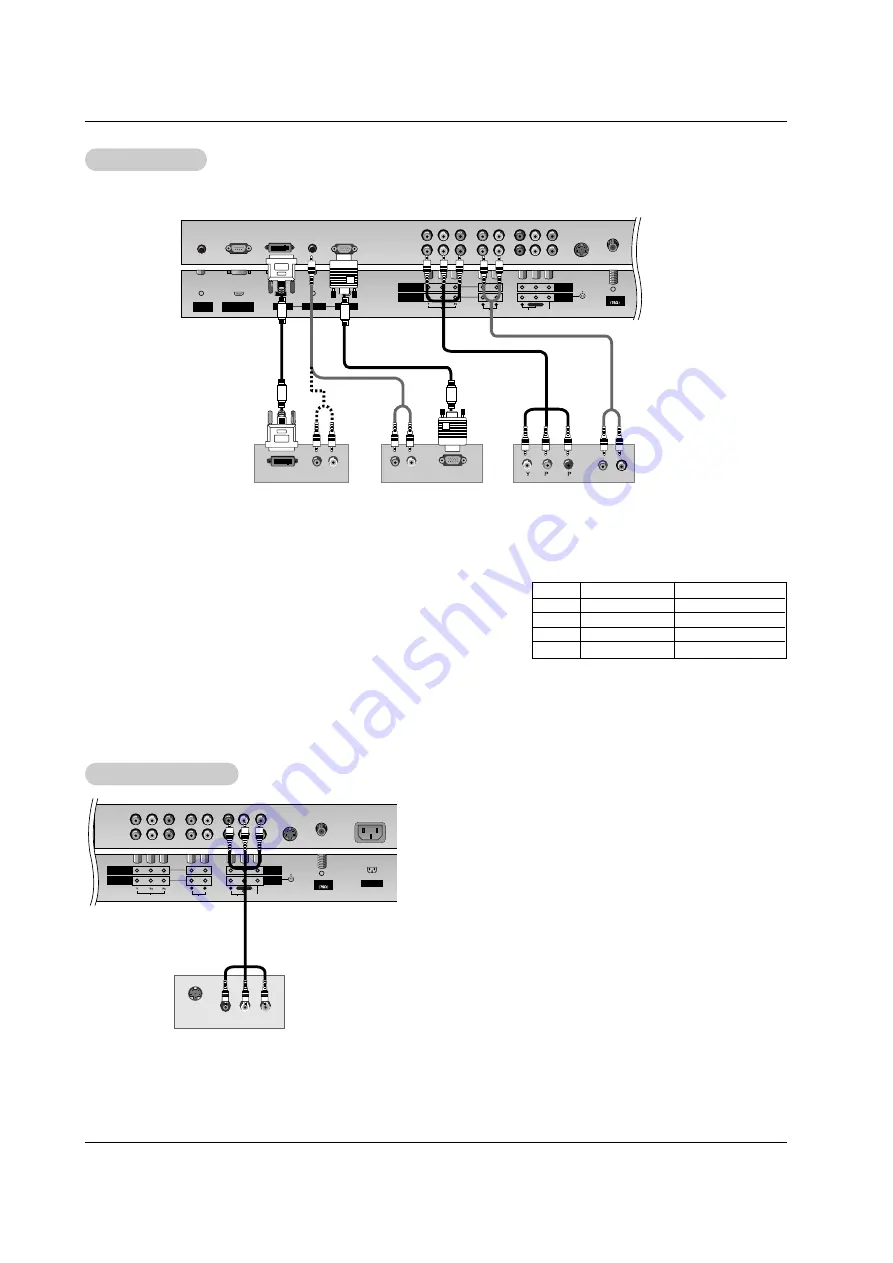
How to connect

Use the TV’s COMPONENT (Y, P

B

, P

R

) INPUT jacks, RGB or DVI port for

video connections, depending on your set-top box connections available.
Then, make the corresponding audio connections.

How to use

1. Turn on the digital set-top box. (Refer to the owner’s manual for the digital

set-top box.) 

2. Use 

TV/VIDEO

or 

MULTIMEDIA

on the remote control to select

Component 1

Component 2

RGB

, or 

DVI

source.

- To watch digitally broadcast programs, purchase and connect a digital set-top box.

DTV Setup

DTV Setup

RGB INPUT

Antenna

AUDIO INPUT

DVI INPUT

S-VIDEO

REMOTE

CONTROL

AUDIO

VIDEO

COMPONENT

INPUT 2

COMPONENT

INPUT 1

MONITOR

OUTPUT

A/V

INPUT 1

R

L

AUDIO

VIDEO

R

RS-232C INPUT

(CONTROL/SERVICE)

L/MONO

B

R

(R) AUDIO (L)

(R) AUDIO (L)

RGB-DTV OUTPUT

(R) AUDIO (L)

DVI-DTV OUTPUT

Digital Set-top Box

or

or

Signal
480i
480p
720p
1080i

Component 1/2

Yes
Yes
Yes
Yes

RGB,DVI

No

Yes
Yes
Yes

The TV has a special signal output capability which allows you to
hook up a second TV or monitor.

Connect the second TV or monitor to the TV’s MONITOR OUTPUT.
See the Operating Manual of the second TV or monitor for further
details regarding that device’s input settings.

NOTE

• Component, RGB, DVI input sources cannot be used for Monitor out.

Antenna

S-VIDEO

AC INPUT

AUDIO

VIDEO

COMPONENT

INPUT 2

COMPONENT

INPUT 1

MONITOR

OUTPUT

A/V

INPUT 1

R

L

AUDIO

VIDEO

R

L/MONO

S-VIDEO

IN

(R) AUDIO (L)

VIDEO

Monitor Out Setup

Monitor Out Setup

Содержание P42W46X - 42" Flat Panel Plasma ED-Ready TV

Страница 1: ... Copyright 2004 LG Electronics USA Inc Installation and Operating Guide Model Numbers P42W46X PLASMA TV ...

Страница 2: ...ned to provide reasonable protection against harmful interference when the equip ment is operated in a residential installation This equipment generates uses and can radiate radio frequency energy and if not installed and used in accordance with the instruction manual may cause harmful interference to radio com munications However there is no guarantee that interference will not occur in a particu...

Страница 3: ...ing of the prod uct should follow the manufacturer s instructions and should use a mounting accessory recommended by the manufac turer 8 Transporting Product A product and cart combination should be moved with care Quick stops excessive force and uneven surfaces may cause the product and cart combination to overturn 9 Attachments Do not use attachments not recommended by the product manufacturer a...

Страница 4: ...ouch dangerous voltage points or short out parts that could result in a fire or electric shock Never spill liquid of any kind on the product 19 Servicing Do not attempt to service this product yourself as opening or removing covers may expose you to dangerous voltage or other hazards Refer all servicing to qualified service per sonnel 20 Damage Requiring Service Unplug this product from the wall o...

Страница 5: ...n Method 25 Low Power 26 Closed Captions 27 Captions 27 Caption Text 27 Screen Menu Features Auto Adjustment 28 Setting Picture Format 28 Screen Position 28 Manual Configure 29 Setting VGA Mode 29 Screen Adjustments 29 Cinema Mode Setup 29 Luminance Noise Reduction 30 Initializing Reset to original factory value 30 Split Zoom 30 Lock Menu Options Parental Lock Setup 31 PIP Picture In Picture Doubl...

Страница 6: ...ia Connect your plasma display to a PC and you can use it for conferencing games and Internet browsing The Picture in Picture feature allows you to view your PC and video images simultaneously Versatile The light weight and thin size makes it easy to install your plasma display in a variety of locations where conventional TVs will not fit The PDP Manufacturing Process a few minute colored dots may...

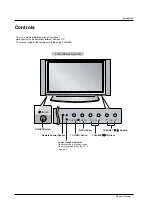
Страница 7: ...l Here shown may be somewhat different from your TV This manual explains the features available on the P42W46X Front Panel Controls Front Panel Controls Remote Control Sensor VOLUME F G Buttons Power Standby Indicator Illuminates red in standby mode Illuminates green when the TV is turned on CHANNEL E D Buttons MENU Button TV VIDEO Button ...

Страница 8: ...lter core along with separate cable Audio Video Input 1 Connect audio video output from an external device to these jacks DVD DTV Input Component 1 2 Connect a component video audio device to these jacks Monitor Output Connect a second TV or Monitor Remote Control Port Connect your wired remote control here S Video Input Connect S Video out from an S VIDEO device to the S VIDEO input Power Cord So...

Страница 9: ...Brings up the main menu to the screen REVIEW Tunes to the last channel viewed NUMBER buttons ARC Changes the picture format PIP INPUT Selects the input source for the sub picture SWAP Exchanges the main sub images PIP DW Switches between PIP and Double Window modes PIPCH PIPCH Changes to next lower higher PIP channel POSITION Moves the sub picture in pip mode SLEEP Sets the sleep timer FCR Use to ...

Страница 10: ...oles on the bracket Install the wall brackets on the wall with 4 bolts not supplied with the product as shown Match the height of the TV brackets and the wall brack ets Check to be sure the brackets are tightened securely Secure the TV assembly to the wall with strong strings or wound wire cables not supplied with the product as shown Owner s Manual 1 5V 1 5V Batteries Power Cord PO W ER MU TE TV ...

Страница 11: ...plit for two TV s install a 2 Way Signal Splitter in the connections If the antenna is not installed properly contact your dealer for assistance Antenna Signal Amplifier Antenna S VIDEO MONITOR OUTPUT A V INPUT 1 AUDIO VIDEO R L MONO Multi family Dwellings Apartments Connect to wall antenna socket Single family Dwellings Houses Connect to wall jack for outdoor antenna outdoor antenna wall antenna ...

Страница 12: ...the S Video cables only the S Video will work VCR Setup VCR Setup Antenna S VIDEO AC INPUT AUDIO VIDEO COMPONENT INPUT 2 COMPONENT INPUT 1 MONITOR OUTPUT A V INPUT 1 R L AUDIO VIDEO R L MONO S VIDEO OUT IN R AUDIO L VIDEO 3 4 OUTPUT SWITCH ANT OUT ANT IN After subscribing to a cable TV service from a local provider you can watch cable TV programming The TV cannot display TV programming unless a TV...

Страница 13: ... TV and connect the DVD audio outputs to the AUDIO INPUT jacks on the TV as shown in the fig ure 2 If your DVD only has an S Video output jack connect this to the S VIDEO input on the TV and connect the DVD audio outputs to the AUDIO INPUT jacks on the TV as shown in the figure NOTE If your DVD player does not have component video output use S Video How to use 1 Turn on the DVD player insert a DVD...

Страница 14: ...ENT INPUT 2 COMPONENT INPUT 1 MONITOR OUTPUT A V INPUT 1 R L AUDIO VIDEO R RS 232C INPUT CONTROL SERVICE L MONO B R R AUDIO L R AUDIO L RGB DTV OUTPUT R AUDIO L DVI DTV OUTPUT Digital Set top Box or or Signal 480i 480p 720p 1080i Component 1 2 Yes Yes Yes Yes RGB DVI No Yes Yes Yes The TV has a special signal output capability which allows you to hook up a second TV or monitor Connect the second T...

Страница 15: ...al RGB simultaneously set the TV to either RGB or DVI the other mode is set to Plug and Play automatically by the TV 3 Then make the corresponding audio connection If using a sound card adjust the PC sound as required How to use 1 Turn on the PC and the TV 2 Turn on the display by pressing the POWER button on the TV s remote control 3 Use TV VIDEO or MULTIMEDIA on the remote control to select RGB ...

Страница 16: ... correctly 2 Press the ON OFF button on the TV At this moment the TV is switched to standby mode Press the TV VIDEO CH D E button on the TV or press the POWER TV VIDEO MULTIMEDIA Number 0 9 button on the remote control and then the TV will turn on Press the ON OFF button on the TV to turn the TV on 1 If the TV was turned off with the ON OFF button on the TV 2 If the TV was turned off with the remo...

Страница 17: ...nnels with Manual Program Redo Auto Program if the Plasma Display is ever moved to another location Auto Program will search for channels only through the ANT IN jack If channels numbers for broadcast over the air TV and cable TV are duplicated where different channels have the same number press the same number but tons again to toggle between For example press 17 to go to the channel press 17 aga...

Страница 18: ...order Favorite Channels Setup Favorite Channels Setup If TV signal reception is poor because you are in a fringe area set Booster to On If the picture condition is good set Booster to Off Adjustments for one channel don t affect the adjustment for other channels Set booster to on or off for each channel separately 1 Press the MENU button and then use D E button to select the CHANNEL menu 2 Press t...

Страница 19: ... use D E button to select the PICTURE menu 2 Press the G button and then use D E button to select ACC 3 Press the G button and then use D E button to select either Cool Preset Normal Default or Warm Preset 4 Press the ENTER button to save Color Color T Temperature Control emperature Control Manual Color Temperature Control ACC set to Off option You can adjust red green or blue to any color tempera...

Страница 20: ... Press the ENTER button to save sRGB only RGB PC DVI PC Modes sRGB only RGB PC DVI PC Modes Use Fleshtone to select the desired skin color option 1 Press the MENU button and then use D E button to select the PICTURE menu 2 Press the G button and then use D E button to select Fleshtone 3 Press the G button and then use F G button to make appropriate adjustments The adjustment range is 0 3 4 Press t...

Страница 21: ...ss the MENU button and then use D E button to select the SOUND menu 2 Press the G button and then use D E button to select A VL 3 Press the G button and then use D E button to select On or Off 4 Press the ENTER button to save A AVL VL Auto V Auto Volume Leveler olume Leveler Sound Menu Options Sound Menu Options CHANNEL PICTURE SOUND TIMER SPECIAL SCREEN PIP DW LOCK Prev Menu On Off DASP BBE AVL G...

Страница 22: ...he primary language is heard from left and right speakers Signal mode is stereo SAP The secondary language is heard from left and right speakers in mono sound 1 Press the MENU button and then use D E button to select the SOUND menu 2 Press the G button and then use D E button to select the desired sound option Balance Treble Bass 3 Press the G button and then use F G button to make appropriate adj...

Страница 23: ...d level at turn on Press the G button and then use D E button to select the channel at turn on 7 Press the ENTER button to save Auto Clock Setup Auto Clock Setup Set the time automatically through the PBS broadcast signal ThePBS channel signal includes information for the current time Set the clock manually if the current time is set incorrectly programed by the auto clock function 1 Press the MEN...

Страница 24: ...e Sleep Timer turns the TV off at the preset time Note that this setting is cleared when the TV is turned off 1 Press the SLEEP button repeatedly to select the number of preset minutes First the Min option appears on the screen followed by the following sleep timer turn off times 10 20 30 60 90 120 180 and 240 minutes 2 When the number of minutes you want is displayed on the screen press the ENTER...

Страница 25: ... period of time 1 Press the MENU button and then use D E button to select the SPECIAL menu 2 Press the G button and then use D E button to select ISM Method 3 Press the G button and then use D E button to select either Normal White wash Orbiter or Inversion Normal If image sticking is never a problem ISM is not necessary set to Normal White wash White Wash removes permanent images from the screen ...

Страница 26: ...then use D E button to select the SPECIAL menu 2 Press the G button and then use D E button to select Low power 3 Press the G button and then use D E button to select On or Off When you select On the screen darkens 4 Press the ENTER button to save CHANNEL PICTURE SOUND TIMER SPECIAL SCREEN PIP DW LOCK Prev Menu On Off Language Key lock ISM Method Low power G Set ID Caption Text Captions ...

Страница 27: ...als normally in the fol lowing situations IGNITION Picture may flutter drift suffer from black spots or horizontal streaking Usually caused by interference from automobile ignition systems neon lamps electrical drills and other electrical appliances GHOSTS Ghosts are caused when the TV signal splits and follows two paths One is the direct path and the other is reflected off tall buildings hills or...

Страница 28: ...p 720p 1080i DTV 480p 720p 1080i sources 1 Press the ARC button repeatedly to select the desired picture format You can also adjust ARC in the SCREEN menu 4 3 Choose 4 3 when you want to view a picture with an original 4 3 aspect ratio with black bars appearing at both the left and right sides 16 9 Choose 16 9 when you want to adjust the picture horizontally in a linear proportion to fill the enti...

Страница 29: ...480i mode only ideo1 2 and Component 480i mode only CHANNEL PICTURE SOUND TIMER SPECIAL SCREEN PIP DW LOCK Prev Menu Auto config ARC Position Manual config G Reset Manual Configure RGB PC mode only Manual Configure RGB PC mode only If the image still isn t clear after auto adjustment and especially if characters are still jittery adjust the picture Phase manually To correct the screen size adjust ...

Страница 30: ... button You can initialize Position Split zoom PIP Transparency PIP position PIP size and sub picture size for double window Initializing Reset to original factory value Initializing Reset to original factory value Use the Reset option to initialize the adjusted settings Split Zoom Split Zoom Enlarges the picture in correct proportions Split Zoom can be used for all input sources In 2 Split Zoom m...

Страница 31: ...V 14 TV MA Violence applies to TV PG TV 14 TV MA F Violence fantasy violence applies only to TV Y7 Aux Block Video 1 2 On Off Component 1 2 On Off RGB DVI On Off Parental Lock Setup Parental Lock Setup 1 Press the MENU button and then use D E button to select the LOCK menu Then press the G button If Lock is already set enter the password as requested The TV is set up with the initial password 0 0 ...

Страница 32: ...switch the main and sub pictures Selecting an Input Signal Source for PIP Selecting an Input Signal Source for PIP Double W Double Window indow Use the PIP INPUT button to select the input source for the sub picture Each press of PIP INPUT button changes the PIP source Main Picture Sub Picture Main Picture Sub Picture PIP PIP Size Size Press the WIN SIZE button and then use F G button to change th...

Страница 33: ...ub 9 Connect the RS 232C input jack to an external control device such as a computer or an A V control system and control the Monitor s functions externally Connect the serial port of the control device to the RS 232C jack on the Monitor back panel RS 232C connection cables are not supplied with the Monitor T Type of Connector D Sub 9 Pin Male ype of Connector D Sub 9 Pin Male RS 232C Configuratio...

Страница 34: ...his time if the data is data read mode it indicates present status data If the data is data write mode it returns the data of the PC computer Command2 Set ID OK Data x Error Acknowledgement The Monitor transmits ACK acknowledgement based on this format when receiving abnormal data from non viable functions or communication errors Command2 Set ID NG Data x Data 1 Illegal Code 2 Not supported functi...

Страница 35: ... 03 Aspect Ratio Command2 c Main picture format G To adjust the screen format You can also adjust the screen format using the ARC Aspect Ratio Control button on remote control or in the Screen menu Transmission Data 0 Normal screen 4 3 1 Wide screen 16 9 2 Horizon 3 Zoom k c Set ID Data Cr Acknowledgement c Set ID OK Data x 04 Screen Mute Command2 d G To select screen mute on off Transmission Data...

Страница 36: ... button on the remote control or in the PIP DW menu Transmission Data 0 PIP DW off 1 PIP 2 DW1 3 DW2 k n Set ID Data Cr Acknowledgement n Set ID OK Data x G To adjust the screen sharpness You can also adjust sharpness in the Picture menu Transmission 11 Sharpness Command2 k Data Min 0 Max 64 Refer to Real data mapping 1 See page 35 k k Set ID Data Cr Acknowledgement k Set ID OK Data x 12 OSD Selec...

Страница 37: ...on Data Min 0 Max 64 Refer to Real data mapping 1 See page 35 k t Set ID Data Cr Acknowledgement t Set ID OK Data x 18 Bass Command2 s G To adjust bass You can also adjust bass in the Sound menu Transmission Data Min 0 Max 64 Refer to Real data mapping 1 See page 35 k s Set ID Data Cr Acknowledgement s Set ID OK Data x 24 PIP Input Select Command2 y G To select input source for sub picture in PIP ...

Страница 38: ...mmand2 t G To adjust main window size in Double Window mode Transmission Data Min 0 Max 14 Refer to Real data mapping1 See page 35 j t Set ID Data Cr Acknowledgement t Set ID OK Data x 31 Auto Configure Command2 u G To adjust picture position and minimize image shaking automatically It works only in RGB PC mode Transmission Data 1 To set j u Set ID Data Cr Acknowledgement u Set ID OK Data x 32 Tun...

Страница 39: ...ode Data code TC Tf T1 C0 Carrier frequency FCAR 1 TC fOSC 12 Duty ratio T1 TC 1 3 Repeat frame C1 C2 C3 C4 C5 C6 C7 C0 C1 C2 C3 C4 C5 C6 C7 D0 D1 D2 D3 D4 D5 D6 D7 D0 D1 D2 D3 D4 D5 D6 D7 Repeat code 9 ms 4 5 ms 0 55 ms 9 ms 2 25 ms G Bit description G Frame interval Tf The waveform is transmitted as long as a key is depressed Bit 0 Tf Tf Tf 108ms 455KHz 0 56 ms 0 56 ms 1 12 ms Bit 1 2 24 ms How ...

Страница 40: ...on Discrete IR Code Input COMPONENT2 Selection Discrete IR Code Input DVI Selection Discrete IR Code Input RGB Selection R C Button R C Button R C Button R C Button R C Button R C Button R C Button R C Button R C Button R C Button R C Button R C Button R C Button R C Button Discrete IR Code Only 4 3 mode Discrete IR Code Only 16 9 mode Discrete IR Code Only Zoom mode R C Button R C Button R C Butt...

Страница 41: ... between the TV and the VCR Activate any function to restore the brightness of the picture If still picture is on the screen for more than 5 minutes the screen gets dark The remote control doesn t work Check to see if there is any object between the TV and the remote control causing obstruction Are batteries installed with correct polarity to to Refer to p 9 Correct remote operating mode set TV VC...

Страница 42: ...n a mixture of lukewarm water and a little fabric softener or dish washing detergent Wring the cloth until it s almost dry and then use it to wipe the screen 2 Make sure the excess water is off the screen and then let it air dry before you turn on your TV To remove dirt or dust wipe the cabinet with a soft dry lint free cloth Please be sure not to use a wet cloth If you expect to leave your TV dor...

Страница 43: ...s of repair or replacement under these excluded circumstances shall be borne by the consumer WARRANTY PERIOD LABOR ONE YEAR from the Date of Purchase PARTS ONE YEAR from the Date of Purchase Effective Date of Warranty Your warranty period Begins on the date of sale to the original consumer end user KEEP THE DEALER S DATED BILL OF SALE OR PROOF OF DELIVERY as evidence of the purchase date You will ...

Страница 44: ...urning the defective unit to Zenith Parts and service in accordance with the Zenith warranty are Zenith s responsibility and will be provided without charge Other service requirements will be at the owner s expense If you have problems in obtaining satisfac tory warranty service write or call the Zenith Customer Interactive Center Service may be provided by inde pendently owned and operated servic...

Отзывы: