Zenith MU-50PZ90MQ Скачать руководство пользователя страница 4

4 Plasma Monitor

Safety Instructions

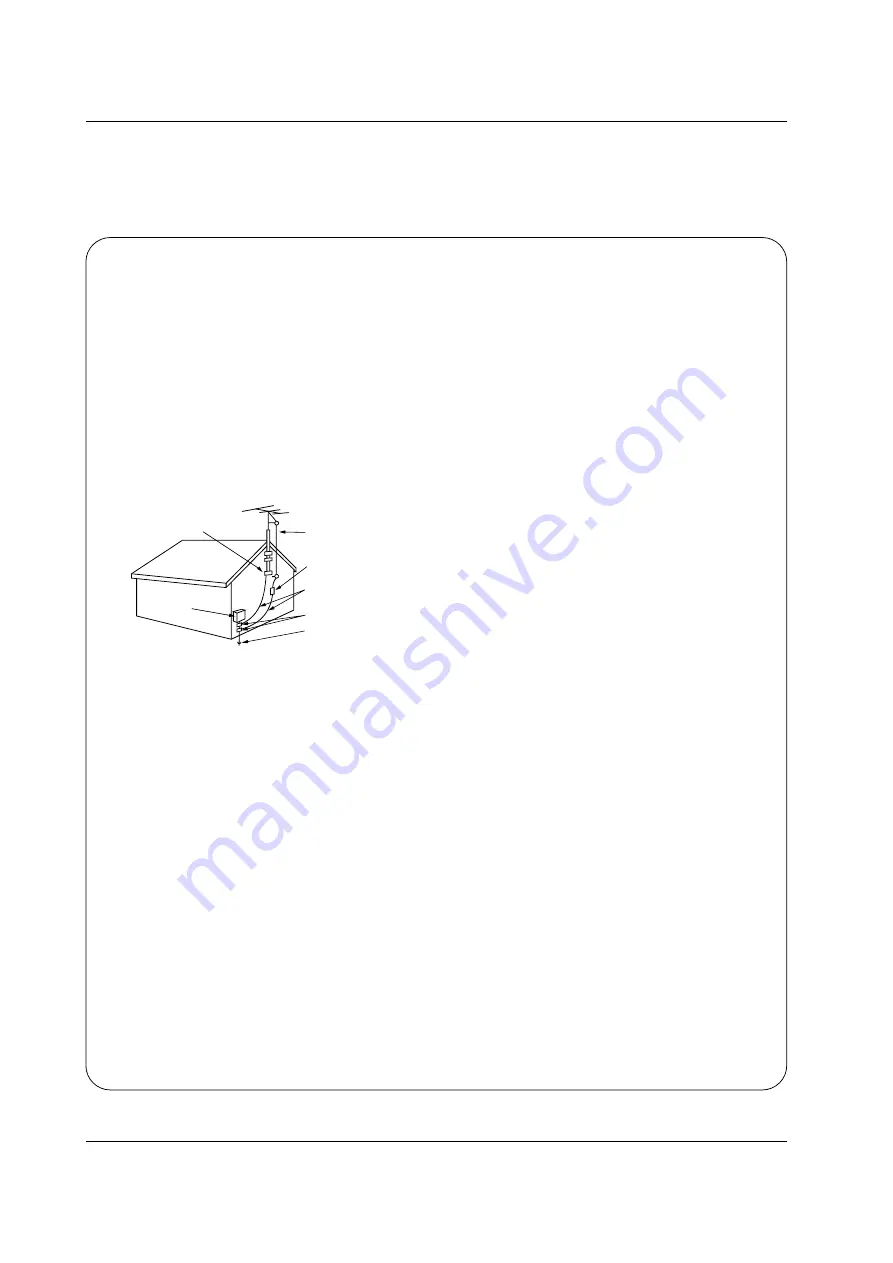
Antenna Lead in Wire

Antenna Discharge Unit
(NEC Section 810-20)

Grounding Conductor
(NEC Section 810-21)

Ground Clamps

Power Service Grounding
Electrode System (NEC
Art 250, Part H)

Ground Clamp

Electric Service

Equipment

Example of Grounding According to National
Electrical Code Instructions

NEC - National Electrical Code

14. Outdoor Antenna Grounding
If an outside antenna or cable system is connected to the
product, be sure the antenna or cable system is grounded so
as to provide some protection against voltage surges and
built-up static charges. Article 810 of the National Electrical
Code (U.S.A.), ANSI/ NFPA 70 provides information with
regard to proper grounding of the mast and supporting struc-
ture, grounding of the lead-in wire to an antenna discharge
unit, size of grounding conductors, location of antenna-dis-
charge unit, connection to grounding electrodes, and
requirements for the grounding electrode. 

15. Lightning 
For added protection for this product (receiver) during a light-
ning storm, or when it is left unattended and unused for long
periods of time, unplug it from the wall outlet and disconnect
the antenna or cable system. This will prevent damage to the
product due to lightning and power-line surges.

16. Power Lines
An outside antenna system should not be located in the
vicinity of overhead power lines or other electric light or
power circuits, or where it can fall into such power lines or
circuits. When installing an outside antenna system, extreme
care should be taken to keep from touching such power lines
or circuits as contact with them might be fatal.

17. Overloading
Do not overload wall outlets and extension cords as this can
result in a risk of fire or electric shock.

18. Object and Liquid Entry
Never push objects of any kind into this product through
openings as they may touch dangerous voltage points or
short-out parts that could result in a fire or electric shock.
Never spill liquid of any kind on the product.

19. Servicing
Do not attempt to service this product yourself as opening or
removing covers may expose you to dangerous voltage or
other hazards. Refer all servicing to qualified service per-
sonnel.

20. Damage Requiring Service
Unplug this product from the wall outlet and refer servicing to
qualified service personnel under the following conditions:

a. If the power-supply cord or plug is damaged.
b. If liquid has been spilled, or objects have fallen into the

product.

c. If the product has been exposed to rain or water.
d. If the product does not operate normally by following the

operating instructions. Adjust only those controls that are
covered by the operating instructions as an improper
adjustment of other controls may result in damage and
will often require extensive work by a qualified technician
to restore the product to its normal operation.

e. If the product has been dropped or the cabinet has been

damaged.

f. If the product exhibits a distinct change in performance.

21. Replacement Parts
When replacement parts are required, be sure the service
technician has used replacement parts specified by the man-
ufacturer or have the same characteristics as the original
part. Unauthorized substitutions may result in fire, electric
shock, or other hazards.

22. Safety Check
Upon completion of any service or repairs to this product,
ask the service technician to perform safety checks to deter-
mine that the product is in proper operating condition.

23. Wall or Ceiling Mounting
The product should be mounted to a wall or ceiling only as
recommended by the manufacturer. The product may slide
or fall, causing serious injury to a child or adult, and serious
damage to the product.

24. Heat
The product should be situated away from heat sources
such as radiators, heat registers, stoves, or other products
(including amplifiers) that produce heat.

Safety Instructions continued

Safety Instructions continued

Содержание MU-50PZ90MQ

Страница 1: ...g the Monitor Retain it for future reference Record model number and serial number of the Monitor See the label attached on the back of the Monitor and relate this information to your dealer if you ev...

Страница 2: ...inst harmful interference in a residential installation This equipment generates uses and can radiate radio frequency energy and if not installed and used in accordance with the instructions may cause...

Страница 3: ...mounting of the prod uct should follow the manufacturer s instructions and should use a mounting accessory recommended by the manufac turer 8 Transporting Product A product and cart combination should...

Страница 4: ...touch dangerous voltage points or short out parts that could result in a fire or electric shock Never spill liquid of any kind on the product 19 Servicing Do not attempt to service this product yourse...

Страница 5: ...icture Format 22 Picture Size Zoom 22 Split Zoom 23 Screen Position 23 Manual Configure 23 Screen Adjustments 24 Initializing 24 Selecting Wide VGA XGA mode 24 Luminance Noise Reduction 24 PIP Picture...

Страница 6: ...ts may be present on the PDP screen The PDP Plasma Display Panel which is the display device of this product is composed of 0 9 to 2 2 million cells A few cell defects will normally occur in the PDP m...

Страница 7: ...tor 6 COMPONENT INPUT AUDIO INPUT JACKS Connect a component video audio device to these jacks 7 ALARM JACK Connect your alarm sensor to this jack Detailed installation instruction is included in the a...

Страница 8: ...ent menu NUMBER buttons WIN SIZE Adjusts the sub picture size WIN POSITION Moves the sub picture SPLIT ZOOM Enlarges the picture ZOOM ZOOM Enlarges or reduces the main picture size VCR BUTTONS Control...

Страница 9: ...n various ways such as on a wall or on a desktop etc The plasma display is designed to be mounted horizontally or vertically The speakers shown are optional GROUNDING Ensure that you connect the groun...

Страница 10: ...r vertically you have to change the OSD display mode so that the menus will appear correctly and also to protect the monitor from overheating Refer to P 21 4 inches 4 inches 2 36 inches 4 inches 2 inc...

Страница 11: ...o the VCR owner s manual 2 Use the INPUT SELECT button on the remote control to select Video If connected to S VIDEO select the S Video input source VCR Setup VCR Setup Y PB PR MONO R AUDIO L R AUDIO...

Страница 12: ...ment Refer to external equipment operating guide Component ports of the Monitor Y PB PR Video output ports of DVD player Y Y Y Y Pb B Y Cb PB Pr R Y Cr PR How to connect 1 Connect the DVD video output...

Страница 13: ...tical pattern contrast or brightness in PC mode If noise is present change the PC mode to another resolution change the refresh rate to another rate or adjust the brightness and contrast on the menu u...

Страница 14: ...72 80 75 00 85 00 56 25 60 31 75 00 85 06 74 55 60 00 70 00 75 00 31 500 35 000 37 500 48 363 56 476 60 023 54 348 63 995 67 500 60 000 63 981 47 700 59 625 47 700 59 625 60 00 70 00 75 00 60 00 70 06...

Страница 15: ...2 If the Monitor was turned off with the remote control and then the ON OFF button on the Monitor Press the ON OFF button on the Monitor and then press the INPUT SELECT button on the Monitor or press...

Страница 16: ...u options contrast brightness color sharpness and tint manually APC automatically changes to User You can adjust red green and blue to any color temperature you prefer 1 Press the MENU button and then...

Страница 17: ...the appropriate sound options based on the program content When adjusting sound options treble bass and balance manually DASP automatically changes to User This feature maintains an equal volume level...

Страница 18: ...curity active On Off Vol MENU Prev VIDEO AUDIO TIME SCREEN TWIN SPECIAL Clock Off timer On timer Auto off G Security set Security active On Off MENU Prev Clock Setup Clock Setup If current time settin...

Страница 19: ...desired beginning minutes c Press the G button and then use D E button to set the desired end hour d Press the G button and then use D E button to set the desired end minutes 5 Press the OK button to...

Страница 20: ...me displayed on the screen for prolonged periods will result in an ghost image remaining even when you change the image Avoid allowing a fixed image to remain on the Monitor s screen for a long period...

Страница 21: ...lect Rotate if the monitor was installed vertically 4 Press the OK button to save Normal Rotate VIDEO AUDIO TIME SCREEN TWIN SPECIAL Language Key lock ISM Method Low power Set ID Security G OSD Rotate...

Страница 22: ...at Setting Picture Format Caution If a 4 3 fixed image is on the screen for a long time it may remain visible Set every aspect ratio for RGB 480p DVI 480p Component 480i 480p Video and S Video sources...

Страница 23: ...NT 480p 720p 1080i 1 Press the MENU button and then use D E button to select the SCREEN menu 2 Press the G button and then use D E button to select Position 3 Press the G button and then use D E F G b...

Страница 24: ...ode to VGA mode automatically VIDEO AUDIO TIME SCREEN TWIN SPECIAL Auto config ARC Zoom in out Position Manual config Screen adj Reset XGA Mode G 1024x768 1360x768 1366x768 MENU Prev VIDEO AUDIO TIME...

Страница 25: ...achieved The sub picture moves up down left right Swapping the PIP Swapping the PIP Press the SWAP button to switch the main and sub pictures Selecting an Input Signal Source for the PIP Selecting an...

Страница 26: ...g the Swapping the T Twin Picture win Picture Use the SWAP button to switch the main and sub pictures in twin picture mode DW 1 DW 2 10 30 10 30 Component Video Video Component As the name suggests th...

Страница 27: ...DP D Sub 9 Connect the RS 232C input jack to an external control device such as a computer or an A V control system and control the Monitor s functions externally Connect the serial port of the contro...

Страница 28: ...0 64 10 Tint k j 0 64 11 Sharpness k k 0 64 12 OSD Select k l 0 1 13 Remote Control Lock Mode k m 0 1 14 PIP Twin k n 0 3 15 PIP Aspect Ratio k o 0 1 16 Split Zoom k p 21 99 17 PIP Position k q 0 3 1...

Страница 29: ...1 Normal screen 4 3 2 Full screen Zoom 3 Horizon k c Set ID Data Cr Acknowledgement You select either 16 9 or 4 3 screen aspect ratio using the PC DTV 720p 1080i c Set ID OK Data x 05 Volume Mute Com...

Страница 30: ...t the PIP picture format You can also select the PIP picture format using PIP ARC on the remote control Transmission k o Set ID Data Cr Acknowledgement Data 0 4 3 1 16 9 o Set ID OK Data x 09 Color Co...

Страница 31: ...s You can also adjust bass in the Audio menu Transmission Data Min 0 Max 64 Refer to Real data mapping 1 See page 29 k s Set ID Data Cr Acknowledgement s Set ID OK Data x 20 Balance Command2 t G To ad...

Страница 32: ...ks in RGB PC mode Transmission Data 1 To set j u Set ID Data Cr Acknowledgement u Set ID OK Data x 31 Picture Size Setting for Twin Picture mode Command2 t G To adjust main picture size in twin pictur...

Страница 33: ...ode Data code TC Tf T1 C0 Carrier frequency FCAR 1 TC fOSC 12 Duty ratio T1 TC 1 3 Repeat frame C1 C2 C3 C4 C5 C6 C7 C0 C1 C2 C3 C4 C5 C6 C7 D0 D1 D2 D3 D4 D5 D6 D7 D0 D1 D2 D3 D4 D5 D6 D7 Repeat code...

Страница 34: ...tton R C Button Power On Off Discrete IR Code Only Power On Discrete IR Code Only Power Off R C Button R C Button R C Button R C Button R C Button R C Button R C Button R C Button R C Button R C Butto...

Страница 35: ...nt distance between the Monitor and the VCR Activate any function to restore the brightness of the picture If still picture is on the screen for more than 5 minutes the screen gets dark The remote con...

Страница 36: ...et with a soft dry lint free cloth Please be sure not to use a wet cloth If you expect to leave your Monitor dormant for a long time such as a vacation it s a good idea to unplug the power cord to pro...

Страница 37: ...improvement MODELS Width inches mm Height inches mm Depth inches mm Weight pounds kg Power requirement Resolution Color Operating Temperature Range Operating Humidity Range Maximum Elevation MU 50PZ90...

Страница 38: ...38 Plasma Monitor Notes Notes Notes...

Страница 39: ...Owner s Manual 39 Notes Notes Notes...

Страница 40: ...g the Monitor Retain it for future reference Record model number and serial number of the Monitor See the label attached on the back of the Monitor and relate this information to your dealer if you ev...

Отзывы: