Zenith L15V26C Скачать руководство пользователя страница 46

Auto Off

46

206-3839-01

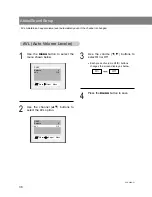
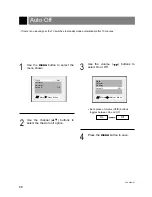
- If there is no input signal, the TV switches to standby mode automatically after 10 minutes.

2

Use the channel (

D

,

E

) buttons to

select the the Auto off option.

3

Use the volume (

F

,

G

) buttons to

select On or Off.

4

Press the 

menu

button to save.

Each press of volume (

F

G

) buttons

toggles between On and Off.

On

Off

1

Use the 

menu

button to select the

menu shown.

DE

Move

G

Next

Menu

Off timer
On timer
Auto off

Off

Clock

-- : -- AM

DE

Move

F G

Adjust

Menu

Clock
Off timer
On timer
Auto off

Off

Auto off

Off

Содержание L15V26C

Страница 1: ...Copyright 2002 Zenith Electronics Corporation Installation Setup Operating Guide I Warranty Model Number L15V26C LCD TV Monitor...

Страница 2: ...s been tested and found to comply with the limits for a Class B digital device pursuant to Part 15 of the FCC Rules These limits are designed to provide reasonable protection against harm ful interfer...

Страница 3: ...mounting of the product should follow the manufacturer s instructions and should use a mounting accessory recommended by the manufacturer 8 Transporting Product A product and cart combination should b...

Страница 4: ...ualified service personnel 20 Damage Requiring Service Unplug this product from the wall outlet and refer ser vicing to qualified service personnel under the fol lowing conditions a If the power suppl...

Страница 5: ...s 18 PC Computer Connections 19 PC Mode Functions Check 21 Turning the TV on 22 TV Mode Menus 23 Menu Language Selection 24 Auto Programming Finding Erasing channels 25 Favorite Channel Memory 27 Clos...

Страница 6: ...u tv video on off Side Control Panel Side Control Panel TV Video Button Enter Button Channel Buttons On Off Button Menu Button Volume Buttons Remote Control Sensor Power Standby indicator Illuminates...

Страница 7: ...480i 480p 720p 1080i DVD DTV IN PR PB Y Power Cord Socket This TV operates on AC power Never attempt to operate the TV on DC power Antenna Input DVD DTV IN Component 480i 480p 720p 1080i Input Headpho...

Страница 8: ...9 7 1 mts fcr memory erase a prog flashbk dasp 206 3839 01 Controls 8 POWER NUMBERS APC MENU CHANNEL DE MTS FCR AUTO PROGRAM Remote Control Buttons Remote Control Buttons Press the FLASHBK button to...

Страница 9: ...26 TV VIDEO Button TV VIDEO Button on Remote Control on Remote Control Each press of this button changes the view ing source as indicted below Video S video Component PC Select each mode for watching...

Страница 10: ...es For Using Remote Control Pull the battery cover upward in the direction shown by the arrow and remove it 1 2 3 Insert the batteries with correct polarity match and Replace the battery compartment c...

Страница 11: ...Batteries power apc menu mute sleep ch enter vol vol ch cc tv video 0 2 3 5 6 4 8 9 7 1 mts fcr memory erase a prog flashbk dasp Tie bands Arrange the wires with the tie band PC signal cable PC sound...

Страница 12: ...the touch there may be a small flicker when turned on This is normal there is nothing wrong with TV Some dot defects may appear on the screen like red green or blue spots However this will have no adv...

Страница 13: ...t Wire 75 Round Cable If you have a 75 round cable insert the bronze wire and then tighten the connection nut If you have a 300 flat wire connect the twisted wire to the antenna converter and then con...

Страница 14: ...e the tv video button on the remote control to select TV Ant In or Video source depending on connection setup 1 or 2 Connection 1 Set cable box switch to 3 or 4 and then tune TV to the same channel nu...

Страница 15: ...ching VCR a Use tv video button on the remote control to select TV Ant In or Video source depending on connection setup 1 or 2 Connection 1 Set VCR switch to 3 or 4 and then tune TV to the same channe...

Страница 16: ...g Setup Camcorder CDGP VCDP Video Game set CDI tv video Video Turn on the external A V equipment Turn the TV on and use the tv video button to select Video source On Remote Control W Watching External...

Страница 17: ...V output jacks to TV s COMPONENT 480i 480p 720p 1080i Y PB PR jacks and S video jack Connect DVD DTV audio output jacks to right and left input jacks on TV L 75 PC INPUT ANT IN S VIDEO H P PC SOUND 12...

Страница 18: ...L R Component Turn on the DTV receiver Set top Box Turn the TV on and use tv video button to select Component source On Remote Control Connect DVD DTV output to COMPONENT 480i 480p 720p 1080i Y PB PR...

Страница 19: ...ntrol 1 Connections Set the monitor output resolution on the PC before connecting to the TV See the next page Connect the TV to the PC with the PC cable Connect the PC audio output to the TV s PC SOUN...

Страница 20: ...t Format Specifications chart above c The synchronization input form for Horizontal and Vertical frequencies is separate DPM Display Power Management mode When the PC is in the power saving mode the m...

Страница 21: ...f V Position may change Clock Minimizes any vertical bars or stripes appearing on the screen background The adjustment range is 0 80 Phase Remove any horizontal noise and clear up or sharpen the chara...

Страница 22: ...e and power cord correctly At this moment the TV is switched to standby mode 1 Press power on the remote control to turn the TV on 2 Select the viewing source by pressing tv video repeatedly 3 After v...

Страница 23: ...nu option DE Move F G Adjust Menu Captions Off Caption Text CC 1 Key lock Off Parental Ctl Language English DE Move G Next Menu Balance 0 AVL Off DE Move G Next Menu Manual program Favorite channel Au...

Страница 24: ...uage 2 Use the volume F G buttons to select the language for the menus to appear in DE Move F G Adjust Menu Captions Off Caption Text CC 1 Key lock Off Parental Ctl Language English DE Move F G Adjust...

Страница 25: ...d channels If you press the enter A button in auto programming the function will stop and only channels programming up to that time will remain Auto programming function can memorize only the channels...

Страница 26: ...buttons to select Memory add or Erase delete Press the memory erase button on the remote control 3 Press the enter A button to save Each time you press the volume F G buttons you toggle between Memor...

Страница 27: ...l D E buttons to select the first favorite channel position Use the volume F G buttons to set the desired channel number for first favorite channel 4 Press the enter A button to save i e To change cha...

Страница 28: ...o save 3 Press the volume G and use the channel D E buttons to set the cur rent minutes If you hold the channel D button the minute display is changed in the sequence of 00 01 02 58 59 and changed in...

Страница 29: ...turn off hour 6 Press the menu button to save 4 Press the volume G and use the channel D E buttons to set the min utes If you hold the channel D button the minute display is changed in the sequence o...

Страница 30: ...turn on On Timer setup is complete Clock Off timer On timer AM Auto off TV 2 Vol 30 Hold FG Move DE Adjust Menu Clock Off timer On timer AM Auto off TV 2 Vol 30 Hold TV 2 6 Press the volume G button...

Страница 31: ...LEEP 1 appears on the screen for 1 minute prior to TV turn off Sleep timer turns the TV off at the preset time When the sleep time you want is displayed on the screen don t press the sleep button agai...

Страница 32: ...volume F G button to select your desired picture appearance 3 Press the enter A button to save Each press of volume F G button selects a different picture appearance Clear Optimum User Soft APC Auto...

Страница 33: ...the menu button to save APC is cancelled if you set User options Manual Picture Control User Option Manual Picture Control User Option DE Move FG Adjust Menu Contrast 85 Brightness 50 Color 70 Sharpn...

Страница 34: ...elow 2 Use the channel D E buttons to select the Manual program option 5 Press the menu button to save DE Move G Next Menu Manual program Favorite channel Auto program DE Move FG Adjust Menu Memory Er...

Страница 35: ...he enter A button to save Audio Setup DASP Audio Setup DASP 1 Press the dasp button on the remote control 2 Use the dasp button or volume F G button to select the desired setting for the sound DASP Us...

Страница 36: ...G button 4 Use the volume F G buttons to select the band you want to adjust and then use the channel D E but tons to adjust the band level 6 Press the menu button to save 3 Use the channel D E button...

Страница 37: ...the channel D E button to select the Balance option 3 Sound Balance Sound Balance Use the volume F G button to adjust the balance Balance is preset at 0 DE Move G Next Menu Balance 0 AVL Off DASP DE...

Страница 38: ...low 2 Use the channel D E buttons to select the AVL option 3 A AVL VL Auto V Auto Volume Leveler olume Leveler Use the volume F G buttons to select On or Off Each press of volume F G buttons changes t...

Страница 39: ...y and secondary language and stereo modes in bilingual signals MONO The primary language is heard from left and right speakers in mono sound STEREO The primary language is heard from left and right sp...

Страница 40: ...uted sound is restored current volume level is displayed on the screen Plug headphones in to H P jack as shown Adjust sound level to a headphone using the volume F G buttons While you are listening to...

Страница 41: ...aid in teaching language skills The picture at left shows a typical caption IGNITION Picture may flutter drift suffer from black spots or horizon tal streaking Usually caused by interference from aut...

Страница 42: ...t steps 1 3 on next page 2 Use the volume F G buttons to select Text 1 Text 2 Text 3 or Text 4 3 Press the menu button to save T Text Setup ext Setup DE Move FG Adjust Menu Language English Captions O...

Страница 43: ...time you press the volume F G buttons the caption mode is changed one by one as shown below This TV is programmed to remember the caption text mode it was last set to when you turn the POWER off Oper...

Страница 44: ...ously shown in theaters Movie Ratings Unblocked G and Above general audience PG and Above parental guidance suggested PG 13 and Above 13 years and up R and Above restricted NC 17 and Above 18 years an...

Страница 45: ...to 99 Use the channel D E buttons to select the Set Password option Enter a four digit password Enter it again when requested A new password may be chosen each time blocking is set up 6 Press the chan...

Страница 46: ...the the Auto off option 3 Use the volume F G buttons to select On or Off 4 Press the menu button to save Each press of volume F G buttons toggles between On and Off On Off 1 Use the menu button to se...

Страница 47: ...e set up so that it can only be used with the remote control This feature can prevent unauthorized viewing 1 Use the menu button to select the menu shown 2 Use the channel D E buttons to select the th...

Страница 48: ...nse the cloth and wipe the cabinet again 3 Let the cabinet air dry before turning your TV on If you leave your TV unused for a long time such as a vacation it s a good idea to unplug the power cord to...

Страница 49: ...antenna impedance 75 Audio output 1 W 1 W Speaker outputs 8 X 2 External input ports Power cord socket 1 Component 480i 480p 720p 1080i input 1 set S VIDEO input 1 Headphone jack 1 Video Audio input s...

Страница 50: ...ultiple images Remote control does not work Cannot tune desired channel CHECK THESE THINGS Is power cord plugged in Is television turned on Check batteries in remote control Try another channel statio...

Страница 51: ...Notes 51 206 3839 01 MISC...

Страница 52: ...de environmental specifications or contrary to the requirements or precautions in the Operating Guide accident lightning strikes or other natural causes unauthorized modification or alteration incorre...

Отзывы: