background image

PAGE 20

BASIC OPERATION

Basic Playback

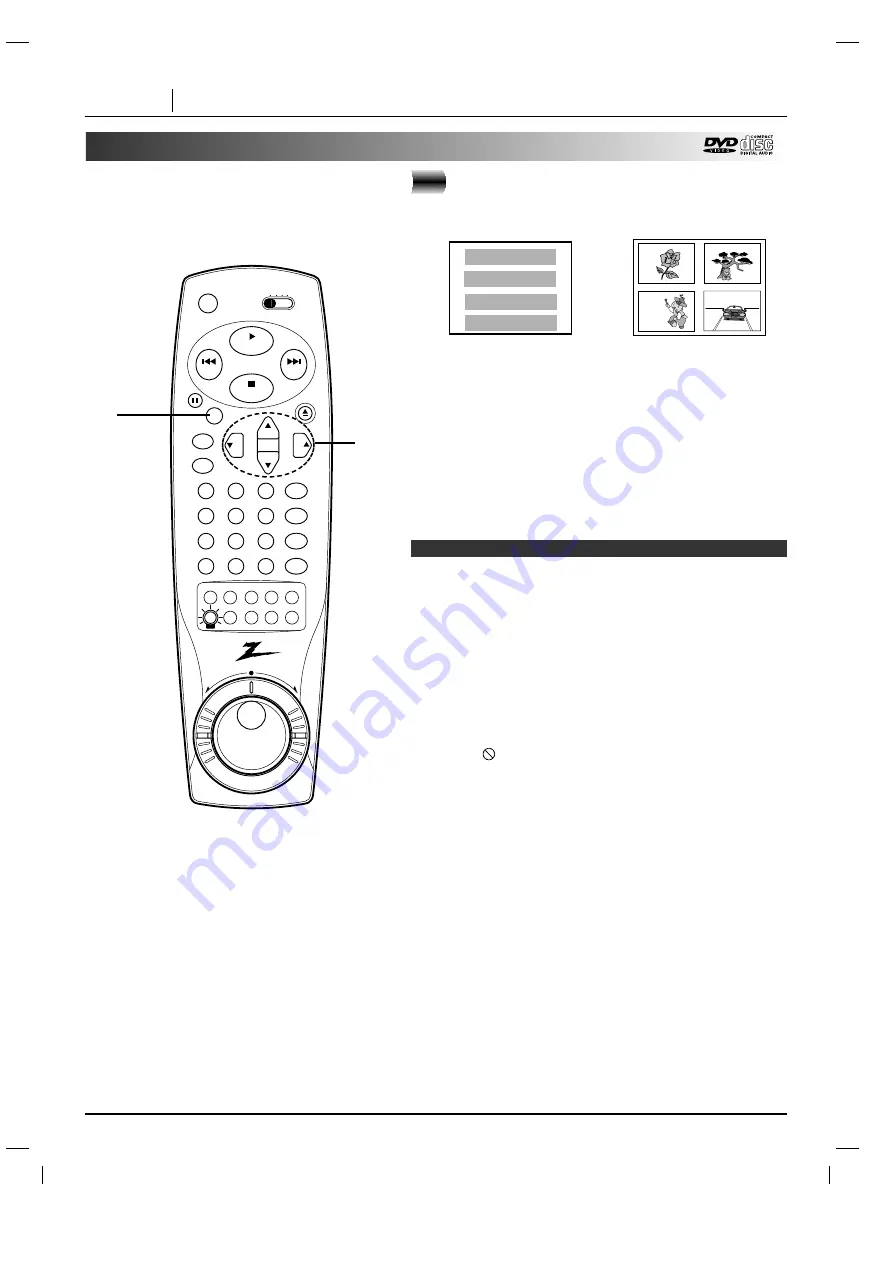
Press

D

D

/

E

E

/

F

F

/

G


and press SELECT/ENTER, or

press the numeric button(s), to select the
desired item.

Play of the selected item now begins.

For further info, also refer to the jacket or case of the disc
you are playing.

After operation
When the unit is not in use, remove the disc and press
POWER to turn off the power.

Do not move the DVD player during playback. Doing so may
damage the disc and the DVD player.

Use the OPEN/CLOSE button on the remote control or DVD
player to open and close the disc tray. Do not push the disc tray
while it is moving. Doing so may cause the DVD player to 
malfunction. 

Do not push up the disc tray or put any objects other than discs
on the disc tray. Doing so may cause the DVD video 
player to malfunction.

Keep your fingers well clear of the disc tray as it is closing. Be
especially careful with children’s fingers around the 
closing disc tray as there is a risk of personal injury.

When “

” appears on the TV screen while a button is

pressed, it means that this function is not available on the disc
you are playing.

Depending on the DVD disc, some operations may be different
or restricted. Refer to the jacket or case of the disc you are 
playing.

vcr

dvd

catv tv

play

power

stop

skip

skip

1

2

3

4

5

6

7

8

9

0

return/tv input

sound/mute

program

title

menu

clear

audio subtitle

angle

marker-search

repeat

a-b

random

zoom

rev

fwd

slow/scan

open/close

vol

vol

ch

ch

pause

/step

select/

enter

setup

display

Notes

5

5

5

1

2

3

4

OR

Содержание IQDVC2350

Страница 1: ...machine number IQDVC2350 e n j o y t h e v i e w o p e r a t i n g g u i d e w a r r a n t y...

Страница 2: ...ion This equipment generates uses and can radiate radio frequency energy and if not installed and used in accordance with the instructions may cause harmful interference to radio communications Howeve...

Страница 3: ...Ring 22 Operation Using GUI Menu Icons General Information about GUI menu icons 23 Detailed description of each GUI menu icon 24 Advanced Operation Using a title menu 25 Using a DVD menu 25 Memorizin...

Страница 4: ...sure reliable operation of the product and to protect it from overheating These openings must not be blocked or covered The openings should never be blocked by placing the product on a bed sofa rug or...

Страница 5: ...usly with high volume sound it may cause hearing damage 20 Laser Beam Do not look into the opening of the disc tray or venti lation opening of the product to see the source of the laser beam It may ca...

Страница 6: ...irty or worn down the picture quality becomes poor To obtain a clear picture we recommend regular inspection and maintenance cleaning or parts replacement every 1 000 hours of use depending on the ope...

Страница 7: ...t cloth Always keep the disc clean If you cannot wipe off the dust with a soft cloth wipe the disc lightly with a slightly moistened soft cloth and finish with a dry cloth Do not use any type of solve...

Страница 8: ...us indicator Chapter Track number indicator Title number indicator Angle icon indicator MP3 indicator Total playing time elapsed time indicators power open close pause step play stop menu skip select...

Страница 9: ...UT jacks VIDEO OUT jack COMPONENT VIDEO OUT jacks POWER CORD Connect to an AC 120V 60Hz outlet only COAXIAL DIGITAL AUDIO OUT jack OPTICAL DIGITAL AUDIO OUT jack Remove the dust protection cap from th...

Страница 10: ...utton Use the MENU button to display the menu screen included on DVD video discs To operate a menu screen follow the instructions in Using a DVD Menu page 25 Directional arrow buttons up down left rig...

Страница 11: ...02 115 124 130 133 JVC 109 141 KMC 131 KTV 115 130 131 138 LG GOLDSTAR 115 122 130 131 133 146 LODGENET 113 LOGIK 113 LXI 104 116 123 124 125 131 139 MAGNAVOX 100 106 107 109 114 115 121 122 130 131 1...

Страница 12: ...attery leakage occurs wipe the battery liquid from the battery compartment then insert new batteries The batteries should last about one year with normal use This section shows you how to use the remo...

Страница 13: ...cause DVD video discs are copy protected Warning Do not set the Digital Audio Output of this DVD player to Dolby Digital unless you are connecting the DIGITAL AUDIO jack of this DVD player to an AV de...

Страница 14: ...wer and unplug all of the equipment from the wall outlet before making any connections If you place the DVD player near a tuner or radio the radio broadcast sound might be distorted In this case move...

Страница 15: ...eceiver equipped with a Dolby Digital AC 3 decoder or Dolby Digital AC 3 processor Refer to the owner s manual of your audio equipment as well When you connect the DVD player to other equipment be sur...

Страница 16: ...nput or Video Input Center speaker Front L Center Woofer Front R Rear R Rear L To 5 1CH input Dolby Digital Surround 5 1 CH Dolby Digital AC 3 is a six channel digital surround sound technology develo...

Страница 17: ...DVD player to an AV decoder that has the Dolby Digital AC 3 decoding function High volume sound may damage your hearing as well as the speakers Refer to Selecting Digital Audio Output on page 41 Dolby...

Страница 18: ...el Digital Stereo by connecting this DVD player to a receiver equipped with a digital audio input and speaker system right and left front speakers Introducing DTS Digital SurroundTM the finest technol...

Страница 19: ...the title the DVD player automatically stops and returns to the menu screen When a menu screen appears on the TV screen In case of interactive DVDs with control a menu screen appears on the TV screen...

Страница 20: ...push up the disc tray or put any objects other than discs on the disc tray Doing so may cause the DVD video player to malfunction Keep your fingers well clear of the disc tray as it is closing Be espe...

Страница 21: ...P during still playback Each time you press PAUSE STEP the picture advance one frame To resume normal playback press PLAY Skipping forward Skipping forward Press SKIP during playback A chapter DVD or...

Страница 22: ...erse The DVD player does not play back sound during slow motion playback the high speed reverse and forward playback of DVD video discs However the DVD player plays back sound during fast forward or f...

Страница 23: ...yellow frame on its GUI menu icons Press F F G G to select the desired setting When numbers are displayed e g title No the numeric buttons can also be used for setting instead of F F G G For some func...

Страница 24: ...o change the setting To show the current track No and to jump to the desired track No To show the elapsed time Display only To show the current audio STEREO LEFT RIGHT and to select to the desired aud...

Страница 25: ...clear audio subtitle angle marker search repeat a b random zoom open close vol vol ch ch pause step select enter setup display 2 1 Using a DVD menu 2 1 2 stop 1 2 3 4 5 6 7 8 9 0 return tv input sound...

Страница 26: ...tle automatically Press F F G G to select Yes and press SELECT ENTER The memorized settings are automatically recalled Notes This unit store in memory settings for DVDs you watched Settings remain in...

Страница 27: ...e appears Notes Changing subtitle language 2 1 OFF 1 2 7 8 9 0 program title menu clear audio subtitle angle marker search repeat a b random zoom 1 ENG Changing audio soundtrack language It is possibl...

Страница 28: ...ound effect using SpatializerTM N 2 2TM technology which simulates multi channel audio playback from two conventional stereo speakers instead of the five or more speakers normally required to listen t...

Страница 29: ...ram play To return to normal play Press REPEAT several times until OFF is displayed Repeating sections between two specific points A B repeat Press A B during play at the point where repeat play is to...

Страница 30: ...tored in the memory Recalling Clearing a marker Press SEARCH during playback Press D D E E F F G G to select the marker to be recalled cleared Press PLAY or SELECT ENTER to recall a marker or Press CL...

Страница 31: ...Random playback The DVD player automatically selects the titles in a DVD video karaoke disc only and plays them back randomly Notes 2 3 1 3 audio subtitle angle marker search repeat a b random zoom 1...

Страница 32: ...d play now begins in the programmed sequence If you press PROGRAM to exit the screen the selected tracks are not memorized After playback all tracks programmed Play is stopped Clearing the program To...

Страница 33: ...n close vol vol ch ch pause step select enter setup display 1 2 3 4 Program MP3 MP3 1 MP3 2 MP3 3 MP3 4 MP3 5 MP3 6 MP3 7 MP3 8 MP3 9 Clear All 2 3 Program MP3 1 MP3 Clear All TRACK_1 TRACK_2 TRACK_3...

Страница 34: ...open close vol vol ch ch pause step select enter setup display 2 3 3 2 1 Program MP3 1 MP3 Clear All TRACK_1 TRACK_2 TRACK_3 TRACK_4 TRACK_5 TRACK_6 TRACK_7 TRACK_8 3 Program MP3 1 MP3 Clear All TRACK...

Страница 35: ...spect see page 39 Menu Language see page 40 TV Output Select see page 40 Digital Audio Output see page 41 5 1 Speaker Setup see page 42 Press G G and then D D E E to select the desired setting and pre...

Страница 36: ...Refer to the language codes on page 43 Press CLEAR if an incorrect language code is entered The Disc Subtitle and Disc Menu are selected by the same method If the language selected is not available on...

Страница 37: ...titles do not match with the rating level described as above If you change the level and enter a password playback of all DVDs with ratings higher than your selection will be blocked unless the correc...

Страница 38: ...k unless the correct password is entered To change clear memorized password At the SETUP screen press E E to select Password and press G G Input your password and Press SELECT ENTER To change or clear...

Страница 39: ...etterbox style black bands appear at top and bottom of screen 4 3 Panscan Select when a conventional TV set is connected The video material formatted in the Pan Scan style is played back in that style...

Страница 40: ...0 return tv input sound mute program title menu clear open close vol vol ch ch pause step select enter setup display 1 2 2 At the SETUP screen press D D E E to select TV Output Select and press G G Pr...

Страница 41: ...to an amplifier or other equipment with linear PCM only or MD recorder or DAT deck 2 1 Disc Subtitle Disc Menu Rating Password TV Aspect Menu Language TV Output Select Pseudo PAL Digital Audio Output...

Страница 42: ...e left figure set the mode as 0ms Otherwise change the setting according to the table below A DF DC Distance of A cm Setting ms 34 1 68 2 102 3 136 4 170 5 Setting Rear Surround Speaker If the distanc...

Страница 43: ...a 7579 Korean 7583 Kashmiri 7585 Kurdish 7589 Kirghiz 7665 Latin Code Language 7678 Lingala 7679 Laothian 7684 Lithuanian 7686 Latvian Lettish 7771 Malagasy 7773 Maori 7775 Macedonian 7776 Malayalam 7...

Страница 44: ...of this DVD player is 1 You may not be able to play back some DVD video discs on this player if they were purchased from outside your geographic area or made for business purposes When you try to play...

Страница 45: ...yer There is an obstacle in the path of the remote control and the DVD player The batteries in the remote control are exhausted Correction Plug the power cord into the wall outlet securely Insert a di...

Страница 46: ...io 0 008 Wow and flutter Below measurable level less than 0 001 W PEAK EIAJ Operating conditions Temperature 41 F to 95 F Operation status Horizontal Video output 1 0 V p p 75 negative sync RCA jack x...

Страница 47: ...cessive rewinding Prolong the life of your video equipment with our rewinder ONLY 14 99 PLUS 6 95 SHIPPING HANDLING VHS TAPE REWINDER ZEN 901 Broken or lost remote Need a second remote or more functio...

Страница 48: ...f your set and how to adjust the customer controls Carry In Service The video product must be taken to a U S or Canadian Zenith authorized service center for warranty service and must be picked up by...

Отзывы: