Zenith DA-3520A Скачать руководство пользователя страница 43

INITIAL SETTINGS   PAGE 43

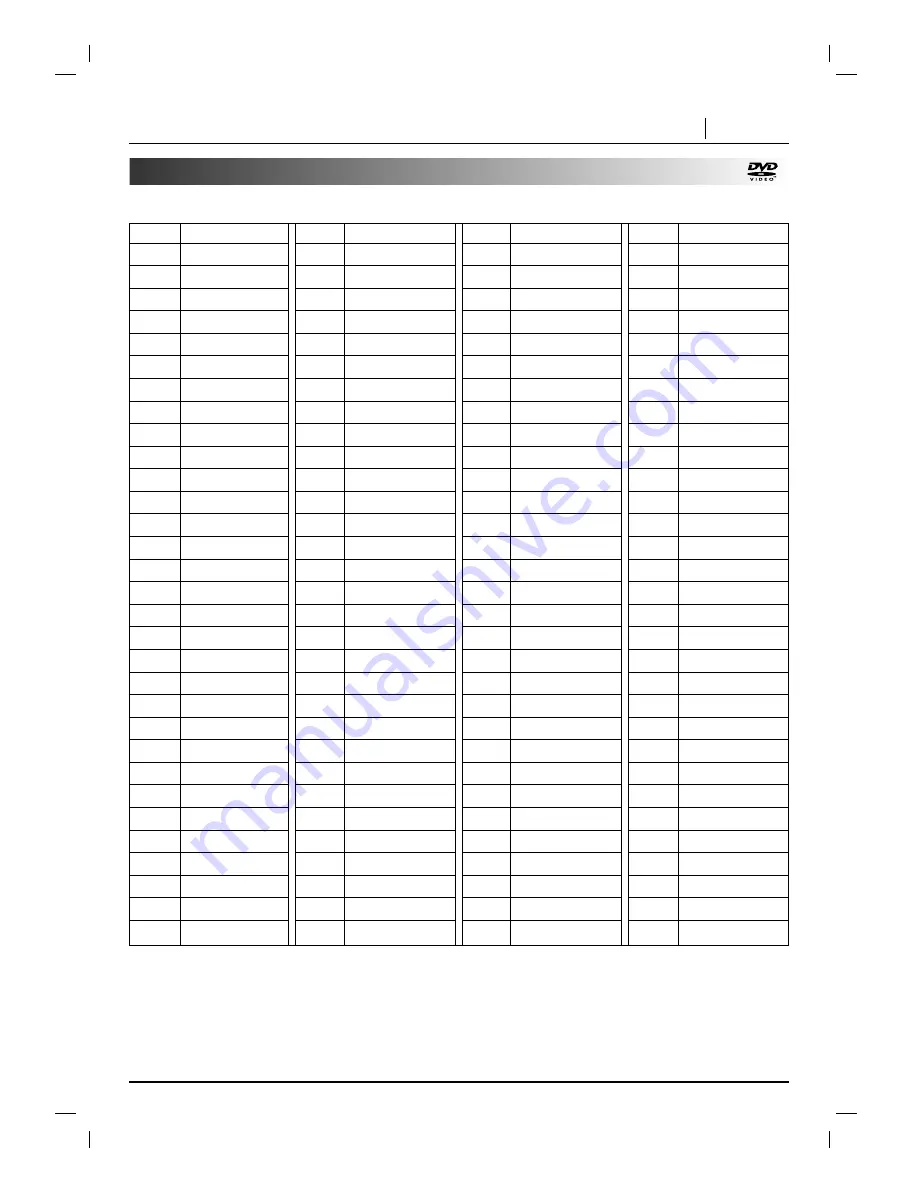
Table of Language and Their Abbreviations

Code

Language 

6565

Afar

6566

Abkhazian

6570

Afrikaans

6577

Ameharic

6582

Arabic

6583

Assamese

6588

Aymara

6590

Azerbaijani

6665

Bashkir

6669

Byelorussian

6671

Bulgarian

6672

Bihari

6678

Bengali; Bangla

6679

Tibetan

6682

Breton

6765

Catalan

6779

Corsican

6783

Czech

6789

Welsh

6865

Danish

6869

German

6890

Bhutani

6976

Greek

6978

English

6979

Esperanto

6983

Spanish

6984

Estonian

6985

Basque

7065

Persian

7073

Finnish

7074

Fiji

Code

Language 

7079

Faroese

7082

French

7089

Frisian

7165

Irish

7168

Scots Gaelic

7176

Galician

7178

Guarani

7185

Gujarati

7265

Hausa

7273

Hindi

7282

Croatian

7285

Hungarian

7289

Armenian

7365

Interlingua

7378

Indonesian

7383

Icelandic

7384

Italian

7387

Hebrew

7465

Japanese

7473

Yiddish

7487

Javanese

7565

Georgian

7575

Kazakh

7576

Greenlandic

7577

Cambodian

7578

Kannada

7579

Korean

7583

Kashmiri

7585

Kurdish

7589

Kirghiz

7665

Latin

Code

Language 

7678

Lingala

7679

Laothian

7684

Lithuanian

7686

Latvian, Lettish

7771

Malagasy

7773

Maori

7775

Macedonian

7776

Malayalam

7778

Mongolian

7779

Moldavian

7782

Marathi

7783

Malay

7784

Maltese

7789

Burmese

7865

Nauru

7869

Nepali

7876

Dutch

7879

Norwegian

7982

Oriya

8065

Panjabi

8076

Polish

8083

Pashto, Pushto

8084

Portuguese

8185

Quechua

8277

Rhaeto-Romance

8279

Rumanian

8285

Russian

8365

Sanskrit

8368

Sindhi

8372

Serbo-Croatian

8373

Singhalese

Code

Language 

8375

Slovak

8376

Slovenian

8377

Samoan

8378

Shona

8379

Somali

8381

Albanian

8382

Serbian

8385

Sundanese

8386

Swedish

8387

Swahili

8465

Tamil

8469

Telugu

8471

Tajik

8472

Thai

8473

Tigrinya

8475

Turkmen

8476

Tagalog

8479

Tonga

8482

Turkish

8484

Tatar

8487

Twi

8575

Ukrainian

8582

Urdu

8590

Uzbek

8673

Vietnamese

8679

Volapük

8779

Wolof

8872

Xhosa

8979

Yoruba

9072

Chinese

9085

Zulu

Enter the appropriate code number for the initial settings “Audio”, “Subtitle” and/or “Menu” (See page 38).

Содержание DA-3520A

Страница 1: ...machine number DA3520 DA 3520A FE 3500TE FE 3500WE E N J O Y T H E V I E W o p e r a t i n g g u i d e w a r r a n t y...

Страница 2: ...residential installation This equipment generates uses and can radiate radio frequency energy and if not installed and used in accordance with the instructions may cause harmful interference to radio...

Страница 3: ...ubtitle language 23 Changing audio soundtrack language 23 Viewing from another angle 24 Repeat Play 25 Storing markers in memory to be viewed listened to again 26 Zoom Feature 27 Sleep Timer Setting 2...

Страница 4: ...product and to protect it from overheating These openings must not be blocked or covered The openings should never be blocked by placing the product on a bed sofa rug or other similar surface This pr...

Страница 5: ...nd it may cause hearing damage 20 Laser Beam Do not look into the opening of the disc tray or venti lation opening of the product to see the source of the laser beam It may cause sight damage 21 Disc...

Страница 6: ...irty or worn down the picture quality becomes poor To obtain a clear picture we recommend regular inspection and maintenance cleaning or parts replacement every 1 000 hours of use depending on the ope...

Страница 7: ...cloth Always keep the disc clean If you cannot wipe off the dust with a soft cloth wipe the disc lightly with a slightly moistened soft cloth and finish with a dry cloth Do not use any type of solven...

Страница 8: ...er indicator PLAY PAUSE indicator Angle icon indicator Disc indicator Total playing time Elapsed time Frequency Delay time Volume etc indicators STOP MEMORY CLEAR button POWER button and indicator Dis...

Страница 9: ...djust the VIDEO SELECTOR switch when the power is turned off When you playback NTSC disc with PAL TV some discs may produce black bands at the top and bottom of the screen Position of VIDEO SELECTOR s...

Страница 10: ...ttons STOP button SKIP SEARCH button SOUND MODE button BY PASS button TEST TONE button DELAY button LEVEL button RETURN button DISPLAY button MENU button SET UP button SLOW SCAN buttons MENU button Us...

Страница 11: ...or if the operating range becomes reduced replace all batteries with new ones If battery leakage occurs wipe the battery liquid from the battery compartment then insert new batteries The batteries sho...

Страница 12: ...ntenna connector Connector the FM wire antenna to the FM antenna connector FM wire antenna supplied AM loop antenna supplied To prevent noise pickup keep the AM loop antenna away from the DVD Receiver...

Страница 13: ...e speaker cord to the appropriate terminal on the components to and to If the cords are reversed the sound will be distorted and will lack base If you use front speakers with low maximum input rating...

Страница 14: ...UDIO VIDEO OUT VIDEO 1 To AUDIO VIDEO OUT TV MONITOR RCA type S VIDEO IN VIDEO IN OR Refer to the owner s manual of your TV as well When you connect the DVD receiver to your TV be sure to turn off the...

Страница 15: ...he disc is placed in upside down and it is a single sided disc NO DISC or DISC ERROR appears on the TV screen If you insert an audio CD the CD indicator lights up in the DVD display The title number d...

Страница 16: ...o open and close the disc tray Do not push the disc tray while it is moving Doing so may cause the DVD receiver to malfunction Do not push up the disc tray or put any objects other than discs on the d...

Страница 17: ...eceiver will be placed in the still picture mode CD The DVD receiver will be placed in the pause mode Press PAUSE STEP during still playback Each time you press PAUSE STEP the picture advances one fra...

Страница 18: ...video discs However the DVD receiver plays back sound during fast for ward or fast reverse playback of audio CDs To Scan at fast forward or fast reverse playback Playing in slow motion DVD only Note...

Страница 19: ...mode Press D D E E to select the desired item The current selected item is indicated by a yellow frame on its GUI menu icons Press F F G G to select the desired setting When numbers are displayed e g...

Страница 20: ...ting To show the current angle number and to change the angle To show the current track number and to jump to the desired track number To show the elapsed time Display only To show the current audio S...

Страница 21: ...e may not be possible on certain DVD discs Press MENU during play The DVD menu available on the disc is now displayed Pressing MENU again resumes play from the scene when MENU was first pressed Resume...

Страница 22: ...at was memorized It will appear on the TV screen as below If the screen is left for more than 10 seconds playback will start from the beginning of the title automatically Press F F G G to select Yes a...

Страница 23: ...itial settings If this language is not recorded on the disc the disc s priority language appears Notes Changing subtitle language 2 1 OFF 1 ENG Changing audio soundtrack language It is possible to cha...

Страница 24: ...of these different angles using the ANGLE button The recorded angles differ depending on the disc used Press ANGLE during playback Number of angle being played back Press ANGLE repeatedly until the d...

Страница 25: ...To return to normal play Press REPEAT several times until OFF is displayed Repeating sections between two specific points A B repeat Press REPEAT A B during play at the point where repeat play is to s...

Страница 26: ...cleared Press PLAY or ENTER to recall a marker Or press CLEAR to clear a marker Play resumes from the point corresponding to the selected marker or the selected marker is cleared The Present Picture i...

Страница 27: ...dly until the normal picture appears Some discs may not respond to the Zoom feature Zoom does not work on subtitles or menus included on DVD video discs The Zoom feature allows you to ZOOM IN and enla...

Страница 28: ...d After playback of all tracks programmed Play is stopped Clearing the program To clear the programmed tracks one by one Press D E F G to select the unwanted number and then press CLEAR To clear all t...

Страница 29: ...e during play the directory will play repeatedly If you press REPEAT button three times the repeat play will be cancelled REPEAT symbol The directory and file name is only displayed in English If ther...

Страница 30: ...MP3 1 MP3 Clear All TRACK_1 TRACK_2 TRACK_3 TRACK_4 TRACK_5 TRACK_6 TRACK_7 TRACK_8 3 Program MP3 1 MP3 Clear All TRACK_1 TRACK_2 TRACK_3 TRACK_4 TRACK_5 TRACK_2 TRACK_7 TRACK_6 TRACK_9 TRACK_6 TRACK_...

Страница 31: ...he front panel to select the preset number you want Press MEMORY again The station is stored Repeat steps 3 to 6 to store other stations To tune in a station with a weak signal Press TUNING SKIP or re...

Страница 32: ...VIDEO 2 To listen to non preset radio stations Use manual or automatic tuning in step 2 For manual tuning press TUNING SKIP or on the front panel repeatedly For automatic tuning press and hold TUNING...

Страница 33: ...nology LLC Manufactured under license from DTS Technology LLC The Dolby Digital surround format lets you enjoy up to 5 1 channels of digital surround sound from a Dolby Digital program source If you p...

Страница 34: ...oofer Add a sub woofer to hear excellent bass sound DTS digital surround or Dolby Digital surround Set up a listening position a couch or chairs etc as shown in the speaker positioning example Front s...

Страница 35: ...ner is 10 ft and from the center speaker to the listener is 8 ft the center delay time is 2msec 10 ft DF 8 ft DC 2 ft A 2 ft A 1 ft 2msec Press DELAY The current surround delay time appears in the dis...

Страница 36: ...he sound balance of the speakers from the listener s position Select the test tone mode by pressing TEST TONE A hiss noise comes out for 2 seconds from each speakers in the following order FL Front Le...

Страница 37: ...the desired setting and press ENTER Some items require additional steps See the respective page When the alternate setting is selected the screen returns to the Initial Settings display To exit SET U...

Страница 38: ...ed is not available on the disc the original language designated by each disc will be selected This is to select the audio soundtrack language subtitle language and the language used in title menus or...

Страница 39: ...unsuitable for children Some DVD discs contain a restriction level which enables parents to remove scenes or prevent playback of discs by children DVD receivers are equipped with a password designed...

Страница 40: ...clear memorized password At the SET UP screen press E E to select Password and press G G Input your password and press ENTER To change or clear your password press D D E E to select the Change or Cle...

Страница 41: ...nscan Select when a conventional TV set is connected The video material formatted in the Pan Scan style is played back in that style the left and right edges are cut off 16 9 Wide Select when a wide s...

Страница 42: ...ress D D E E to select the desired Language and press ENTER 2 1 Selects language for SET UP menus and displays on the TV Disc Subtitle Disc Menu Rating Password TV Aspect Menu Language Disc Audio Engl...

Страница 43: ...577 Cambodian 7578 Kannada 7579 Korean 7583 Kashmiri 7585 Kurdish 7589 Kirghiz 7665 Latin Code Language 7678 Lingala 7679 Laothian 7684 Lithuanian 7686 Latvian Lettish 7771 Malagasy 7773 Maori 7775 Ma...

Страница 44: ...zed disc Check Regional Code appears on the TV screen It is forbidden by law to copy broadcast show broadcast on cable play in public and rent copyrighted material without permission DVD video discs a...

Страница 45: ...Plug the power cord into the wall outlet securely Insert a disc Check that the DVD or audio CD indicator in the DVD display is lit Select the appropriate video input mode on the TV so the picture fro...

Страница 46: ...y Adjust the antennas and connect an external antenna if necessary Tune in the station manually Preset the stations page 31 Point the remote control at the remote sensor of the DVD receiver Operate th...

Страница 47: ...1 C 0 3 V p p 75 Tuning Range 87 5 108 MHz Intermediate Frequency 10 7 MHz Signal to Noise Ratio 50 dB Frequency Response 150 12 000 Hz Tuning Range 522 1 611 kHz Intermediate Frequency 450 kHz Stere...

Страница 48: ...f your DVD Receiver and how to adjust the customer controls Carry In Service The video product must be taken to a U S or Canadian Zenith authorized service center for warranty service and must be pick...

Отзывы: