background image

206-3803


P A G E   3 5

Using the PIP Feature

Using two-tuner, Picture-in-Picture (PIP) features

ENTER

0

MENU

RECORD

QUIT

PIP

PIP ch

FREEZ

CC

TV/VCR

SOURCE

PAUSE

TIMER

FLASHBK (FLASHBACK)

Returns to the last channel viewed. 

Up/Down/Left/Right Arrows
UP/DOWN ARROWS 

Swap Main and PIP sources

LEFT/RIGHT ARROWS 

Move PIP inset around screen.
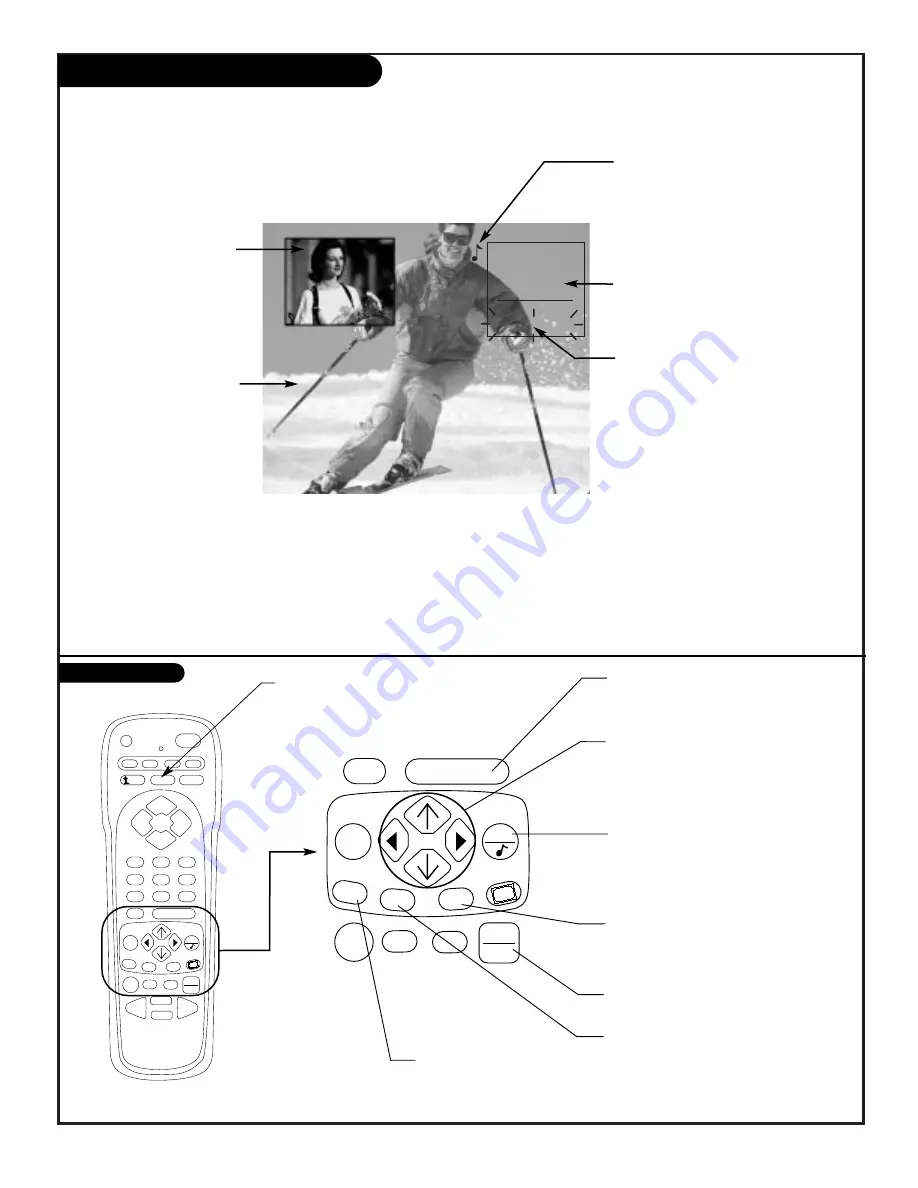
CH 32-UPN

2:45 

STEREO

PIP

CH 2-CBS

PM

PIP Inset Picture

Press PIP to turn PIP on

and off.

Move PIP Around Screen

Press Right/Left arrows to

move the PIP inset to the

other corners of the screen.

Main Screen Picture

With PIP off, press FREEZ to

place the Main screen pic-

ture in the PIP inset and

“freeze” the image thereby

turning PIP on. 

(A good

way to freeze the image so

you can write down phone

numbers etc.) 

Swap Main Picture with PIP

Press the Up/Down arrows repeatedly to swap the images
between the Main picture and PIP inset.

Main Picture Sourc

e

In Main picture channel tuning mode, press TV/VCR
SOURCE to change the source to ANTENNA/CABLE, Video
1, or Video 2. (Or, use the Setup Menu.)

Musical Note Symbol

Indicates if PIP or the Main screen is
the sound source. (In this case sound
is from Main screen source.) To change
sound source, press QUIT repeatedly
with the Channel/Time/Audio Display
on-screen.

Channel/Time/Audio Source Display

Press ENTER to show display. Shows
source for: Main picture, PIP, and
sound source (Main or PIP). 

Channel Tuning Mode

Press PIP ch repeatedly to switch
channel tuning between Main screen
and PIP inset.
Flashing shows channel tuning mode;
in this case, channel tuning is for the
PIP inset. (When you press Channel
Up/Down, the channels in the PIP
inset change.)

PIP Source

In PIP channel tuning mode, press
TV/VCR SOURCE to change the source
for the PIP inset to ANTENNA/CABLE,
Video 1, or Video 2. (Or, use the Setup
Menu.)

FREEZ

PIP On: Freezes image in PIP inset.
PIP Off: Freezes Main screen picture
in PIP inset and turns PIP on.

QUIT 

Chooses sound source. (With
Channel/Time Display on-screen.)

ENTER 

Shows Channel/Time Display on
Main screen.

TV/VCR SOURCE 

Chooses Main picture and PIP sources.

PIP

Turns PIP on and off.

PIP CH

Chooses the channel tuning mode;
Main screen channels or PIP chan-
nels.

PIP Key Functions

PRG

POWER

CABLE

VCR

AUX

TV

SURF

ENTER

FLASHBK

MUTE

CHANNEL

CHANNEL

VOLUME

VOLUME

1

2

3

4

5

6

7

0

8

9

MENU

REWIND

FFWD

RECORD

QUIT

PIP

PIP ch

FREEZ

CC

TV/VCR

SOURCE

PAUSE

TIMER

PLAY

STOP

Содержание C32A26

Страница 1: ...Copyright 2002 Zenith Electronics Corporation Operating Guide Warranty Machine Numbers C32A26 C36A26...

Страница 2: ...designed to provide reasonable protection against harmful interference when the equipment is operated in a residential installation This equipment generates uses and can radiate radio frequency energy...

Страница 3: ...er s instructions and should use a mounting accessory recommended by the manufacturer 8 Transporting Product A product and cart combination should be moved with care Quick stops excessive force and un...

Страница 4: ...you to dangerous voltage or other hazards Refer all servicing to qualified service personnel 20 Damage Requiring Service Unplug this product from the wall outlet and refer servic ing to qualified ser...

Страница 5: ...Control Menu 27 29 Restricts viewer programming Special Menu EZ Timer Sleep Timer On Time Off Time On Off Timer 30 Channel Labels 31 XDS Display 32 PIP Menu 33 Picture in Picture Overview and Explanat...

Страница 6: ...for hook up of your Entertainment Machine IMPORTANT Use this page to decide where you need to begin your setup First find the line below that best describes what you want to do then go to that page n...

Страница 7: ...antenna to your Entertainment Machine Hook up your Entertainment Machine see diagrams at right Remove the back of the remote and put in two AAA batteries Plug in your TV Do not plug it into a switche...

Страница 8: ...l jack Cable TV wall jack Cable box In Out RF coaxial wire 75ohm RF coaxial wire 75ohm 3 4 output switch TV back panel expanded view Antenna Cable Typical TV back TV back panel expanded view Antenna C...

Страница 9: ...ut 3 4 VCR back VCR back A V panel Flat wire 300 ohm Antenna 300 75 ohm Adapter output switch A V cables not included with TV TV back panel expanded view Typical TV back RF coaxial wire 75ohm not incl...

Страница 10: ...nment Machine Out 3 4 output switch Cable TV wall jack RF coaxial wire 75ohm In Out Audio R L Out Video Out 3 4 VCR back VCR back A V panel output switch A V cables not included with TV TV back panel...

Страница 11: ...ocate the Ant In jack on the back of your S VHS VCR Connect the cable line coming from your wall directly to this jack Now locate the Out to TV jack Connect a cable from the Out to TV jack to the ANTE...

Страница 12: ...These are for the stereo system Connect the stereo system s cables according to their color red is the right channel white the left to these jacks 1 Before you begin plugging in your stereo system it...

Страница 13: ...03 Note EZ Program finds channels being received by the TV tuner Cable will not work unless you subscribe to a cable service P A G E 1 3 Press MENU repeatedly until the SETUP menu appears Using the Up...

Страница 14: ...ric values for some options MENU Shows on screen menus for TV mode See page 18 MENU UP DOWN DIRECTIONAL ARROWS The Up Down directional arrows select and adjust menu options remote control part number...

Страница 15: ...NEXT NEXT MENU AUX BLOCK MPAA AGE BLOCK CONTENT BLK SET HOURS SET PASSWORD LOCK ON OFF PARENTAL CTRL MENU MOVE On screen menus automatically disappear after about 10 seconds Remote must be in the TV m...

Страница 16: ...he selected feature using the LEFT or RIGHT Volume arrow Wait a few moments and the menus will disappear by themselves or press MENU repeatedly to remove menus Menus disappear by themselves To get the...

Страница 17: ...nection Panels Where picture and sound sources are connected AUDIO VIDEO OUT VIDE O R AUD IO L AUDIO VIDEO OUT VIDE O R AUD IO L AUDIO IN R AUD IO L AUDIO VIDEO OUT VIDE O R AUD IO L Camcorder VCR S V...

Страница 18: ...30 Goes beyond basics and customizes your Entertainment Machine s features Your options are EZ Timer 30 Sleep Timer Sets a time that the TV will automatically turn itself off On Time Sets the time the...

Страница 19: ...nd source Remove On Screen Displays and Menus Press QUIT to remove displays or menus returning to TV viewing Or wait a few moments and the displays or menus will automatically disappear from the scree...

Страница 20: ...AGE SOURCE MENU SETUP MENU MOVE CH 20 Customize your channel selection list Add Channels not found by EZ Program Delete channels you don t watch Create a favorite channels list to Surf with Surf on on...

Страница 21: ...d two numbers that are entered when setting the clock FLASHBK Use to set AM or PM when setting time In the Setup menu with the EZ Clock option highlighted press the Adjust RIGHT arrow to go to the EZ...

Страница 22: ...osed Captions or Text available Press QUIT to remove menu and return to TV viewing The Caption Text feature sets up your Entertainment Machine to receive various closed caption and text options provid...

Страница 23: ...the Language option on your screen then press the Right arrow Use the Up Down arrow to choose any of the following options English Spanish or French Press QUIT to remove menu and to return to TV view...

Страница 24: ...1 VIDEO 2 With the smaller PIP inset picture on screen press PIP Ch repeatedly to toggle between Main Picture channel tuning mode and PIP inset channel tuning mode Pressing ENTER reveals what channel...

Страница 25: ...to reset the video menu settings to their original levels PRG POWER CABLE VCR AUX TV SURF ENTER FLASHBK MUTE CHANNEL CHANNEL VOLUME VOLUME 1 2 3 4 5 6 7 0 8 9 MENU REWIND FFWD RECORD QUIT PIP PIP ch F...

Страница 26: ...ogramming SAP If 2nd Audio SAP is selected and none is present audio may not be heard BASS TREBLE BALANCE AUDIO MODE FRONT SURR EZ SOUNDRITE SPEAKERS EZ SOUND Move Next Menu Adjust AUDIO MENU BASS 92...

Страница 27: ...ed on individual parameters such as Strong Dialog Bad Language Sex Scenes Violence Scenes or Fantasy Violence Scenes in the Content Blk option How many hours do you want Parental Control to be active...

Страница 28: ...an acceptable rating like TV Y7 See the Mini Glossary Ratings Charts on this and the previous page for rating meanings Press the Left arrow to go back to select another Content Block classification l...

Страница 29: ...TV 14 and above TV MA UNBLOCKED TV Y and above TV Y7 PARENTAL CTRL BACK MENU MOVE NEXT AUX BLOCK MPAA AGE BLOCK CONTENT BLK SET HOURS SET PASSWORD LOCK ON OFF DIALOG LANGUAGE SEX SCENES VIOLENCE F VI...

Страница 30: ...K to choose AM or PM Off Time With the EZ Timer menu selected use Up Down arrows to choose Off Time then press the Right arrow Use the number keypad or the Left Right arrows to pick a time for the TV...

Страница 31: ...h the alphabetical listing starting with A B C D etc Or use the Up arrow key to go through the alphabetical listing backwards starting with Z Y X W etc Autolabel setting will show a label if one is pr...

Страница 32: ...D QUIT PIP PIP ch FREEZ CC TV VCR SOURCE PAUSE TIMER PLAY STOP 1 4 Mini glossary XDS Extended Data Service if provided by the broadcaster may show some or all of the following information Channel Time...

Страница 33: ...turn to TV viewing Customize the PIP inset appearance and size 3 PRG POWER CABLE VCR AUX TV SURF ENTER FLASHBK MUTE CHANNEL CHANNEL VOLUME VOLUME 1 2 3 4 5 6 7 0 8 9 MENU REWIND FFWD RECORD QUIT PIP P...

Страница 34: ...from Set the main screen source to Antenna Cable then set the PIP source to Antenna Cable as an example Then if you use the TV s tuner to pick your channels you can enjoy 2 tuner PIP channel scan capa...

Страница 35: ...is the sound source In this case sound is from Main screen source To change sound source press QUIT repeatedly with the Channel Time Audio Display on screen Channel Time Audio Source Display Press ENT...

Страница 36: ...enu Press MENU repeatedly to select the SPECIAL menu Use the Up Down arrow to select the EZ DEMO option then press the Right arrow Use the Up Down arrow to choose either On then press ENTER EZ Demo wi...

Страница 37: ...XT MENU EZ TIMER CH LABELS XDS DISPLAY PIP MENU EZ DEMO EZ HELP SPECIAL MENU MOVE TO SET PRESS 4 PRG POWER CABLE VCR AUX TV SURF ENTER FLASHBK MUTE CHANNEL CHANNEL VOLUME VOLUME 1 2 3 4 5 6 7 0 8 9 ME...

Страница 38: ...th your Zenith remote control 5 3 Turn on the device you want to program On the chart on page 42 43 find the type of device you re programming and then find the brand name Make a note of the three num...

Страница 39: ...FFWD RECORD QUIT PIP PIP ch FREEZ CC TV VCR SOURCE PAUSE TIMER PLAY STOP 2 4 3 Indicator Light Find the code that operates your amplifier Test it to make sure it s the correct one by following the pr...

Страница 40: ...rogramming your Zenith remote may allow you to use one remote to work up to 7 different products or devices Some devices may not work with your Zenith remote control 3 Refer to the chart on page 42 43...

Страница 41: ...ER FLASHBK MUTE CHANNEL CHANNEL VOLUME VOLUME 1 2 3 4 5 6 7 0 8 9 MENU REWIND FFWD RECORD QUIT PIP PIP ch FREEZ CC TV VCR SOURCE PAUSE TIMER PLAY STOP Turn on the device you want the remote to control...

Страница 42: ...ure 2000 216 219 249 Sony 232 723 724 Sylvania 275 297 Tatung 268 292 Teac 268 Teknika 272 Toshiba 213 274 290 297 Vector Research 726 727 Victor 726 Video Concepts 726 727 XR 1000 243 Yamaha 726 Zeni...

Страница 43: ...441 931 948 Luxman 930 Magnavox 421 422 433 434 Marantz 929 947 MCS 928 Mitsubishi 927 Nakamichi 925 926 Onkyo 923 924 946 Optimus 920 921 922 Panasonic 431 432 945 Phillips 421 433 434 Pioneer 431 4...

Страница 44: ...t 4 AUX Digit 4 5 TV Digit 5 VCR Digit 5 Cable Digit 5 AUX Digit 5 6 TV Digit 6 VCR Digit 6 Cable Digit 6 AUX Digit 6 7 TV Digit 7 VCR Digit 7 Cable Digit 7 AUX Digit 7 8 TV Digit 8 VCR Digit 8 Cable...

Страница 45: ...aner and polish This will protect the Entertainment Machine from dirt and dust as well as keep the cabinet looking new If you leave your Entertainment Machine dormant for a long time such as a vacatio...

Страница 46: ...in TV or cable tuning mode and should be in the other Make sure output channels on all A V equipment are on the same channel 3 or 4 Check that all connections are tight Is the AC power cord plugged in...

Страница 47: ...the AUDIO menu to see if all the settings are correct EZ Demo feature is operating Turn EZ Demo off in the SPECIAL menu Is Parental Control set to block programming Check that all the wires are conne...

Страница 48: ...er a period of time EZ Help menu shows only two options SOLUTIONS Display will not function properly if a selected source does not have any equipment connected to it A Video source is the selected sou...

Страница 49: ...control is currently controlling TV VCR Cable etc is the remote s operating mode MONO SOUND Mono monaural sound is one channel of sound On more than one speaker all the speakers play the same audio 75...

Страница 50: ...Notes 206 3803 P A G E 5 0...

Страница 51: ...206 3803 P A G E 5 1 Notes...

Страница 52: ...IONS MAY NOT APPLY TO YOU OWNER S RESPONSIBILITY Effective Warranty Date Warranty begins on the date of original consumer purchase For your convenience keep the dealer s dated bill of sale or delivery...

Отзывы: