background image

Pg 4 of 16

Arrows on

cams

should be

pointing

up.

7

1

A

4

D

T

4

7

2

7

A

6

H

Finished edge

Finished edge

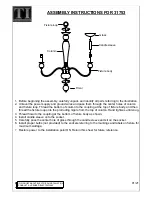
Place the assembly upside-down so the cam holes in the
side panels are on top. Insert cams (H) into cam holes mak-
ing sure the arrows on the cams are pointing up.

Insert one metal dowel (T), by tapping with a hammer, into
the top hole on each end in one of the curved trim pieces
(4). Insert one short dowel (D) into the bottom hole in each
end of the same curved rail (4).

Attach the curved trim piece (4) to the left top panel (7), by
inserting the dowels (D,T) into the dowel holes.

Fasten right top panel (6) to the assembly, by inserting the
dowels (D,T) into the dowel holes and using large screws
(A). 

5.

6.

3.

4.

2.

Insert 4 short dowels (D) into the holes in the middle fixed
shelf (2). Insert the short dowels (D) of the middle fixed shelf
(2) into the left top panel (7).

1.

Fasten the left top panel (7) to the top (1), using large
screws (A). 

IS9178

Содержание 9107W

Страница 1: ...sin costo por la llamada al 1 800 892 3986 entre las 8 00 AM y las 5 00 PM Hora del Este de lunes a viernes o comun quese con nuestro sitio Web en www zenith products com para obtener m s informaci n...

Страница 2: ...ort Dowels 8 Clavijas cortas 8 goujons courts G 4 Shelf Clips 4 Sujetadores para repisa 4 attaches d tag res L 4 Cam Caps 4 Cubiertas para levas 4 cache cames M 2 Bumper Strips 2 Tiras protectoras 2 b...

Страница 3: ...ently with a damp cloth DO NOT use strong detergents or abrasive cleaners they may damage the surface of this product Nota acerca de la limpieza Limpiar con un trapo seco puede ser suficiente pero par...

Страница 4: ...e curved trim pieces 4 Insert one short dowel D into the bottom hole in each end of the same curved rail 4 Attach the curved trim piece 4 to the left top panel 7 by inserting the dowels D T into the d...

Страница 5: ...he top assembly Attach the curved trim piece 4 to the left bottom panel 9 by inserting the dowel D and using a large screw A Attach the right bottom panel 8 to the curved trim piece 4 by inserting the...

Страница 6: ...cket screws R making sure the long sides of the mounting brackets are facing the front of the assembly Carefully place bottom assembly on top assembly by lining up dowels E and cambolts O with holes T...

Страница 7: ...e assembly until the space saver is placed over the toilet The bottom rail may be adjusted using different holes in the bottom side panel 19 21 20 Mounting Instructions 1 It is imperative that the uni...

Страница 8: ...corte 4 golpeando suavemente con un martillo Inserte una clavija corta D en el orificio inferior en cada extremo de la misma pieza curva con recorte 4 Fije la pieza curva con recorte 4 al panel superi...

Страница 9: ...s el ensamble superior Fije la pieza curva con recorte 4 al panel inferior izquierdo 9 insertando la clavija D y utilizando un tornillo grande A Fije el panel inferior derecho 8 a la pieza curva con r...

Страница 10: ...soportes de montaje est n orientados hacia el frente del ensamble Coloque cuidadosamente el ensamble inferior sobre el ensamble superior alineando las clavijas E y los pernos para levas O con los ori...

Страница 11: ...ensamble sino hasta que el economizador de espacio se coloque sobre el inodoro El riel de soporte se puede ajustar utilizando diferentes orificios en los paneles laterales inferiores 19 21 20 Instrucc...

Страница 12: ...aque extr mit d un chambranle incurv 4 Introduisez un goujon court D dans le trou inf rieur situ chaque extr mit du m me chambranle incurv 4 Fixez le chambranle incurv 4 au panneau sup rieur gauche 7...

Страница 13: ...nit sup rieure Fixez le chambranle incurv 4 au panneau inf rieur gauche 9 l aide du goujon D et d une vis longue A Fixez le panneau inf rieur droit 8 au chambranle incurv 4 l aide du goujon D et d une...

Страница 14: ...le plus long des supports se trouve sur l avant du meuble Posez d licatement l unit inf rieure sur l unit sup rieure en alignant les goujons E et les boulons cames O avec les trous Vissez chaque came...

Страница 15: ...dos du meuble avant d avoir plac ce dernier au dessus des toilettes La position de la traverse d appui sur les panneaux lat raux inf rieurs peut tre modifi e en pla ant les vis dans des trousdiff ren...

Страница 16: ...ni re l aide de cette vis Hinge Adjustments Ajuste de las bisagras R glages des charni res Lateral Adjustment Screw allows for adjusting the door 2 5mm left or right El tornillo para el ajuste lateral...

Отзывы: