Zenith Soap Dispenser Installation & Operating Instructions 87401NZ - June 2008
Page 3
A. Service Instructions
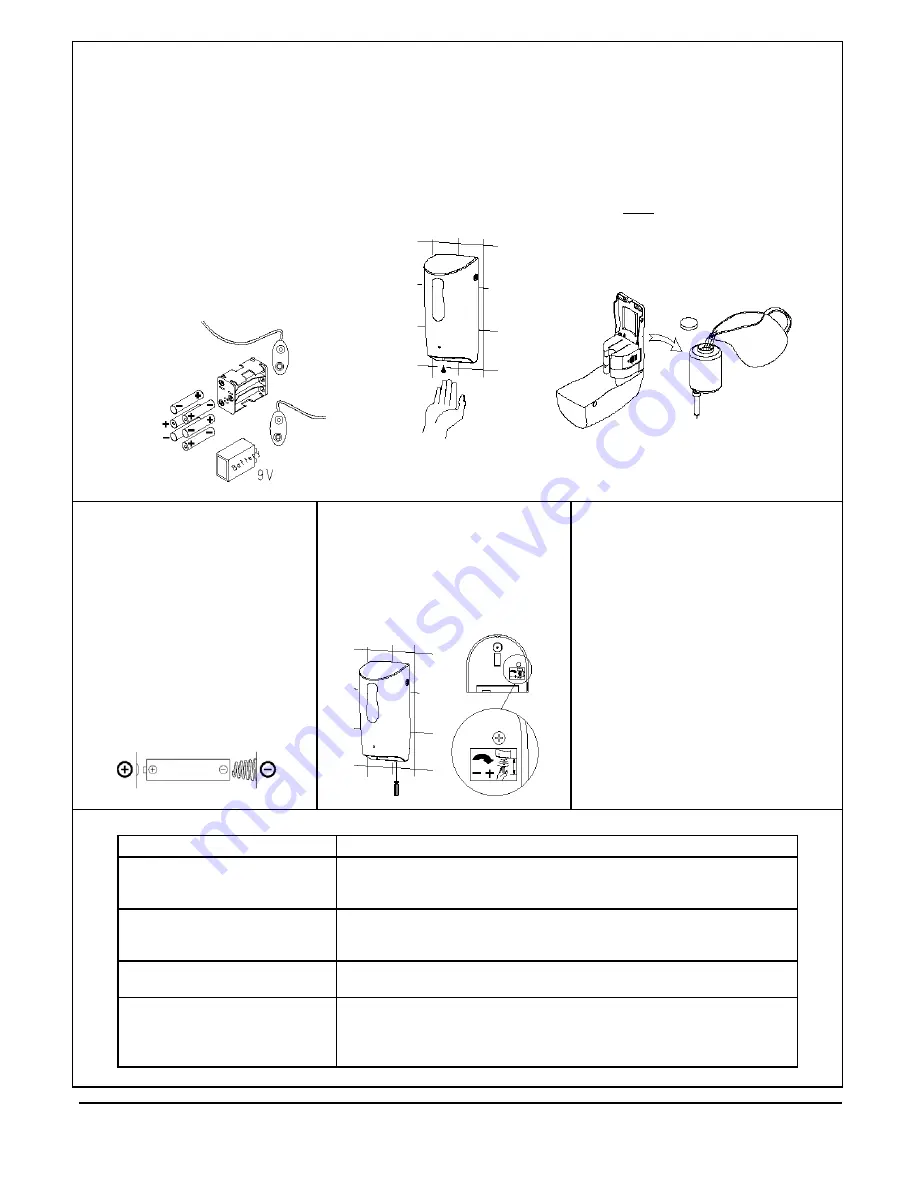
1. Open the casing using the key provided.
2. Remove cover from battery box, put 6 pieces of Alkaline AA
1.5V batteries into the battery box, put box back into original
casing and close with cover.
3. Remove soap container, open it and pour liquid soap into the
container. Close properly. Should any soap spill over the
outside of the container, it must be cleaned thoroughly.
Replace soap container in its original position. Close the
casing and lock it.
4. Wait 5 seconds, then place your hands under the dispenser.
The LED will turn on and the dispenser will release a portion
of liquid soap.
5. When using for the first time, repeat that process a few
times to order to fill the system.
6. A flashing LED will indicate low battery. Replace batteries
with new ones. If problem persists, contact your dealer.
1. The sensing distance is factory set.
2. If adjustment is necessary, proceed as follows:
-Use a small flat-head screwdriver. Insert into
small hole at the bottom of the dispenser as
shown in Fig. 10.
-Turn clockwise to increase the sensing distance
and counter-clockwise to reduce it.
-Do not apply excessive force.
1. Check if soap dispenser is firmly fixed to the
wall.
2. Check if soap container is closed properly
and no soap is leaking.
3. Use 6 pieces of new Alkaline AA (1.5V)
batteries (or alternately, use 1 piece of 9V
Alkaline battery). Ensure that the batteries
are installed properly and in the right
direction (o/- indication).
4. Once batteries are installed and casing is
closed, a red light will flash 4 times to
indicate normal function. If casing is re-
closed within 40seconds, LED will not flash.
5. Make sure soap dispenser is locked properly
using the key provided.
6. OPERATION INSTRUCTIONS :
8. ADJUSTMENT OF SENSOR :
7. INSTALLATION CHECK :
10. TROUBLE SHOOTING (FOR QUALIFIED ELECTRICIAN USE ONLY) :
Fig. 10
1. Ensure no light source is aimed at the sensor
from below.
2. Ensure that no light reflection occurs through
any object within a distance of 45cm below the
sensor.
3. Use a pure liquid soap only and clean the soap
container properly before each re-fill. Deposits
of old soap will lead to malfunction and
jamming.
4. Do not dilute liquid soap and do not use grain
containing soap. Observe specified viscosity
factor of liquid soap.
5. Do not immerse the soap dispenser in water or
clean it under running water. This will lead to
short circuit.
6. Should the dispenser be out of order and
batteries have been replaced, do not attempt
any repair work. Call your dealer for professional
assistance.
9. IMPORTANT NOTICE :
Problem
Solution
LED does not indicate
- Check batteries and ensure that they are new and properly inserted.
- Check sensor cover for stain. Clean unit properly.
- Check sensor distance. If adjustment is necessary, refer to Section 8
.
LED flashes when unit is not used
- Low voltage: Change batteries (Fig. 7)
- Sensor is activated constantly. Remove the object below the sensor.
- If above does not help, return the unit to your dealer for professional assistance.
No soap discharges when motor works
- Obstructed soap dispenser nozzle. Clean soap container or change it.
- Check if soap is not liquid enough (viscosity as per specification).
Insufficient soap is released
- Soap has hardened: use unit fro several times or remove soap container and wash it thoroughly.
- Soap nozzle is obstructed:wash soap container and use unit continuously until normal quantity
is dispensed.
- Check sensor distance. If adjustment is necessary, refer to Section 8.
B. Users Instructions
1. Put palm of your hand under the dispenser. The
sensor will activate and the motor will release
1~2ml of liquid soap. If you need more soap,
repeat the movement a few times, waiting at
least 1 second before you replace your hand
under the unit. Do not scoop soap from the nozzle
as this may lead to damage. (Fig. 8)
2. For refilling liquid soap into the container, always
remove the ocntainer completely from the
housing and then fill it. NEVER never fill when the
soap tank is still in the dispenser housing. (Fig. 9)
For all other enquiries call you local deal for technical assistance.
AA (1.5V)
Fig. 9
AA x 6
Fig. 7
Fig. 8


