Carl Zeiss
Left Tool Area and Hardware Control Tools
Lightsheet Z.1
76
000000-1790-528
02/2013
3.2.12
Multidimensional Acquisition –
Multiview-Setup
The
Multiview-Setup
tool tab is only available, if
the
Multiview
checkbox is ticked in the
Multidimensional acquisition
field. The
Z-Stack
checkbox will be automatically activated along
with the
Multidimensional acquisition
field and
greyed out since every Multiview setup requires a
Z-Stack. When the
Multiview-Setup
tool tab is
expanded the
Multiview-Setup
control panel
becomes available.
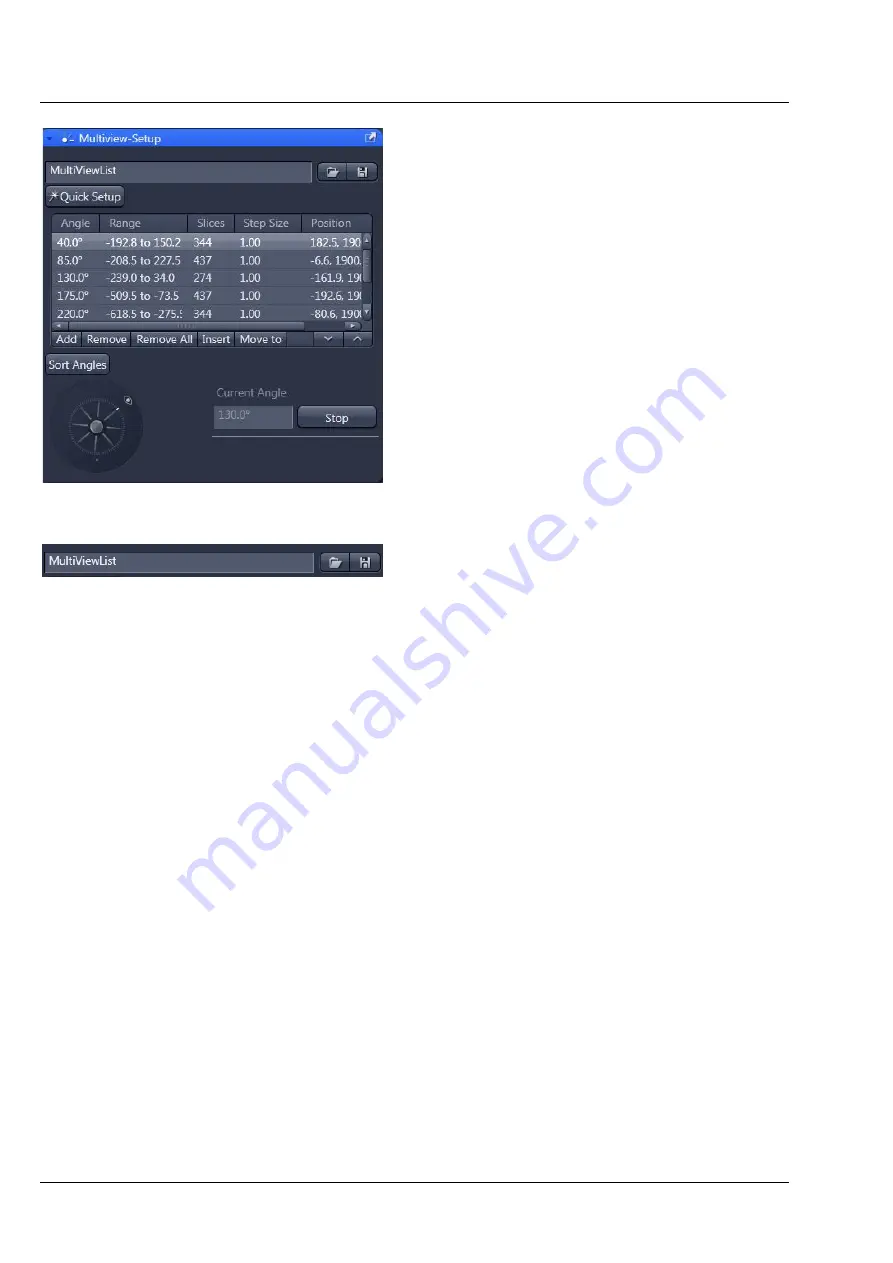
The
Multiview-Setup
tool tab is divided into
three regions (Fig. 117). The upper region is the
organization region and the access to the
Quick
Setup
wizard. In the middle you find a list of
created Views and their control buttons.
In the lower part of the tool tab is an illustration of
the angle from which the detection optics (eye
symbol) is facing the sample (middle cylinder). The
zero angle is indicated by the dot at the bottom of
the outer circle. To easily get an overview of the
assigned angles, this graphic shows a stable
sample and translates the relative movement of the
detection optics, whilst in the system the sample is
moved and the detection optics remains in place.
Next to this graphical display is the
Current Angle
shown. To interrupt the movement from one angle to
the next when
Move to
has been pressed, the
Stop
button can be clicked. This button must not be used
during an experiment in progress.
You can load a predefined MultiViewList (Fig. 118) by pressing the
Load
button (symbolized by the
folder
icon). This opens a Windows explorer window in which you can open the folder and select the
MultiViewList file (.mvl) to open. Its name will appear in the Input box.
To save a list of Views, press the save button (symbolized by the disc). This opens a Windows explorer
window. Here you can choose a folder and name for the MultiView List file (.mvl).
You can define a series of
Views
which shall be used for image acquisition. A View is defined by the
angle, x- and y-position; for each View a Z-Stack can be associated. The information about a View is
shown in the table:
Angle:
angle position of the specimen in regards to the detection optics
Range:
First and Last Z-position of the defined Z-Stack for that View
Slices:
Number of Z-Slices of the Z-Stack defined for that View.
Step Size:
Interval used in the Z-Stack defined for that View.
Position:
displays the motor coordinates defining x, y, and z to position the sample (x,y,z). The values for
x and y will change when the sample is moved in x, y, or rotated (only if
Center of Image
is activated)
with the controls in the
Specimen Navigator
tool tab, or for x and y with the Ergo Drive control panel.
Values for z can only be influenced by the Z-Stack defined within the Z-Stack tool tab for that View.
To add a View, place the sample using the
Specimen Navigator
tool tab or the Ergo Drive control panel
hardware, then press the
Add
button.
Fig. 117
Multiview-Setup panel
Fig. 118
Multiview Setup, MultiViewList
organisation panel
Содержание Lightsheet Z.1
Страница 1: ...Lightsheet Z 1 Operating Manual February 2013 ZEN 2012 black edition ...
Страница 4: ......
Страница 170: ......
Страница 427: ...Lightsheet Z 1 Overview ...


