Lightsheet Z.1
Left Tool Area and Hardware Control Tools
Carl Zeiss
02/2013
000000-1790-528
61
3.2.8.2
Defining Detector and Illumination Settings
To define the detector and illumination settings, you can either highlight the track or channel in the
Track selection display
by clicking on the track or channel bar next to the track name or the colored
square of the channel. This will display the detector and illumination settings for the marked track or
channel. To open the detector and illumination settings for all tracks and channels, press the
Expand All
button; to close the display for all, press the
Collapse All
button.
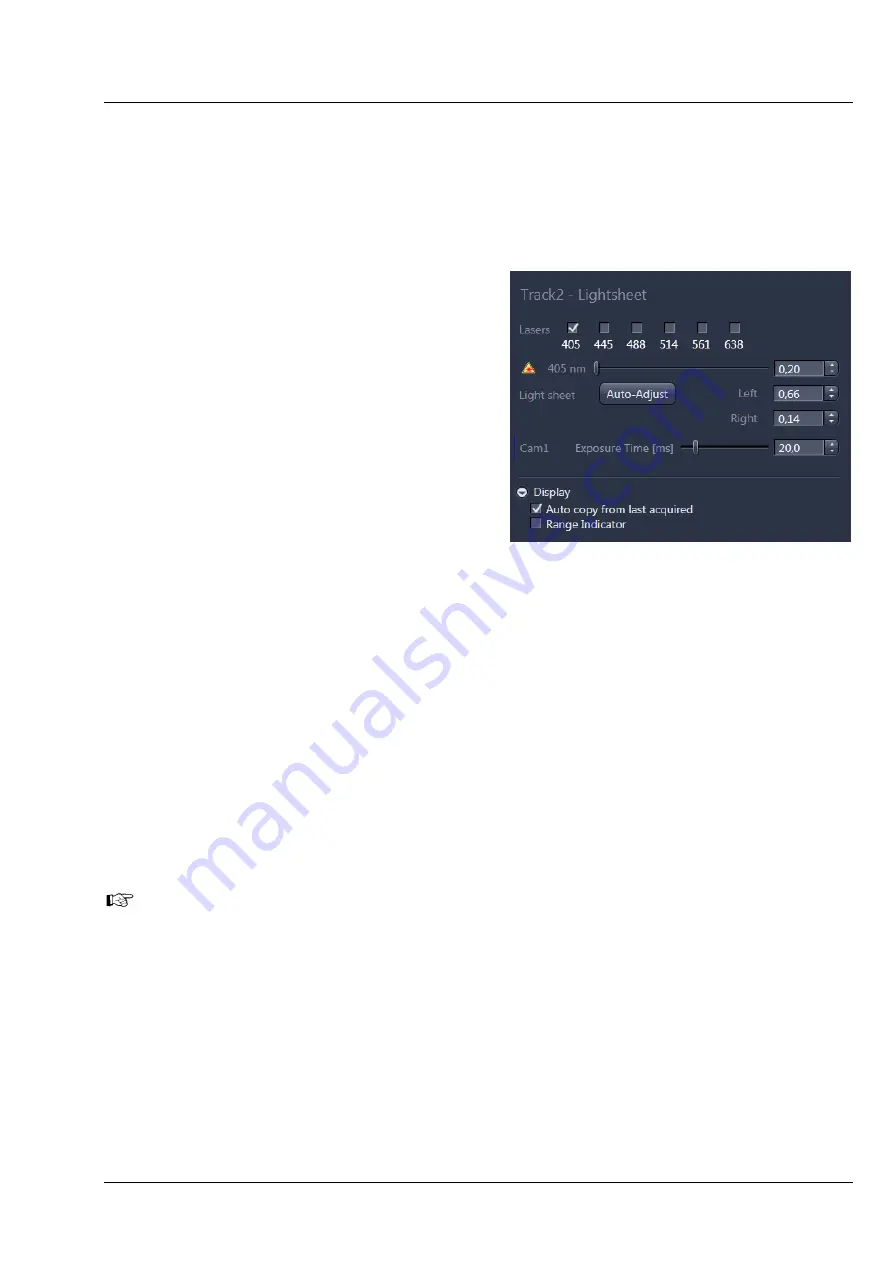
Within the
Detector and Illumination settings
display (Fig. 88) the options for Illumination are
given in the upper half and the options for the
detection module are in the lower half.
You can activate a laser line by marking the
according
Lasers
checkbox. For each chosen laser
line, a slider with input box and arrows appear.
Here you can set the laser power in percentage of
total output.
With one or more activated laser lines, the tools to
adjust the light sheet, the Light Sheet
Auto-
Adjust
button, and the input boxes
Left
and
Right
, become visible. If
Single Side Illumination
is chosen in the
Acquisition Mode
tool window
the respective input box is accessible while the
other one is inactive. This way only the chosen
illumination side can be changed.
The numbers of the input boxes correspond to the Light sheet adjustment settings for the left and for the
right illumination side. They can be changed manually. For proper adjustment, the Auto-Adjust wizard
can be used. For each Track this alignment must be done separately.
The light sheet adjustment is needed to guarantee a slim light sheet with the liquid in the sample
chamber and the embedding medium of the sample present in the beam path. The adjustment is always
done for the laser with the lowest wavelength, when multiple lasers are used in the same track.
This adjustment should be performed right before the image acquisition or experiment is started. The
sample should be in position and all other settings in the Light Path, Acquisition Mode, Channel Tool, etc.
set. After the Light sheet Auto-Adjust procedure, the original position of the sample is restored and
imaging can start without further modification. If the image quality is not as expected, it might be
necessary to perform this correction again during an imaging session. The
Auto-Adjust
button leads you
through a wizard-based step-by-step process.
Be aware that Light sheet
Auto-Adjust
is done right before the acquisition starts. If you change
the Zoom settings (e.g. during Multiview Quick Setup), you need to repeat the Light sheet
Auto-
Adjust
process.
Fig. 88
Detector and Illumination settings
display
Содержание Lightsheet Z.1
Страница 1: ...Lightsheet Z 1 Operating Manual February 2013 ZEN 2012 black edition ...
Страница 4: ......
Страница 170: ......
Страница 427: ...Lightsheet Z 1 Overview ...


