background image


OPERATION 

Carl Zeiss 

Illumination and Contrast Techniques in Reflected Light 

Axio Vert.A1 


88 

431030-7044-001 

05/2012 


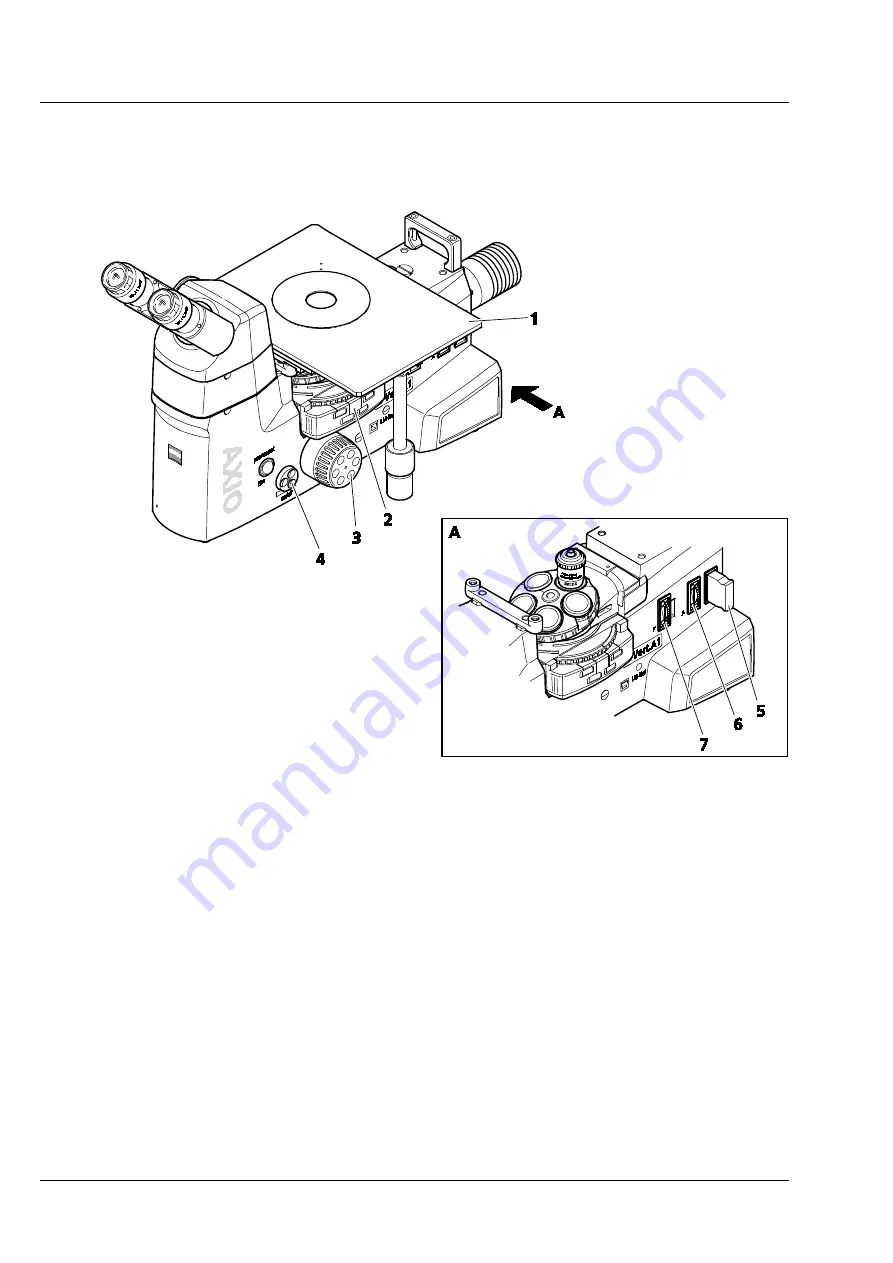
If required, adjust the illumination intensity on the 

On/off

  control button (Fig. 4-14/

4

) or place a 

neutral-density filter into the filter slider (Fig. 4-14/

5

) and slide it into the light path. 


Fig. 4-14 

Setting Bright Field 


Содержание Axio Vert.A1

Страница 1: ...Operating Manual Axio Vert A1 Inverted Microscope ...

Страница 2: ...hts reserved in the event of the grant of a patent or the registration of a utility model All the names of firms or products mentioned in this Operating Manual may be trademarks or registered trademarks Other products are mentioned for information only Such mention neither constitutes endorsement nor recommendation of those products Carl Zeiss Microscopy GmbH is not liable for the performance or u...

Страница 3: ... 4 Axio Vert A1 MAT Stand for Reflected Light Material 32 2 6 Operation and Functional Elements of Optional Components 34 2 6 1 Phototube and Intermediate Phototube 34 2 6 2 Microscope Stages 36 2 6 3 Condensers 37 2 6 4 Objective Nosepiece with Objectives 38 2 6 5 Filter Slider and Slider for Aperture and Luminous Light Diaphragms for the Axio Vert A1 MAT and Axio Vert A1 FL Stands 39 2 6 6 Filte...

Страница 4: ...e of LD Objectives 71 4 2 Use of Korr Objectives 71 4 3 Use of Immersion Objectives 72 4 4 Possible Condenser Objective and Diffusion Disk Combinations 72 4 5 Use of Objectives 73 4 6 ECO Power Saving Function 73 4 7 Height Stop for the Focusing Drive 74 4 8 Operating Functions on the Axio Vert A1 FL LED Stand 74 4 9 Light Manager Function on the Axio Vert A1 MAT Stand 75 4 10 USB Interface on the...

Страница 5: ...Page 1 21 Fig 2 5 Axio Vert A1 System Overview Material Stand Page 2 22 Fig 2 6 Axio Vert A1 27 Fig 2 7 Axio Vert A1 FL 29 Fig 2 8 Axio Vert A1 FL LED 31 Fig 2 9 Axio Vert A1 MAT 33 Fig 2 10 Binocular Phototube 45 23 and Binocular Phototube Left 45 23 34 Fig 2 11 Intermediate Phototube Left with Exchangeable Mirror 34 Fig 2 12 Adjusting the Viewing Height on the Binocular Tube 35 Fig 2 13 Binocula...

Страница 6: ...00 Illuminator 58 Fig 3 23 Changing the Halogen Lamp 59 Fig 3 24 Connecting and Switching on the Microscope 60 Fig 3 25 Installing Diaphragms in the Modulator Disk of the Condenser 61 Fig 3 26 Inserting and Changing Diaphragms in the Slider 63 Fig 3 27 Orienting the Slit Diaphragm in the Slider as a Function of the Position to the Microscope Axis 63 Fig 3 28 Changing a Filter Set in the FL P C Ref...

Страница 7: ...IC 90 Fig 4 16 Setting the Polarization 93 Fig 4 17 Setting Fluorescence 95 Fig 4 18 Screw on Options for Micromanipulators 96 Fig 5 1 Replacing Fuses 98 NOTE The figures integrated into the text bear numbers and captions Fig 2 8 for instance means the figure in Section 2 identified by consecutive number 8 Details discussed in the text are marked with a reference slash and a location number In run...

Страница 8: ...tion and warnings that need to be observed by the user The following warning and caution symbols are used in this Operating Manual WARNING This symbol indicates a hazard that may arise to the user WARNING Hot Surface WARNING LED Risk Group 1 under IEC 62471 LED radiation is emitted Do not look into the LED beam It may be dangerous for your eyes WARNING UV radiation leakage IMPORTANT Pull the power...

Страница 9: ...s unit allows power supply voltages ranging from 100 V to 240 V 10 50 Hz 60 Hz to be used without requiring any change of voltage on the microscope Before turning the power supply units for the HBO 50 HBO 100 illuminators on be sure to check whether they are suitable for the existing supply voltage Always pull the power plug before opening the instrument and replacing fuses The equipment fuses use...

Страница 10: ... environment Be sure to operate the instrument on a hard non flammable surface only LED Risk Group 1 under IEC 62471 LED radiation is emitted Never look into the LED beam of the illuminator be it with or without optical instruments Failure to heed this warning may result in eye damage Do not place combustible and highly inflammable materials near the light beam Be certain to read the safety notes ...

Страница 11: ...d to the Microscope and to Components Carl Zeiss 05 2012 431030 7044 001 11 1 2 Nameplate and Warning Labels Attached to the Microscope and to Components Fig 1 1 Nameplate on the Axio Vert A1 FL Stand and Warning Labels on the LED Illuminator for Transmitted Light ...

Страница 12: ... Nameplate and Warning Labels Attached to the Microscope and to Components Axio Vert A1 12 431030 7044 001 05 2012 Fig 1 2 Warning Labels on the Axio Vert A1 FL LED Stand Fig 1 3 Warning Labels on the VIS LED 423053 9030 000 ...

Страница 13: ...r and tear in particular defective consumables and improper operation The manufacturer of the instrument will not be liable for any damage attributable to operation errors negligence or tampering with the instrument This is especially true for damage caused by the removal or replacement of components or the use of accessories made by other manufacturers Acts of this kind will void all and any warr...

Страница 14: ...INTRODUCTION Carl Zeiss Types of Stands General Views Axio Vert A1 14 431030 7044 001 05 2012 1 4 Types of Stands General Views ...

Страница 15: ...s for samples taken from the human body Examples of observation and culture vessels Culture bottles Petri dishes and microtiter plates The microscopes are typically used for medical examinations in laboratories hospitals and medical practices in science and research colleges universities for industrial applications pharmacology food technology for the examination of blood and tissue samples from t...

Страница 16: ...r a digital video camera via specific adapters for the purpose of image documentation 2 2 Instrument Description and Main Features Axio Vert A1 microscopes are high performance desktop instruments available in four microscope stand versions Axio Vert A1 Inverted transmitted light microscope Axio Vert A1 FL LED Inverted transmitted light reflected light fluorescence microscope with fluorescence exc...

Страница 17: ...l interference contrast Reflected light fluorescence contrast as an alternative to or simultaneous with transmitted light contrasts It is possible to adapt reflected light fluorescence to the application task concerned by changing the fluorescence filter combination reflector module FL Flexible use of the stage thanks to an attachable object guide Use of different mounting frames or inserts for va...

Страница 18: ...NSTRUMENT DESCRIPTION Carl Zeiss System Overview Axio Vert A1 18 431030 7044 001 05 2012 2 3 System Overview 2 3 1 Stands for Biomed Applications Fig 2 1 Axio Vert A1 System Overview Biomed Stands Page 1 ...

Страница 19: ...INSTRUMENT DESCRIPTION Axio Vert A1 System Overview Carl Zeiss 05 2012 431030 7044 001 19 Fig 2 2 Axio Vert A1 System Overview Biomed Stands Page 2 ...

Страница 20: ...INSTRUMENT DESCRIPTION Carl Zeiss System Overview Axio Vert A1 20 431030 7044 001 05 2012 Fig 2 3 Axio Vert A1 System Overview Biomed Stands Page 3 ...

Страница 21: ...INSTRUMENT DESCRIPTION Axio Vert A1 System Overview Carl Zeiss 05 2012 431030 7044 001 21 2 3 2 Stand for Material Applications Fig 2 4 Axio Vert A1 System Overview Material Stand Page 1 ...

Страница 22: ...INSTRUMENT DESCRIPTION Carl Zeiss System Overview Axio Vert A1 22 431030 7044 001 05 2012 Fig 2 5 Axio Vert A1 System Overview Material Stand Page 2 ...

Страница 23: ...tand 12 3 kg Axio Vert A1 FL Stand 11 7 kg Axio Vert A1 MAT Stand 10 3 kg Actual weight of the stand without any attachments such as stages tubes etc Ambient Conditions Shipping in Packaging Permissible ambient temperature 40 C to 70 C Storage Permissible ambient temperature 5 C to 40 C Maximum permissible humidity without condensation 75 at 35 C Operation Permissible ambient temperature 5 C to 35...

Страница 24: ...o line voltage change over required Line frequency 50 Hz 60 Hz Maximum power consumption when operated with HAL 100 280 VA Axio Vert A1 Fluorescence Reflected Light LED Illumination Reflected light fluorescence illumination via exchangeable LED modules Selectable wavelengths 365 nm 385 nm 420 nm 445 nm 455 nm 470 nm 505 nm 530 nm 590 nm 615 nm 625 nm or neutral white 540 nm to 580 nm LED classific...

Страница 25: ...or lamp for fluorescence Maximum power consumption of power supply unit for HBO 50 90 VA Maximum power consumption of power supply unit for HBO 100 155 VA VIS LED reflected light LED classification LED risk group 1 according to DIN EN 62471 2009 Wavelength 400 nm to 700 nm peak at 460 nm Power supply Via microscope or external power supply unit Voltage 0 VDC to 12 VDC Maximum power consumption 20 ...

Страница 26: ...y of transmitted light on off Turn the control button to increase or lower illumination intensity Press the control button to switch transmitted light illumination on or off 10 permanent ECO switch permanent position Transmitted light illumination is switched on permanently with the ECO power saving function not activated ECO position The ECO power saving function is activated 11 Power indicator b...

Страница 27: ...INSTRUMENT DESCRIPTION Axio Vert A1 Operation and Functional Elements on the Microscope Carl Zeiss 05 2012 431030 7044 001 27 Fig 2 6 Axio Vert A1 ...

Страница 28: ...on intensity Press the control button to switch transmitted light or reflected light illumination on or off 14 permanent ECO switch permanent position Transmitted light illumination is switched on permanently with the ECO power saving function not activated ECO position The ECO power saving function is activated 15 Power indicator blue 16 Slot for filter sliders left hand and right hand sides 17 S...

Страница 29: ...INSTRUMENT DESCRIPTION Axio Vert A1 Operation and Functional Elements on the Microscope Carl Zeiss 05 2012 431030 7044 001 29 Fig 2 7 Axio Vert A1 FL ...

Страница 30: ...ation Turn the control button to increase or lower illumination intensity Press the control button to save light intensity values of the LED illumination permanently 15 permanent ECO switch permanent position Illumination is switched on permanently with the ECO power saving function not activated ECO position The ECO power saving function is activated Applies to both transmitted light and reflecte...

Страница 31: ...INSTRUMENT DESCRIPTION Axio Vert A1 Operation and Functional Elements on the Microscope Carl Zeiss 05 2012 431030 7044 001 31 Fig 2 8 Axio Vert A1 FL LED ...

Страница 32: ... not activated ECO position The ECO power saving function is activated 12 Power indicator blue 13 Slot for filter sliders left hand and right hand sides 14 Slot A for aperture diaphragm slider 15 Slot for polarization slider A rotatable 90 degrees 16 Slot F for luminous field diaphragm slider 17 LM Set button 18 USB port 19 Slot for TIC C DIC sliders 20 Slot for DIC sliders in the objective nosepi...

Страница 33: ...INSTRUMENT DESCRIPTION Axio Vert A1 Operation and Functional Elements on the Microscope Carl Zeiss 05 2012 431030 7044 001 33 Fig 2 9 Axio Vert A1 MAT ...

Страница 34: ... light source To obtain artifact free images use the dust caps provided for the eyepieces Intermediate Phototube Left Using an exchangeable slider Fig 2 11 2 and the intermediate phototube you can direct the light to the eyepieces to the camera attached on the left hand side or to both simultaneously For this purpose you may install either the beam splitting mirror or the mirror The slider itself ...

Страница 35: ...e by adjusting the eyepiece tubes in relation to one another vary the viewing height by tilting the eyepiece tubes upward Fig 2 12 A or downward Fig 2 12 B Binocular Ergotube 30 60 23 This tube has been designed for field of view 23 By tilting the binocular part Fig 2 13 1 you can adjust the viewing angle continuously between 30 and 60 Fig 2 12 Adjusting the Viewing Height on the Binocular Tube Fi...

Страница 36: ...itted light and reflected light With the object guide Fig 2 15 2 attached this stage is capable of holding specimens in mounting frame Flex M Fig 2 15 1 and mounting frame inserts for Petri dishes or object slides and chambers as well as accommodating mounting frame M from the current product line Coaxial drive Fig 2 15 3 designed to position the mounting frame in XY To attach the object guide to ...

Страница 37: ...to guard against glare Depending on the type of slider employed the condenser can be utilized for the bright field phase contrast PlasDIC or VAREL methods For optical reasons the Ph PlasDIC H Var slider is suitable for condenser 0 4 only LD Condenser 0 4 H Ph PlasDIC DIC iHMC Condenser with an adjustable aperture diaphragm Fig 2 18 1 for the bright field position position 1 of the modulator disk w...

Страница 38: ...ver the camera field with the help of an imaging software such as AxioVision Be sure to choose the condenser setting that produces the highest illumination intensity Depending on the phase stop or slit diaphragm or the condenser modules employed the condenser can be utilized for bright field phase contrast DIC contrast or PlasDIC contrast 2 6 4 Objective Nosepiece with Objectives Five fold objecti...

Страница 39: ... 21 3 to open or close the diaphragm can be inserted from the right 2 6 6 Filter Slider Mounted on the Carrier for Transmitted Light Illumination Alternately usable two position transmitted light filter slider Fig 2 22 2 for d 32 mm filters neutral density and conversion filters or shutter plate fixed mounted in the carrier Fig 2 22 1 If an LED illuminator is used the shutter plate can be inserted...

Страница 40: ...roscope and put it into operation 3 1 Mounting Standard Components 3 1 1 Microscope Unpacking and Setup The various Axio Vert A1 models including their accessories are delivered in industry standard packaging Open the packaging Take out the carton box containing the accessories Grasp the grip openings and pull the polyethylene packaging containing the microscope stand out of the carton box and set...

Страница 41: ...ediate piece may be added If the ergotube is employed only ergo intermediate pieces of up to 25 mm should be used however The utilization of the 50 mm extension would require optical compromises For the installation follow the same procedure as for the installation of the tube To mount or change the tube proceed as follows Use ball headed screwdriver SW 3 to loosen the Allen screw Fig 3 2 3 on the...

Страница 42: ...f the auxiliary microscope you can focus on those diaphragms and stops As an alternative to the auxiliary microscope you can employ a diopter for viewing aperture diaphragms and phase stops or centering phase stops 3 1 4 Inserting an Eyepiece Reticle Eyepiece reticles Fig 3 4 3 may be inserted into eyepieces marked with a red dot The slight image shift resulting from the additional path through gl...

Страница 43: ...ve to lock focus on the microscopic image of the specimen put on Then use the adjustment features of the second adjustable eyepiece to lock focus on the microscopic image for the second eye In so doing be sure to leave the setting of the focusing drive on the microscope stand unchanged 3 1 5 Screwing Objectives in Place Remove as many dust caps Fig 3 5 2 as there are objectives Take the objectives...

Страница 44: ...stage Fig 3 6 2 onto the three locating points Fig 3 6 4 of the stand and fasten it with three Allen screws Fig 3 6 1 two at the front one at the back 3 1 6 2 Mounting the Specimen Stage If the fixed specimen stage is included in the order placed for the stand the specimen stage will be supplied factory mounted Fasten the bar Fig 3 7 5 of the specimen stage to the two locating points at the front ...

Страница 45: ... The traversing ranges of the scanning stage in X and Y directions may be restricted in the following way if necessary X direction In order to change the right or left stop for the X direction loosen the relevant stop screw Fig 3 8 2 on the underside of the stage move the screw into the desired position and retighten it Y direction In order to change the front or rear stop for the Y direction firs...

Страница 46: ...ng stage follow the same procedure as for the mechanical stage Before placing the gliding stage on the stand screw out the three support blocks located on the underside of the gliding stage Put spacer washers on the three locating points of the stand Position the gliding stage on the stand and fasten it from the top with three Allen screws In so doing make sure that the screws also go through the ...

Страница 47: ...ifted crosswise but lengthwise to the microscope axis Thus conflicts between the movements of the manipulator and the slider are avoided and the slider is easier to operate In order to enlarge the specimen space the condenser may additionally be shifted to the back in its slot toward the reflected light illumination carrier This applies to slider condensers only Inserting the Condenser into the Ca...

Страница 48: ...he locking ring to slide downward and turn it leftward 3 1 8 Inserting Stop Sliders into Condensers 0 3 or 0 4 for Sliders Pull the dust protection slider out of the slider slot Move the required slider into the condenser from the right or left and wait until it has snapped into the desired position The center position corresponds to bright field and is provided with neutral density filters for li...

Страница 49: ... inclined position from below with the locating elements Fig 3 12 4 on the right hand and left hand sides into the two upper clamping springs Fig 3 12 1 Then press the module against the lower clamping springs Fig 3 12 2 from the front until the module is safely locked in place While inserting the module make certain that it does not get jammed and that you press it securely against the upper stop...

Страница 50: ...the illuminator base in place Take the halogen lamp Fig 3 13 2 out of the packaging box and insert it into the mount Fig 3 13 3 In so doing make sure that the tip of the mount engages in the centering notch of the carrier plate see arrow in Fig 3 13 of the halogen lamp CAUTION Do not touch the bulb with your bare hands If required clean the bulb with pure alcohol before you switch it on for the fi...

Страница 51: ...n order to prevent dirt from burning into the glass Pull the illuminator cap Fig 3 14 1 upward off the carrier support Fig 3 14 5 Pull the malfunctioning halogen lamp Fig 3 13 2 out of the mount Fig 3 13 3 Insert the new halogen lamp Fig 3 13 2 into the mount Fig 3 14 3 In so doing make sure that the tip of the mount engages in the centering notch of the carrier plate see arrow in Fig 3 13 of the ...

Страница 52: ...be sure to fit the supplied shutter plate in the second position of the slider in the carrier to block the light path temporarily Last Checking Step Insert the three pin plug of the transmitted light illuminator into the connector socket located at the back of the stand or into the jacks marked TL on the Axio Vert A1 MAT and switch the halogen lamp on 3 1 11 Attaching Illuminators for Reflected Li...

Страница 53: ...rom the reflected light port Fig 3 16 2 Insert the HBO 50 Fig 3 16 1 or the adapter for the HXP 120C illuminator with the dovetail directly into the reflected light port Fig 3 16 2 and lock it into position with the clamping screw Fig 3 16 3 using ball headed screwdriver SW 3 When it comes to the HBO 100 be sure to attach the 35 mm distance ring Fig 3 16 4 onto the reflected light port in the same...

Страница 54: ...r on the power supply unit The burner will ignite automatically Screw out an objective Using a free passage check the source image on a sheet of paper held at a distance of approximately 10 mm above the objective shoulder Using the adjusting screw Fig 3 17 1 set the burner in axial direction to the mirror until the two light arcs appear equally sized on the source image see Fig 3 17 4 Position the...

Страница 55: ...s to protect your eyes when observing the bright light spot Insert a filter set for GFP green fluorescent protein Switch on the fully connected illuminator on the power supply unit The burner will ignite automatically Screw out an objective Using a free passage check the source image on a sheet of paper held at a distance of approximately 10 mm above the objective shoulder Using the knurled knob F...

Страница 56: ...ition Insert the three pin illuminator plug Fig 3 19 3 into the lower socket Fig 3 19 5 for reflected light RL at the back of the instrument Put the TL RL switch Fig 2 9 22 into the position for reflected light RL Adjusting the VIS LED Attachment Illuminator Switch on the attachment lamp via the operational microscope See Section 1 1 Switch off the diffusion disk Fig 2 9 26 and remove the filter f...

Страница 57: ...ion 3 1 13 The halogen lamp can only be operated with the external power supply unit Loosen the clamping screw Fig 3 21 2 on the reflected light port Fig 3 21 1 and remove the cap Insert the illuminator housing Fig 3 21 3 with the dovetail ring into the port Fig 3 21 1 Use ball headed screwdriver SW 3 and the locking screw Fig 3 21 2 to fix the illuminator firmly into position Insert the plug of t...

Страница 58: ...as sharply defined as possible Use the adjusting screws Fig 3 22 2 and 3 to align the lamp filaments and their mirror image in such a way to each other that the mirror image fills up the spaces of the lamp filaments Fig 3 22 5 Fine Adjustment Reattach the microscope lamp to the microscope stand and fix it into position using the clamping screw Switch off the diffusion disk Fig 2 9 26 and remove th...

Страница 59: ...of the HAL 100 Fig 3 23 1 halogen illuminator pull out the illuminator drawer completely Fig 3 23 2 and set it down separately Press down the two spring levers Fig 3 23 5 and pull the old halogen lamp Fig 3 23 6 out upward Press down the two spring levers insert the new lamp into the lamp base Fig 3 23 4 and release the spring levers Be sure to always use the replacement tool Fig 3 23 7 for holdin...

Страница 60: ...eck and if necessary replace the two G fuse links in the event of a malfunction See Section 5 2 2 If required use the separate power supply unit to switch on the fluorescence illuminator e g HBO 50 or HBO 100 or HXP 120C on the Axio Vert A1 FL stand or the halogen illuminator HAL 100 on the Axio Vert A1 MAT See Section 3 1 11 1 Fig 3 24 Connecting and Switching on the Microscope If the microscope ...

Страница 61: ...ot have to be taken out of its mount when diaphragms are to be installed or changed Loosen the quick locking mechanism of the condenser and turn the condenser in such a way that the mounting hole on the right hand or left hand side of the transmitted light illumination carrier becomes accessible Tighten the quick locking mechanism Remove the sealing cap Fig 3 25 5 from the mounting hole Each of th...

Страница 62: ...sm are automatically centered via the hole Fig 3 25 15 and the shoulder Fig 3 25 9 For the DIC prism and the PlasDIC diaphragm rotate the alignment unit Fig 3 25 7 of the mounting tool to allow the cam Fig 3 25 10 to engage into the recess Fig 3 25 12 Hold the alignment unit Fig 3 25 7 and turn the mounting tool Fig 3 25 6 out of the contrast module Remove the mounting tool and reinsert the sealin...

Страница 63: ... spring Fig 3 26 5 Turn the centering screws in until the stop is securely fixed and rests almost centrically in the mount Inserting PlasDIC Slit Diaphragms Turn the centering screws Fig 3 26 6 completely out of the mount hole Place the slit diaphragm Fig 3 26 2 into the mount Use the recess Fig 3 26 7 on the slider and the pin Fig 3 26 1 on the side of the module to fix the diaphragm in its posit...

Страница 64: ...in Fig 3 28 5 and then secure them with the retaining rings Fig 3 28 1 Both the barrier filter and the excitation filter may carry their designation and an arrow on the circumference The arrow which must always point inwards indicates the direction in which the filter in question is to be installed into the reflector module See arrows in Fig 3 28 With a view to minimizing the image shift in multif...

Страница 65: ...arrows Fig 3 29 7 mark the illumination beam path or the imaging beam path 3 3 4 Changing the Beam Splitter in the FL P C Reflector Module Please proceed with utmost care in mounting the filters and the beam splitter to avoid damaging and soiling optical components We recommend that you order fully fitted FL P C reflector modules from Carl Zeiss as changing the beam splitter is a demanding operati...

Страница 66: ... two parts together into the lower module half Make sure that the tongue of the frame sits in the relevant recess of the lower module half The reflecting coated side Fig 3 32 3 of the beam splitter is provided with a beveled edge Fig 3 32 1 or corner Fig 3 32 2 Place the excitation module half Fig 3 31 1 on the emission module half Fig 3 31 4 The retaining elements Fig 3 31 5b and the eyes Fig 3 3...

Страница 67: ...the cover Fig 3 33 2 and the spring Fig 3 33 3 Take out the existing beam splitting mirror Fig 3 33 4 Then insert the desired beam splitting mirror with the coated surface downward Put on the spring so that the gib of the spring engages into the existing groove and the bent edge of the short sides around the mirror Put on the cover and fasten it with the screw In so doing make sure that the openin...

Страница 68: ...ving a front diameter of 27 5 mm to 34 mm When attaching bellows see to it that the upper edge does not form any collection tray Close unused objective holes with the protective caps supplied Plug the cut to size drain hose Fig 3 34 3 onto the drain outlet Fig 3 34 6 Push the other end of the hose through the plug of the collection bottle Fig 3 34 4 in such a way that the hose projects some 3 mm t...

Страница 69: ... 35 3 of the LED module Fig 3 35 5 to be changed Push the clamping strap Fig 3 35 4 of the module mount outward and pull out the LED module Slide the LED module to be employed into the LED mount as far as it will go The clamping strap will lock the LED module firmly in its groove Insert the plug of the LED module into the corresponding socket until it snaps into position Attach the cover and secur...

Страница 70: ...rying handle Remove the cover screw Fig 3 36 5 from the tapped hole Take the carrier Fig 3 36 1 out of the packaging Turn out the three Phillips screws Fig 3 36 7 of the cover at the back of the carrier Fig 3 36 8 and remove the cover from the carrier Set the carrier onto the stand Fig 3 36 4 and loosely attach it with the three screws Fig 3 36 6 and 9 and washers using the special screwdriver sup...

Страница 71: ...length of all the other objectives Plug the appropriate cover slip cap Fig 3 37 1 onto the objective to adapt LD A Plan objectives to thin bottoms or cover slips 4 2 Use of Korr Objectives For an excellent image the correct cover slip thickness is important It is for this reason that Korr objectives can be adjusted to cover slips of different thicknesses through a correction mount To this end sele...

Страница 72: ...r each experiment Excessive amounts of immersion oil may get into the mechanical system of inverted microscopes where the oil could adversely affect their functionality For cleaning suggestions please refer to the brochure entitled The Clean Microscope 4 4 Possible Condenser Objective and Diffusion Disk Combinations The following combinations are recommended Condensers Objectives Diffusion Disks C...

Страница 73: ...me microscope use This will save energy and extend the service life of the transmitted light illumination halogen lamp Activating the Power Saving Function Put the permanent ECO Fig 2 8 15 switch into the ECO position The illumination will automatically shut off after approximately 15 minutes of operation and go into the stand by mode You can terminate the power saving function by pressing the On ...

Страница 74: ...age into the desired position Then clamp the stop again by pressing the clamping lever downward 4 8 Operating Functions on the Axio Vert A1 FL LED Stand TL RL Switch in RL Position You can set reflected light LED brightness by rotating the illumination intensity control button Fig 2 8 14 To permanently save the LED brightness set for the reflector turret position in use press the control button Fi...

Страница 75: ...he LM Set button will be set again even when you switch the microscope off and turn it on again later Separate values are saved for reflected light and transmitted light The TL RL switch is in the RL position for reflected light A brightness value will be saved for every nosepiece position The TL RL switch is in the TL position for transmitted light A brightness value will be saved for every nosep...

Страница 76: ...hragm is not meant to adjust image brightness loss of image quality If required adjust illumination intensity by turning the on off control button or inserting the attenuation filter into the filter slider Fig 4 2 1 and moving it into the light path Use of a conversion filter and a shutter plate is recommended when you employ the LED lamp for transmitted light illumination To this end insert the c...

Страница 77: ... 4 3 4 into the light path Open the aperture diaphragm Fig 4 3 3 of the condenser completely Instead of the eyepiece insert the auxiliary microscope Fig 4 3 5 into an eyepiece tube and render the phase rings of the objective visible by focusing its eye lens The phase ring of the phase contrast objective appears as a gray ring in the bright pupil Fig 4 4 A Move the phase stop of the slider Fig 4 3 ...

Страница 78: ...s locked into position A plane parallel specimen is required if an exact image of the phase stop is to be obtained Use two SW 1 5 Allen wrenches to center the phase stop for the condenser with modulator disk The holes for accessing the centering screws are located to the left and right on the condenser Then replace the auxiliary microscope by the eyepiece Due to the fluid meniscus working with Ph ...

Страница 79: ...e specimen into the retaining clips Fig 4 5 3 of the object guide Move the VAREL position of the Ph PlasDIC H VAR slider Fig 4 5 2 into the light path until the notch for the currently selected specimen magnification has been found There are three different notches for VAREL The contrast desired can be adjusted via the setscrew Fig 4 5 1 You may insert the var slider in two different orientations ...

Страница 80: ... beams can interfere with one another in the intermediate image with the path differences resulting in different gray values intensities Requirements The microscope must have properly been put into operation as described in Section 3 The microscope must be switched on Condenser 0 4 with modulator disk and built in DIC I 0 4 or DIC II 0 4 condenser module or condenser 0 55 with modulator disk and b...

Страница 81: ...e condenser Fig 4 8 1 rotate the proper DIC I II or III condenser module as identified by the stickers on the front of the condenser into the light path Put the three position contrast slider Fig 4 8 2 with the analyzer position into the stand or rotate in the D P C analyzer module on the reflector turret Watch for the correct locking position Adjust optimum contrast using the knurled thumb screw ...

Страница 82: ... one of the two required if a PlasDIC slider is used Objective for PlasDIC e g LD A Plan 10x 20x 32x 40x or 63x Setting PlasDIC Open the aperture diaphragm on the condenser completely Put on the specimen Rotate in the PlasDIC diaphragm on the condenser Fig 4 8 1 with modulator disk or move the PlasDIC position of the slider on the condenser into the light path Brightness may have to be increased a...

Страница 83: ...must be switched on Condenser 0 4 with modulator disk and built in iHMC modules 1 2 or 3 Polarizer slider D 10 mm x 46 mm rotatable 90 degrees Objective for iHMC Auxiliary microscope Aligning the iHMC Module in the Condenser Rotate in the condenser Fig 4 9 5 in such a way that its change position Fig 4 9 4 is located on the right hand side of the transmitted light illumination carrier Fig 4 9 1 Fo...

Страница 84: ...of the relief impression Fig 4 9 2 in the field of view Fig 4 9 3 For that see Examples A and B in Fig 4 9 The concrete approach selected may of course deviate from the examples provided The position shown can be altered by as much as 45 degrees Whenever iHMC is meant to be employed for several magnifications it makes sense to proceed in a similar way to position the diaphragms of the iHMC modules...

Страница 85: ...f the zone plate and area b of the iHMC diaphragm line up completely in middle position if possible Fig 4 11 3 In the example shown the position of the contrast elements may appear rotated in relation to Fig 4 11 depending on the relief impression orientation chosen Remove the auxiliary microscope and insert the eyepiece Stick onto the relevant space for the condenser position used the condenser l...

Страница 86: ...light path Insert the analyzer slider Fig 4 13 2 a P C analyzer module in the reflector turret may be used as an alternative into the slot Fig 4 13 1 under the nosepiece The analyzer can be rotated 90 degrees Use the analyzer turning lever Fig 4 13 4 to cross the vibration direction of the analyzer and polarizer dark position The analyzer slider may be inserted both from the left hand and right ha...

Страница 87: ...d objectively Requirements The microscope must have properly been put into operation as described in Section 3 The microscope must be switched on VIS LED or HAL 100 reflected light illumination Setting Bright Field Place the specimen on the specimen stage Fig 4 14 1 and focus at weak magnification e g using the EC Epiplan 10x objective and the focusing drive Fig 4 14 3 Set the position for bright ...

Страница 88: ...cted Light Axio Vert A1 88 431030 7044 001 05 2012 If required adjust the illumination intensity on the On off control button Fig 4 14 4 or place a neutral density filter into the filter slider Fig 4 14 5 and slide it into the light path Fig 4 14 Setting Bright Field ...

Страница 89: ...faces All the light scattering details will light up brightly in the dark field while reflecting plane surfaces will remain dark Requirements The microscope must have properly been put into operation as described in Section 3 The microscope must be switched on VIS LED or HAL 100 reflected light illumination Objectives for dark field designation HD P C dark field module Setting Dark Field Rotate in...

Страница 90: ...cation and aperture are engraved on the upper side of the slider or C DIC slider For DIC DIC P C or DIC Rot I P C reflector module For C DIC C DIC TIC reflector module Setting DIC Set up the microscope for reflected light bright field as described in Section 4 12 1 Open the luminous field diaphragm until the edge of the diaphragm just about disappears from the field of view to avoid reflections On...

Страница 91: ...ditional contrast effects by turning the adjustment wheel on the C DIC slider Additional Comment When using the differential interference contrast or the differential interference contrast in circularly polarized light the contrast develops through a pseudo relief in the specimen When it comes to linear structures the contrast depends therefore on whether those structures are oriented in light sha...

Страница 92: ...themselves as different gray values when passing the analyzer Requirements The microscope must have properly been put into operation as described in Section 3 The microscope must be switched on VIS LED or HAL 100 reflected light illumination Objectives for polarization designation Pol DIC P C reflector module in the reflector turret or Pol P C reflector module plus analyzer slider A 12x35 mm rotat...

Страница 93: ...6 4 dark position The analyzer slider may be inserted both from the left hand and right hand sides For the purpose of color contrasting anisotropic materials compensator Lambda Pol sub 10 Fig 4 16 3 may be used in addition to compensator Lambda To do so place the compensator on the analyzer Setting Polarization with Analyzer Slider A 12x35 mm Rotatable 90 Degrees and Polarizer Slider A 6x30 mm Set...

Страница 94: ... operation and switched on as described in Section 3 Bright field objectives FL P C reflector module in the reflector turret Illuminators for fluorescence HBO 50 HBO 100 Colibri 2 HXP 120 C Prior to their use the HBO 50 or HBO 100 illuminators need to be adjusted and warmed up for about 15 minutes as described in Section 3 1 11 2 and 3 1 11 3 respectively HAL illuminator or LED illuminator for tra...

Страница 95: ...0 7044 001 95 Insert the FL attenuator into slot A for aperture sliders Set the correct brightness with the adjustment wheel Additional excitation filters measuring 25 mm in diameter and held in position by O rings can be inserted into the additional filter slider Fig 4 17 8 Fig 4 17 Setting Fluorescence ...

Страница 96: ... carrier for transmitted light illumination which are covered by protective caps When employing micromanipulators you may want to use the condenser for stop sliders in a position that has been rotated 90 degrees so that the slider is shifted lengthwise rather than crosswise to the microscope axis Conflicts between the movements of the manipulator and the slider are thus avoided and the slider is e...

Страница 97: ...le outward to the edge of the surface In so doing apply light pressure on the optical surface Heed the following suggestions when using the Axio Vert A1 in regions with a hot and humid climate Keep the microscope in bright dry and well ventilated rooms where humidity is less than 65 Store particularly susceptible components and accessories such as objectives and eyepieces in drying cabinets If you...

Страница 98: ...ctives and eyepieces for cleanliness and damage 5 2 2 Replacing Fuses on the Microscope Always be sure to pull the power plug before replacing fuses Should any fuse on the instrument fail the cause of such failure must first be determined and any technical defect that may exist must be properly repaired The fuse compartment is located at the back of the microscope The compartment is combined with ...

Страница 99: ...vice or specially authorized personnel only In order to ensure that your microscope stays optimally adjusted and operates smoothly for a longer period of time we recommend that you sign a service maintenance contract with Carl Zeiss Whenever you require service contact your regional dealer or Carl Zeiss Microscopy GmbH Carl Zeiss Promenade 10 07745 Jena Germany microscopy zeiss com www zeiss com m...

Страница 100: ...pean Standard Ergo Ergonomic ergonomics FL Fluorescence foc Focusable fot fotografisch photographic H HF Hellfeld bright field iHMC improved Hoffman modulation contrast IEC International Electrotechnical Commission IP Internal protection degree of protection provided by the housing ISO International Standardization Organization Korr Korrektion correction L Left control knob on the left of the mech...

Страница 101: ...e VIS LED 56 B Beam splitter 65 Binocular part 26 28 30 32 Bright field 76 87 C Care 97 C DIC reflector module 91 C DIC slider 91 Changing diaphragms in the condenser 61 Changing diaphragms in the slider 63 Changing the LED module 69 Checks 98 Coarse focusing 26 28 30 32 Compensator 92 Components 34 Optional 61 Standard 40 Condenser 26 28 30 37 72 Connecting the microscope 60 Contrast slider 26 28...

Страница 102: ... Focusing drive 26 28 30 32 G Gliding stage Z 46 H HAL illuminator 50 Halogen lamp 51 59 Height stop 26 28 30 32 74 I iHMC 83 85 Illumination intensity 26 28 30 32 Illumination method 76 87 Immersion objective 72 Inserting a condenser 47 Inserting stop sliders 48 Instrument description 15 16 Instrument safety 8 Intended use 15 Intermediate phototube 34 Intermediate tube 34 Interpupillary distance ...

Страница 103: ...ptomechanical data 25 P Permanent ECO toggle switch 30 73 Phase contrast 77 Phototube 34 PlasDIC 82 PlasDIC module 26 28 30 32 PlasDIC slider 26 28 30 32 Pol reflector module 92 Polarization 92 Polarizer slider A 32 92 93 Polarizer slider DL 37 Power indicator 26 28 30 32 Power saving function 73 Property rights 105 Putting the instrument into operation 40 Putting the microscope into operation 40 ...

Страница 104: ...Specimen stage 26 30 44 Stand 18 21 26 30 32 74 Switching the microscope on 60 Swiveling a condenser 47 System overview 18 T Technical data 23 TL RL toggle switch 30 32 Transmitted light 26 28 30 76 77 79 80 82 83 86 Transmitted light illumination 26 28 30 Tube 26 28 30 32 34 41 Types of stands 14 U Unpacking 40 USB interface 75 USB port 32 Use of LD Objectives 71 V VAREL contrast 79 Viewing heigh...

Страница 105: ...instruments components or processes described in this manual are protected by the following patents See the label attached to the microscope stand authorized dealer Pulch Lorenz microscopy Am Untergrün 23 D 79232 March tel 07665 9272 0 fax 07665 9272 20 mail kontakt pulchlorenz de web pulchlorenz de ...

Страница 106: ......

Отзывы: