background image

Page 6  

|

    ZvPro 800i-EU Configuration Guide    

www.zeevee.com

Front Panel Configuration

You can set the RF broadcast channels or 

implement delay matched audio using the front 

panel controls. In many cases, your ZeeVee 

modulator will require only these configurations.

Setting the RF broadcast channel,  

RF power or audio delay

1.

 Unlock the panel by pressing/holding together 

the left and right arrow buttons (


) until 

“Setup” lights up. 

2.

 Press “OK” to enter the Configuration screen. 

3.

 Use the arrow buttons (




) to go to 

each item you want to configure (such as 

RF Number, RF Power or Audio Delay), then 

press “OK” to edit the highlighted field. Use 

the up and down (



) arrow buttons to 

scroll through the options for that field.

4.

 Once you’ve made changes, press “OK” to 

accept. You can then select the next item for 

configuration.

5.

 When finished making changes, use the 

arrow buttons to scroll down and select 

“Apply,” then click “OK” to save your changes.

Note: The front panel locks automatically after 

a few seconds. To make more changes, press/

hold the left and right arrow buttons again to 

re-enter the setup screen.

To update firmware:

• If unit is connected to the 

internet and can communicate 

with our servers, select Update 

Firmware from the Setup screen 

and press “OK”.

To reset IP address:

• When using DCHP, select Reset 

IP Address to force a release/

renew of your IP address, and 

press “OK”.

To restore factory defaults or 

revert firmware:

1.

 Power down the unit.

2.

 Hold the left and right arrows 

down and reapply power. You 

will be prompted to a screen:

•  Press up arrow to reset to 

defaults;

•  Press down arrow to revert 

firmware.

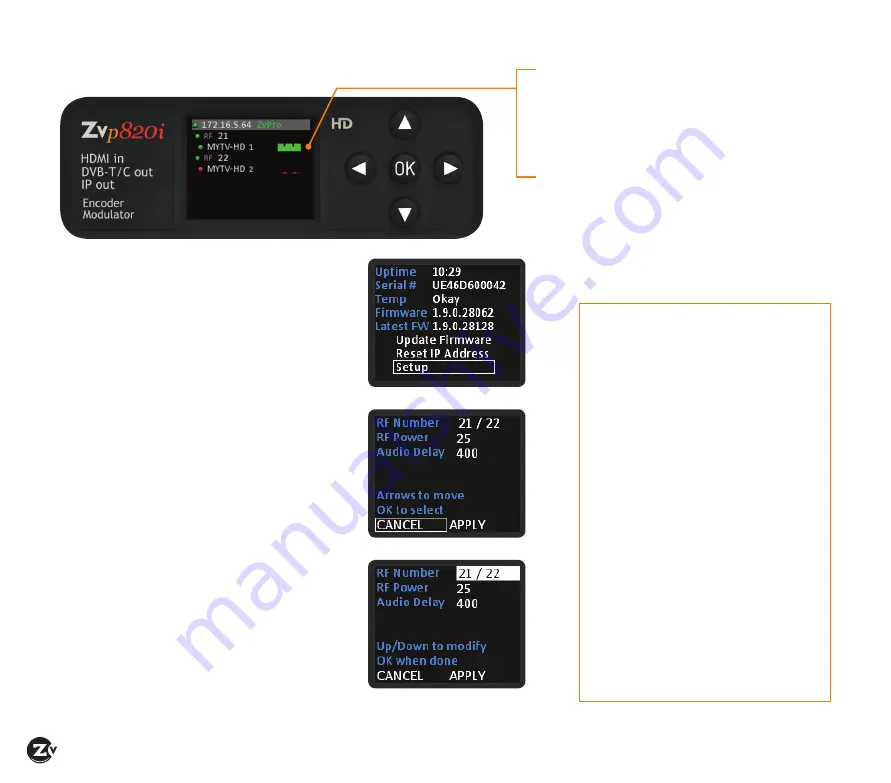
Shows audio/video being encoded

 Green —  Both audio and video are detected
 Yellow —  Video, but no audio detected
  Red —  No video detected

SETUP SCREEN

CONFIGURATION SCREEN

ACTIVE CONFIGURATION SCREEN

Содержание ZvPro Series

Страница 1: ...EU ZvPro 800i CONFIGURATION GUIDE ZvPro810i ZvPro820i i S E R I E S...

Страница 2: ...s voltage with in the product s enclosure that may be of sufficient magnitude to constitute a risk to persons The exclamation point within an equilateral triangle is intended to alert the user to the...

Страница 3: ...aestro tabs 10 11 Troubleshooting 12 13 Warranty 15 Declaration of Conformity 16 Contact ZeeVee 16 Available Separately ZeeVee Modulator What s in the Box Here s what you can expect to find when you o...

Страница 4: ...B T C RF CATV output channels for up to 2 video sources Output power can be set between 45 to 25 dBmV using the Maestro web interface or the front panel Audio Video Inputs Digital Audio Video Unencryp...

Страница 5: ...l Output of the ZvPro to your RF network If the RF power for your network is too high you will observe video breakup 2 Set the RF Input on the TVs to DVB T default or DVB C with the Symbol Rate 6740 K...

Страница 6: ...figuration 5 When finished making changes use the arrow buttons to scroll down and select Apply then click OK to save your changes Note The front panel locks automatically after a few seconds To make...

Страница 7: ...r a frequency such as 474 MHz RF Channel Band MHz 21 470 478 22 478 486 23 486 494 24 494 502 25 502 510 26 510 518 27 518 526 28 526 534 29 534 542 30 542 550 31 550 558 32 558 566 33 566 574 34 574...

Страница 8: ...u can see the general information status Configuring RF numbers and logical channel numbers LCN 1 Click on the RF Channel Plan tab 2 Click in the RF field and enter the RF number as you choose from th...

Страница 9: ...at is attached to a display COMPUTER OR SERVER If you want secondary processing of the stream the stream can be sent to a server or servers In such a case UDP unicast addressing is typically used to a...

Страница 10: ...dio systems first port only Using the Maestro tabs Click on the Maestro tabs to configure your unit as needed We provide brief information here Please click on the Help button on each tab or refer to...

Страница 11: ...e firmware as well as configure Emergency Alerts System EAS You can find detailed information on EAS in the Support section of the website THE NETWORK TAB Allows you to assign a static IP address THE...

Страница 12: ...age Breakup Image or video break up is often caused by an issue in the RF coax network You may have chosen a channel number that is not completely vacant If you are combining with other modulators be...

Страница 13: ...se it is traveling a shorter path To work around the issue you can try one of the following Use an audio delay device that allows you to add a delay to the audio stream before it reaches the sound sys...

Страница 14: ...intentionally blank...

Страница 15: ...ee Any modifications or other changes to the ZeeVee Equipment including but not limited to software or hardware modification in any way other than as expressly authorized by ZeeVee will void these lim...

Страница 16: ...irements of the EMC Directive 2004 108 EC and the Low Voltage Directive 2 6 95 EC and carry the CE Marking accordingly All listed products meet the RoHS guidelines for electronic components and hardwa...

Отзывы: