background image

Page 8  

|

  ZvPro 800 Configuration Guide    

www.zeevee.com

Maestro Configuration

Maestro is a configuration tool that you use optionally to 

customize your system beyond what is allowed in the front 

panel. For example, using Maestro you can assign a channel 

number (virtual channel) independent of the RF number and 

label the channels.

Connecting with Maestro

1.

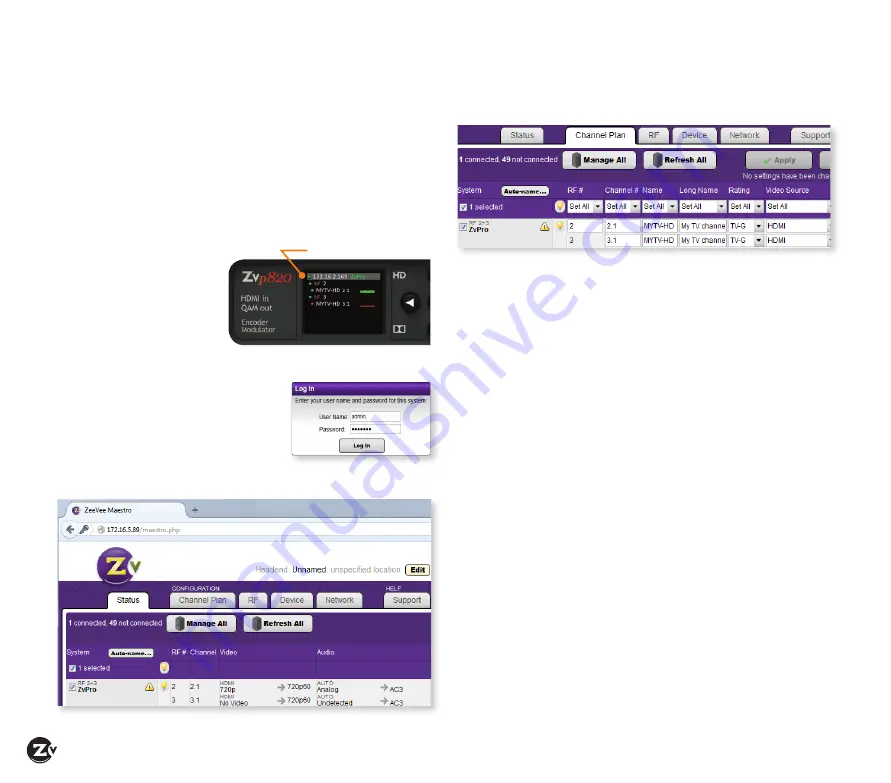
 Connect your computer directly to the ZeeVee modulator 

using a standard Ethernet cable (not a cross-over cable) or 

connect the unit and your computer to any LAN that has a 

DHCP server.

2.

 After a few moments, 

an IP address will 

appear at the top of 

the front panel display.

3. 

Using any web browser 

(Chrome or Firefox 

preferred), enter the IP address to launch Maestro.

4.

 You will be directed to a login page. 

Your user name is always “

admin

.” 

The default password is “admin” 

but you can change the password. 

Login is case-sensitive.

5.

 After you log in, the Maestro Status tab appears. Here you 

can see the general information status.

Configuring RF numbers and virtual channels

1.

 Click on the Channel Plan tab.

2.

 Click in the RF # field and enter the RF number as you 

choose from the RF Frequency Map (on page 7).

 Make sure 

you’ve reviewed the RF Frequency Map Important Notes 

before completing this task.

3.

 Click in the Channel # field and enter a channel number 

(virtual channel). The channel number is what the TV 

displays. You can configure a channel number two ways:

•  As a dotted number — Enter the number with a “.” 

following it, for example, “5.1”. This is the default display.

•  As a dotless number — Enter the number with a “#” 

preceding it, for example, “#5”.

Note that you can choose a channel number that is different 

from the RF#. For instance, if your RF# is 3, you can choose a 

channel number of 10.1 or #10. 

4.

 Click Apply to save changes. Your unit stores configurations 

so they are not lost on power-down.

5

. Run Auto Scan at TV (see Tuning your channel at the HDTV, 

page 5) when you have saved configuration changes.

Labeling channels with channel and content information

1. 

In the Channel Plan tab, click in the Name field and enter 

the channel short name (up to 7 characters). 

2.

 Click in the Long Name field and enter the long or more 

descriptive channel name (up to 63 characters). The TV 

displays these names and descriptions when the channel is 

changed or info guide information is requested.

3.

 Click Apply to save changes. 

IP address

Содержание ZvPro 800

Страница 1: ...ZvPro 800 CONFIGURATION GUIDE NA ZvPro810 ZvPro820 S E R I E S...

Страница 2: ...voltage with in the product s enclosure that may be of sufficient magnitude to constitute a risk to persons The exclamation point within an equilateral triangle is intended to alert the user to the pr...

Страница 3: ...of Contents Front and Back Panels 4 Basic Installation 5 Beginning setup 5 Tuning your channel at the HDTV Auto Scan 5 Front Panel Configuration 6 7 Setting the RF broadcast channels or power 6 Cable...

Страница 4: ...RF CATV output channels for up to 2 video sources Output power can be set between 45 to 25 dBmV using the Maestro web interface or the front panel Audio Video Inputs Digital Audio Video Unencrypted HD...

Страница 5: ...Scan 1 Connect the Coaxial Output of the ZvPro to your RF network If the RF power for your network is too high you will observe video breakup 2 Specify Cable not Air or Antenna setting in your TV menu...

Страница 6: ...press OK to accept You can then select the next item for configuration 5 When finished making changes use the arrow buttons to scroll down and select Apply then click OK to save your changes Note The...

Страница 7: ...522 108 696 702 21 162 168 44 342 348 74 522 528 109 702 708 22 168 174 45 348 354 75 528 534 110 708 714 7 174 180 46 354 360 76 534 540 111 714 720 8 180 186 47 360 366 77 540 546 112 720 726 9 186...

Страница 8: ...d and enter the RF number as you choose from the RF Frequency Map on page 7 Make sure you ve reviewed the RF Frequency Map Important Notes before completing this task 3 Click in the Channel field and...

Страница 9: ...information and allows you to send logs for troubleshooting Using the Maestro tabs Click on the Maestro tabs to configure your unit as needed We provide brief information here Please click on the Help...

Страница 10: ...extra signals that a TV will not display and can cause interference There may also be an RF power balance issue Verify that the RF power of the unit is balanced with signals from other modulators and...

Страница 11: ...Any modifications or other changes to the ZeeVee Equipment including but not limited to software or hardware modification in any way other than as expressly authorized by ZeeVee will void these limit...

Страница 12: ...a postcard stamp Customer Details Product Details End User Company Name Serial Number an 11 or 12 digit number End User Address 1 Model Number End User Address 2 Date of Purchase Installation State Pr...

Отзывы: