ZeeVee ZvPro 600 Скачать руководство пользователя страница 5

 ZvPro 600 Configuration Guide  

|

  Page 5 

Beginning setup

1.

 Apply power.

2.

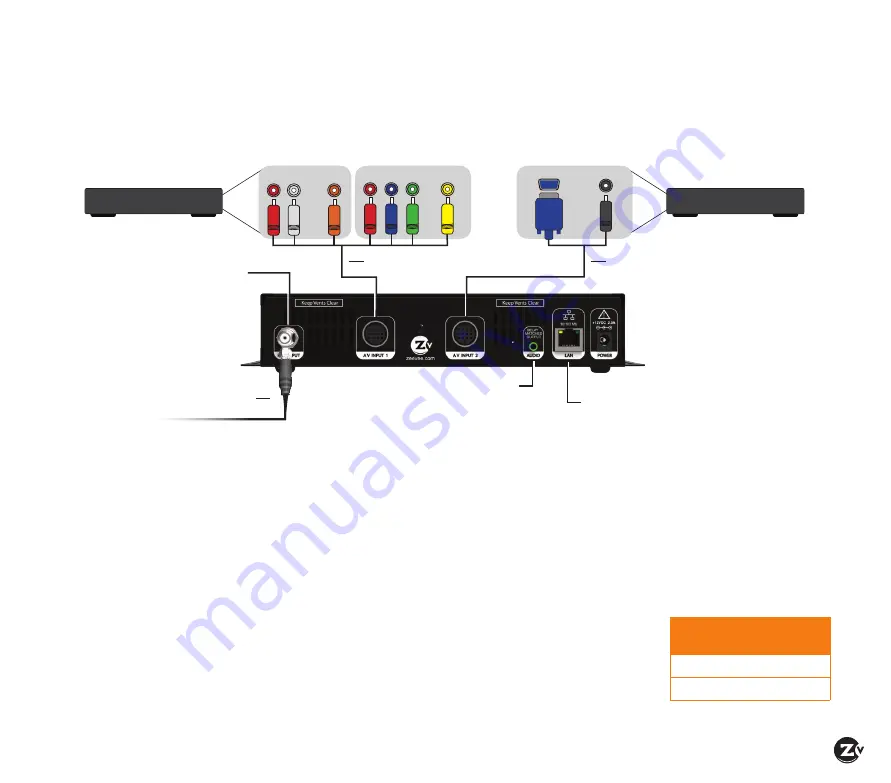
 Connect the cables according to your cable choice:

 HYdRA AV CABLE—

Connect the Component 

(red/green/Blue)


Video connectors on the A/V Cable to the corresponding 

Video Outputs on your video source. Use the Composite 

(Yellow)

 connector for closed captioning. Connect either the 

Digital 

(orange)


or Analog 

(red/white)


Audio connectors on 

the A/V Cable to the Audio Outputs on your video source. 

Connect the DIN to the A/V Input on the ZvPro. 


If you want to implement the delay matched audio feature, 

you need to use analog audio.

 VGA/dIN CABLE—

Connect the VGA connector to the 

VGA Output on your video source. Use the Analog Audio 

connector with the Audio Out on the Video Source. Connect 

the DIN to the A/V Input on the ZvPro.

Tuning your channel at the HDTV (Auto Scan)

1. 

Connect the Coaxial Output of the ZvPro to your RF network. 


If the RF power for your network is too high, you will 

observe video breakup.

2. 

Specify Cable (not Air or Antenna) setting in your TV menu.

3.

 Enter the RF number to tune directly to the channel.   

For default channel lineup information, refer to the  

Default Channel Lineup table. 


If you cannot tune directly to 

the channel at this point, it is 

because most TVs will require 

you to run a full Auto Scan.

4.

 Run the Auto Scan through 

the menu system of your 

HDTV to find the channels. 

Basic Installation

dEFAULT CHANNEL LINEUP

AV Input

RF 

#

HdTV  

Channel 

AV Input 1

2

2.1

AV Input 2

3

3.1

Factory default settings allow ZvPro 600 series modulators to broadcast up to two sources on RF channels 2 and 3 for 

reception at connected HDTVs.

We recommend using the most updated version of firmware. You can find the latest version on the Support section of our website.

Audio Out

Composite

Video Out

Component

OR

       f

or Closed


  Cap

tion 

only

Video Source

Component Video Source

Analog

Digital

Video Source

VGA Video Source

Video Out Audio Out

Hydra AV Cable

VGA DIN Cable

VGA

Analog

Coax cable connects 

to coax network

RF Output

 +25 dBmV

Ethernet to network or 

directly to computer

Optional Delay Matched 

Audio Output (Analog) 

to audio system

Содержание ZvPro 600

Страница 1: ...NA ZvPro 600 Configuration Guide ZvPro610 ZvPro620 S E R I E S...

Страница 2: ...voltage with in the product s enclosure that may be of sufficient magnitude to constitute a risk to persons The exclamation point within an equilateral triangle is intended to alert the user to the pr...

Страница 3: ...ents Front and Back Panels 4 Basic Installation 5 Beginning setup 5 Tuning your channel at the HDTV Auto Scan 5 Front Panel Configuration 6 7 Setting the RF broadcast channels or power 6 Cable TV Chan...

Страница 4: ...channel pair frequency agile QAM RF CATV output channels for up to 2 video sources Output power can be set between 45 to 25 dBmV using the Maestro web interface or the front panel Audio Video Inputs F...

Страница 5: ...ideo breakup 2 Specify Cable not Air or Antenna setting in your TV menu 3 Enter the RF number to tune directly to the channel For default channel lineup information refer to the Default Channel Lineup...

Страница 6: ...on 5 When finished making changes use the arrow buttons to scroll down and select Apply then click OK to save your changes Note The front panel locks automatically after a few seconds To make more cha...

Страница 7: ...522 108 696 702 21 162 168 44 342 348 74 522 528 109 702 708 22 168 174 45 348 354 75 528 534 110 708 714 7 174 180 46 354 360 76 534 540 111 714 720 8 180 186 47 360 366 77 540 546 112 720 726 9 186...

Страница 8: ...d and enter the RF number as you choose from the RF Frequency Map on page 7 Make sure you ve reviewed the RF Frequency Map Important Notes before completing this task 3 Click in the Channel field and...

Страница 9: ...information and allows you to send logs for troubleshooting Using the Maestro tabs Click on the Maestro tabs to configure your unit as needed We provide brief information here Please click on the Help...

Страница 10: ...lay and can cause interference There may also be an RF power balance issue Verify that the RF power of the unit is balanced with signals from other modulators and from the cable company As a test try...

Страница 11: ...Any modifications or other changes to the ZeeVee Equipment including but not limited to software or hardware modification in any way other than as expressly authorized by ZeeVee will void these limit...

Страница 12: ...a postcard stamp Customer Details Product Details End User Company Name Serial Number an 11 or 12 digit number End User Address 1 Model Number End User Address 2 Date of Purchase Installation State P...

Отзывы: