background image

HDbridge 2840 Configuration Guide  

|

  Page 5 

Factory default settings allow HDb2840 units to broadcast 

up to 4 unencrypted HDMI sources on RF channels 2, 3, 5, 

and 6 for reception at connected HDTVs.

We recommend using the most updated version of 

firmware. You can find the latest version on the Support 

section of our website. 

Beginning setup

1.

 Apply power.

2.

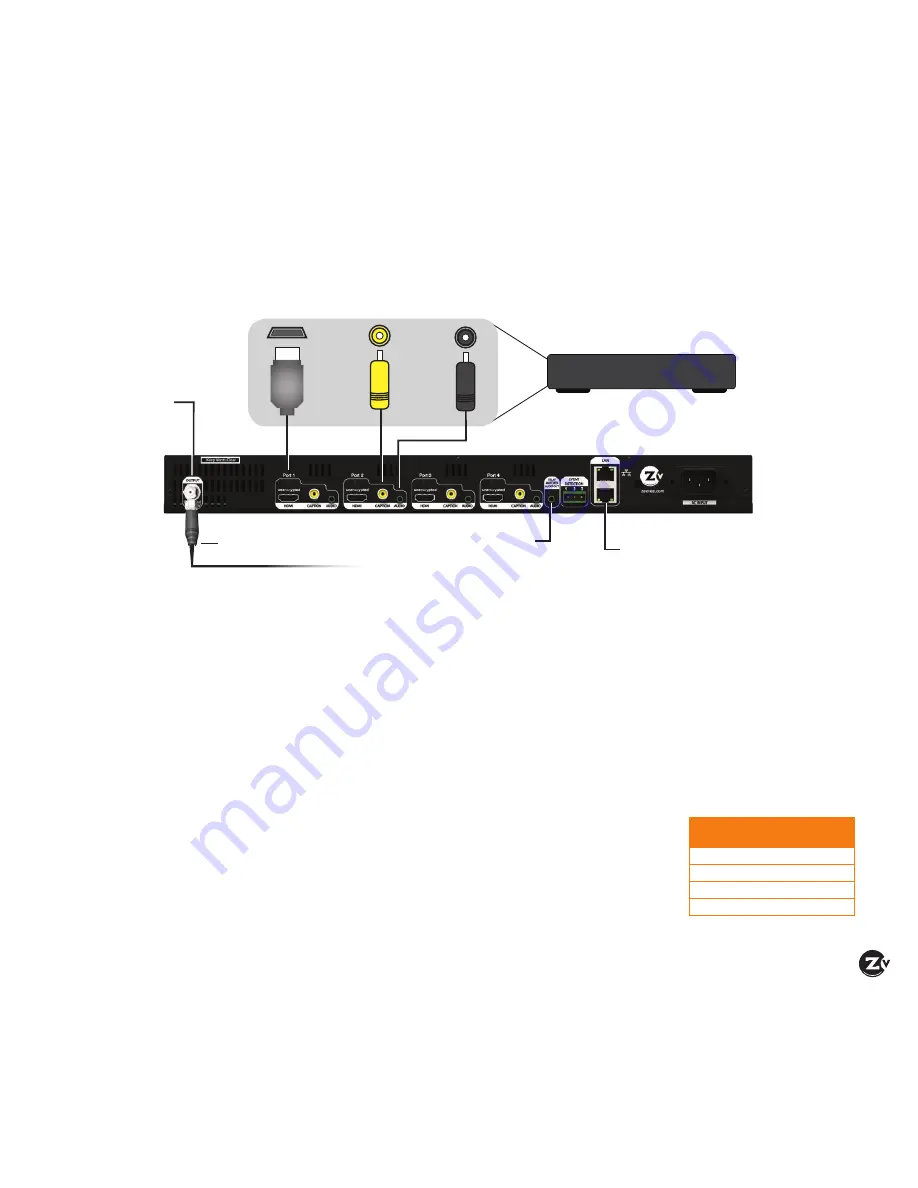
 Connect an HDMI video source to the HDMI input port 

of the HDb2840, using an HDMI cable (which is sold 

separately). For Closed Captioning, connect a composite 

(yellow) cable from the video source to the Caption port.

3.


Optional 

– Connect the Analog Audio if the digital audio is 

not present on HDMI or if you want to implement the delay 

matched audio feature.

Tuning your channel at the HDTV (Auto Scan)

1. 

Connect the Coaxial Output of the HDb2840 to your  

RF network.


  If the RF power for your network is too high, you will 

observe video breakup.

2.

 Specify Cable (not Air or Antenna) setting in your TV menu.

3.

 Enter the RF number to tune directly to the channel. For 

default channel lineup information, refer to the Default 

Channel Lineup table.


If you cannot tune directly to 

the channel at this point, it is 

because most TVs will require 

you to run a full Auto Scan.

4

. Run the Auto Scan through 

the menu system of your 

HDTV to find the channels. 

DEFAULT CHANNEL LINEUP

AV Input

RF 

#

HDTV  

Channel 

AV Input 1

2

2.1

AV Input 2

3

3.1

AV Input 3

5

5.1

AV Input 4

6

6.1

Basic Installation

Back of HDb2840 Modulator

Composite 

Video

Unencrypted 

HDMI Out

Analog 

Audio

       for Closed


  Caption 

only

Video Source

Unencrypted HDMI  

Video Source

RF Output 

 +45 dBmV

Ethernet to network or 

directly to computer

Optional Delay Matched 

Analog Audio Out to 

audio system

WARNING: +45 dBmV

Do not connect directly to HDTV

Coax cable connects 

to coax network

Содержание HDbridge 2840

Страница 1: ...HDbridge 2840 CONFIGURATION GUIDE S E R I E S NA...

Страница 2: ...age with in the product s enclosure that may be of sufficient magnitude to constitute a risk to persons The exclamation point within an equilateral triangle is intended to alert the user to the presen...

Страница 3: ...or Table of Contents Front and Back Panels 4 Basic Installation 5 Beginning setup 5 Tuning your channel at the HDTV Auto Scan 5 Front Panel Configuration 6 7 Setting the RF broadcast channels or power...

Страница 4: ...eo sources Output power can be set between 45 to 25 dBmV using the Maestro web interface or the front panel Audio Video Inputs Digital Audio Video Unencrypted HDMI Closed Caption Composite Analog Audi...

Страница 5: ...HDb2840 to your RF network If the RF power for your network is too high you will observe video breakup 2 Specify Cable not Air or Antenna setting in your TV menu 3 Enter the RF number to tune directl...

Страница 6: ...then select the next item for configuration 5 When finished making changes use the arrow buttons to scroll down and select Apply then click OK to save your changes Note The front panel locks automatic...

Страница 7: ...6 522 108 696 702 21 162 168 44 342 348 74 522 528 109 702 708 22 168 174 45 348 354 75 528 534 110 708 714 7 174 180 46 354 360 76 534 540 111 714 720 8 180 186 47 360 366 77 540 546 112 720 726 9 18...

Страница 8: ...eld and enter the RF number as you choose from the RF Frequency Map on page 7 Make sure you ve reviewed the RF Frequency Map Important Notes before completing this task 3 Click in the Channel field an...

Страница 9: ...t information and allows you to send logs for troubleshooting Using the Maestro tabs Click on the Maestro tabs to configure your unit as needed We provide brief information here Please click on the He...

Страница 10: ...e extra signals that a TV will not display and can cause interference There may also be an RF power balance issue Verify that the RF power of the unit is balanced with signals from other modulators an...

Страница 11: ...ant equipment purchased through grey market resellers or certain internet resellers WHAT THESE WARRANTIES EXCLUDE Your warranties do NOT cover Labor charges for installation or set up of the ZeeVee Eq...

Страница 12: ...77 4ZEEVEE 1 877 493 3833 support zeevee com Representatives are available from 9 00 AM to 6 00 PM Monday through Friday Eastern Time Sales North America 1 347 851 7364 Phone sales zeevee com EMEA 44...

Отзывы: