ZEBSBOARDS EZInstall Kit V2 Скачать руководство пользователя страница 11

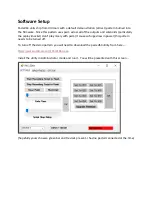
Click on the Brightness tab and you will come this screen …. 


Set the slider all the way to the left to turn down the brightness and set the LED number to 0. 

This effectively turns off all outputs during the demo pattern. 

Return to the 1

st

 screen and click the Start Recording to Flash button.  After about 20 seconds 

or so click on the stop recording to flash button.  Click on the OK button and exit the utility. 


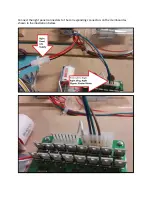
BEFORE turning on the NIGHT MODE SWITCH for the 1

st

 turn on the kit and 

ensure that the lightbar is not running a pattern, if it is, rerun the above steps.  

Zebsboards is not responsible for damage caused by adverse side effects of 

controllers and or software setup.  

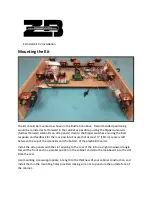
Содержание EZInstall Kit V2

Страница 1: ...for them as possible Ensure that at least 19mm space is left between the top of the solenoids and the bottom of the playfield monitor Install the side panels with the slot opening to the rear of the k...

Страница 2: ...kit is interrupted please check and reset the circuit breaker if necessary Make sure the 110v 220v selector is set to the correct AC voltage for your country Installation of the wiring using a plug v...

Страница 3: ...2V distribution board are provided to supply additional 12V toys if desired There is a 10A standard automotive blade fuse in the black fuseholder below the power supply protecting the booster module r...

Страница 4: ...Connect the right panel connectors to the corresponding connectors on the mainboard as shown in the illustration below...

Страница 5: ...ide of the toy to the open port on the booster board and connect the positive side of the toy to the appropriate positive voltage source 12V is supplied by the kit other voltages will require an addit...

Страница 6: ...ar Connections Ensure that the 6 pin connector at the left of the bar is connected to the left panel as previously described and connect the 8 pin connector at the right side to the booster board as s...

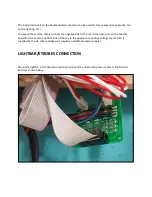
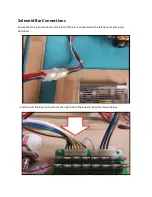
Страница 7: ...From Left to Right the pinout for the Solenoid Bar and Right Panel connectors is as follows...

Страница 8: ...USB Cable Connection Connect the USB cable from the PacLED64 shown below to a free USB port in your computer...

Страница 9: ...ight mode switch has been installed which will allow you to turn off the booster board controlling the solenoids shaker motor and replay knocker Enough cable has been provided to allow for remote moun...

Страница 10: ...y knocker don t play nicely with pwm it causes a huge draw in power this pattern needs to be turned off To turn off the demo pattern you will need to download the pacled64 utility from here https www...

Страница 11: ...screen and click the Start Recording to Flash button After about 20 seconds or so click on the stop recording to flash button Click on the OK button and exit the utility BEFORE turning on the NIGHT M...

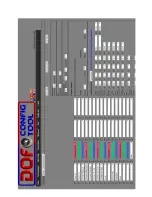
Страница 12: ...DOF Configuration Standard Kit Settings...

Страница 13: ......

Отзывы: