background image


Wireless Setting (M511W Model) 

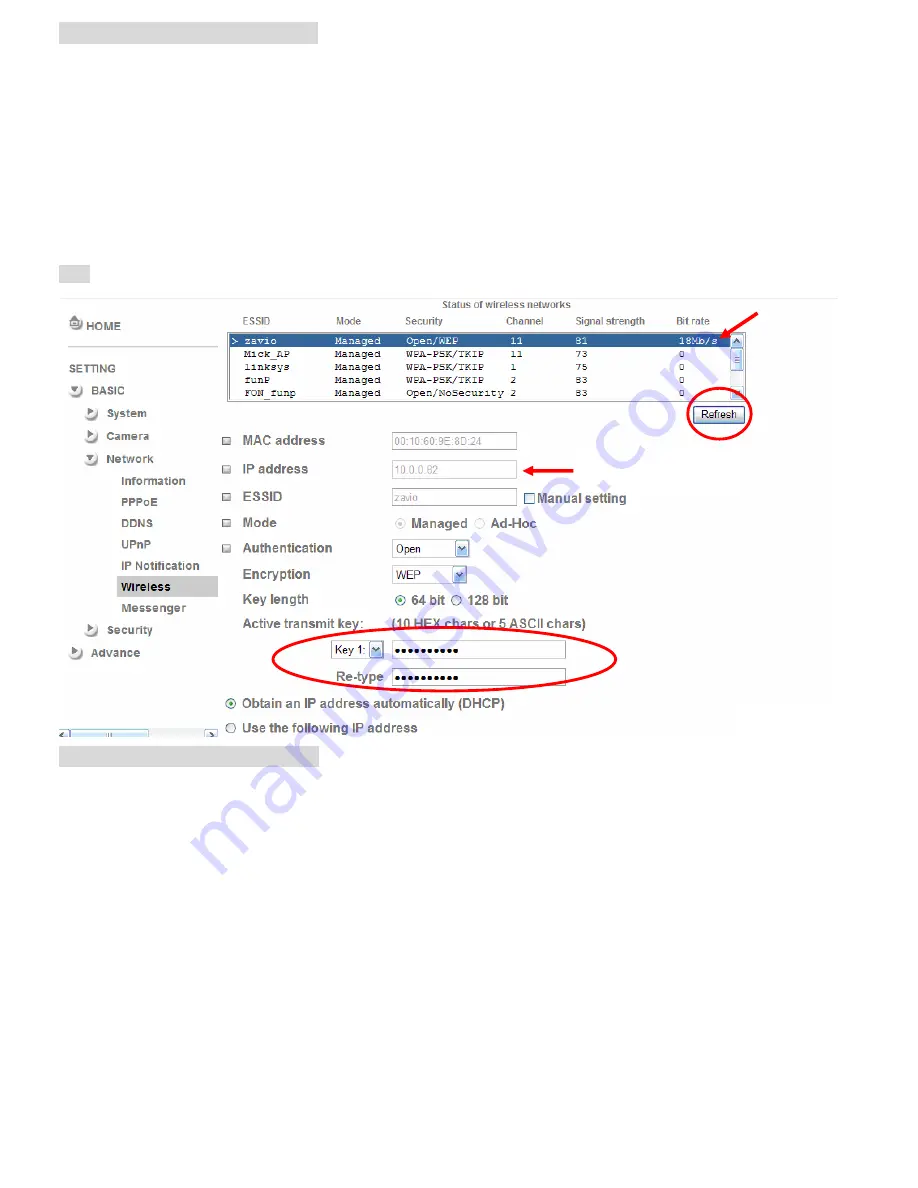
Power the IP Camera and connect an Ethernet network cable to the IP Camera’s LAN port. Using Intelligent IP 

Installer and entering the camera’s setting page.   

Please go to “Setting   

 Basic 

 System 

 Network 

  Wireless”, set the wireless option to “On” 

1. Click Refresh and choose the Access Point you wish to connect. 

2. Enter the password within the 

Active transmit key

 field if required. 

3. Choose DHCP to connect through a dynamic IP or assign a static IP for the wireless connection. 

4. Click “OK” to apply settings. The 

Wireless IP address

 appears in the 

IP address

 field. 


Note: The wireless private IP address can be found in Intelligent IP Installer. 


Windows Live Messenger Setting 

Live video of the IP Camera can be displayed using Microsoft Live Messenger, whilst providing its public IP address 

to users for access via the web browser. This feature is useful especially when the IP address of the camera is 

dynamically assigned. 

If you wish to set up MSN Messenger, enter the camera’s setting page. 

Go to “Setting 

 Basic 

 System 

 Network 

  Messenger”, set the Messenger option “On.” 

1. Create a new MSN Messenger account (

e.g.: [email protected]

) for the IP Camera. 

2. Enter the new MSN Messenger 

Login Account

 and

 Password

 within the designated boxes. 

3. Under the 

IP Notification Option, Click “On”

 to enable IP notification to the users.   

4. Under the 

Privacy

 Option, Click “On” to create an allow list. 

5. Use your existing account to login to MSN Messenger. 

6. Add the new MSN Messenger account (

e.g.: [email protected]

) to your contact list. 

Wireless IP address 

Содержание M511E

Страница 1: ......

Страница 2: ...W Model See P 7 Windows Live Messenger Setting See P 7 Access to Internet via Static IP Dynamic IP or both See P 9 For more information please check the User Manual available in the Software CD or you...

Страница 3: ...Switch Router B2 Power over Ethernet PoE M511E Model 1 Using a standard RJ 45 network cable connect the IP Camera to a PoE enabled Hub Switch Router B3 Wireless connection M511W Model 1 Connect the p...

Страница 4: ...Intelligent IP Installer please check two setting Select Intelligent IP Installer and follow the installation process to complete the installation a Browser s Internet Properties Security Default Leve...

Страница 5: ...Default is admin admin 4 When accessing the IP Camera for the first time a yellow information bar appears below the address bar This website wants to install the following add on AxvideoView cab from...

Страница 6: ...n the centre of your web browser 3 Enter name and password to login to the IP camera Default is admin admin 4 The monitor image will be displayed in your browser 1 Select Safari icon 2 Click Bonjour f...

Страница 7: ...n the Software CD and then click OK 3 The web interface will change into your preferred language Use IP Camera via Mobile Phone 1 Using IP Camera via iPhone Select Safari function Enter IP address in...

Страница 8: ...senger Setting Live video of the IP Camera can be displayed using Microsoft Live Messenger whilst providing its public IP address to users for access via the web browser This feature is useful especia...

Страница 9: ...n Then choose View a new contact s webcam Camera at home says 9 The IP Camera automatically accepts your invitation and its live video is displayed 10 Click Action button and choose Start control pane...

Страница 10: ...Connectivity of the IP Camera can be established through PPPoE Point to Point Protocol over the Ethernet by inputting the username and password from your Internet Service Provider ISP within the PPPo...

Страница 11: ...UPnP Internet Gateway Device IGD turn on the UPnP function within the UPnP section Please go Setting Basic Network UPnP Note If you turn on the UPnP Port Forwarding function RTSP Real Time Streaming...

Страница 12: ...Memo...

Страница 13: ...Memo...

Отзывы: