background image


Install the hardware and connect all cables   
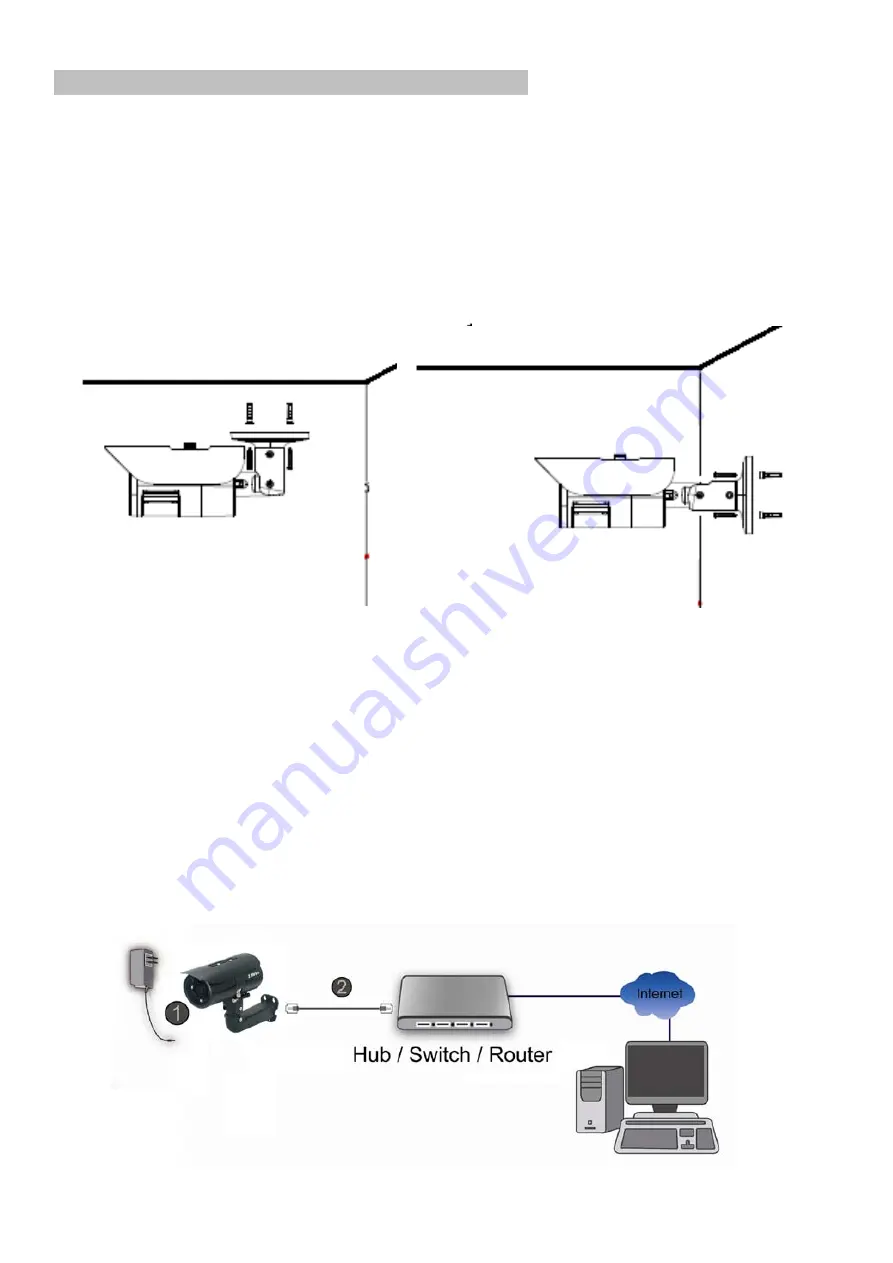
 
A.


Wall mounting and Ceiling mounting 
 

1)


Attached the alignment sticker to the wall. Drill four holes into the wall. Then 
hammer the supplied plastic anchors into the screw holes and secure the 
bracket with supplied screws.   

2)


Adjust the angle of the bracket to aim the desired area.   


Note: when the adjustment is finished, please change the desiccant bag in back 
cover. 
 
 
B.


Connect all cables 

 
B1. Without Power over Ethernet (PoE) connection   
1. Connect the power adaptor to the IP Camera. 
2. Use a standard RJ-45 network cable and connect the IP Camera to a 
hub/switch/router. 


Содержание B6330

Страница 1: ...0 ZAVIO Motorized Outdoor IR Bullet Quick Installation Guide...

Страница 2: ...wser See P 9 Lighting environment See P 11 Change language of the web interface See P 12 Application of IP Camera See P 13 Package Contents Camera IP camera Quick Installation Guide Brief product info...

Страница 3: ...l overview Micro SD Card Slot The micro SD card slot is built inside the housing Remove the three screws of the back housing as below No 1 and you ll see the micro SD card slot IR LED Lens Light Senso...

Страница 4: ...ted to deactivate 30V DC Alarm Input 2 Connect to GND to activate or leave floating unconnected to deactivate 30V DC Alarm Output Relay contact output Contact capacity with resistance load 0 3A at 125...

Страница 5: ...to the screw holes and secure the bracket with supplied screws 2 Adjust the angle of the bracket to aim the desired area Note when the adjustment is finished please change the desiccant bag in back co...

Страница 6: ...ke sure all components are assembled as shown on the below graph 2 Check that the Ethernet Port and the Waterproof main body are tightly fasten Windows Go to Zavio Website and download Camera Installa...

Страница 7: ...era using Camera Installation Tool 1 Please check two settings before using Camera Installation Tool a Browser s Internet Properties Security Default Level b Browser s Internet Properties Privacy Unch...

Страница 8: ...on on your desktop The main page will show up listing all active camera and video server devices Select the desired IP cameras from the list and click Link to IE 3 Enter Username and Password to login...

Страница 9: ...or the first time a yellow information bar appears below the address bar This website wants to install the following add on AxvideoView cab from Zavio Inc 5 Click the information bar and select Instal...

Страница 10: ...9 7 Live video will display in the center of your web browser MAC OS using Safari Browser 1 Select Safari Icon...

Страница 11: ...10 2 Click Bonjour function and select the camera you wish to access 3 Enter name and password to login to the IP camera Default is admin admin...

Страница 12: ...display in the center of your web browser Lighting environment setting Default setting for lighting environment is Auto You may change exposure frequency to 50 or 60 Hz at Setting Live View Camera Se...

Страница 13: ...guage pack 1 Go to http www zavio com downloads php and download the language pack corresponding to your IP camera model 2 Go to the IP camera setting page and upload the preferred language from the l...

Страница 14: ...13 Application of IP Camera...

Страница 15: ...14 Memo...

Страница 16: ...15...

Отзывы: