background image

20 

BH$

 -

"H5

 -

G

  I

 &&#

(")

2%)),.D

,.D

 %)-

% ;  <= ---


EF E F      -E 

F


% ;<  


EF E F     -

F  

% ;=<-   -  = -:  


EF E F     -E 

F  


> %)-C%),%&&#&"">

 %)-

"H5

 -

G

  I

-

!"-+

&" 
&"

4*"

-5%&

+%)-

 %)-

"H5

 -

G

  I

-

!"-+

&" 
&"

4*"

-5%&

+%)-

 %)-

"H5

 -

G

  I

-

!"-+

&" 
&"

4*"

-5%&

+%)-

 %)-

"H5

 -

G

  I

-

!"-+

&" 
&"

4*"

-5%&

+%)-

 %)-

"H5

 -

G

  I

-

!"-+

&" 
&"

4*"

-5%&

+%)-

#=


2%."

8&.""

#=

"

B
#

%=


"
B  
#

A    =

 -

EFE F  7

 +-%&#

 +-%&#

'> %)-C%),%"&&%>

BH$

 -

"H5

 -

G

  I

"

 %)-

,- "&&%

4*,- "&&%

-

!"-+

&" 
&"

4*"

-5%&

+%)-

67

8*6&).96:6.;

 %)-

-

!"-+

&" 
&"

4*"

-5%&

+%)-

67

8*6&).96:6.;

 %)-

2%."

8&.""

"
B  

!    

!      

/> %)-C%),%?>

 "%

78*

-5%&9

:

?"

%2%."

-5%&

%&"&

"#

8$"."

 %)-

BH$

 -

"H5

 -

G

  I

+&

 %)-

2))

B)%+

"#

#"$"&

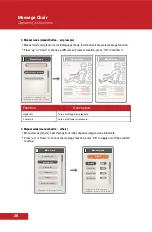
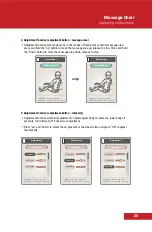
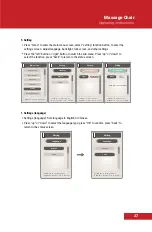
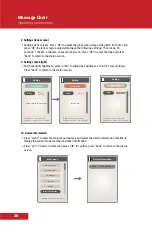
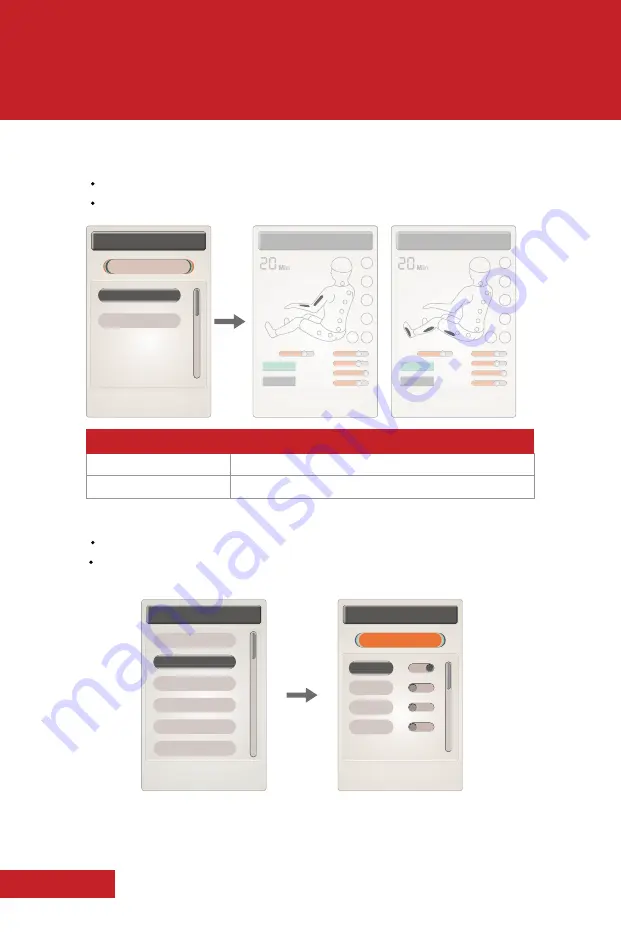
Manual mode (others): heat therapy, foot roller, negative (oxygen) ions, Bluetooth.

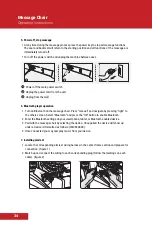
4. Manual mode (manual button – others)

Press “up” or “down” to choose the massage function, press “OK” to toggle on/off the selected 

function.

3. Manual mode (manual button – air pressure)

Manual mode (air pressure): Including upper body, lower body air pressure massage function.
Press “up” or “down” to choose a different air pressure function, press “OK” to confirm it.

BH$

 -

"H5

 -

G

  I

 &&#

(")

2%)),.D

,.D

 %)-

% ;  <= ---


EF E F      -E 

F


% ;<  


EF E F     -

F  

% ;=<-   -  = -:  


EF E F     -E 

F  


> %)-C%),%&&#&"">

 %)-

"H5

 -

G

  I

-

!"-+

&" 
&"

4*"

-5%&

+%)-

 %)-

"H5

 -

G

  I

-

!"-+

&" 
&"

4*"

-5%&

+%)-

 %)-

"H5

 -

G

  I

-

!"-+

&" 
&"

4*"

-5%&

+%)-

 %)-

"H5

 -

G

  I

-

!"-+

&" 
&"

4*"

-5%&

+%)-

 %)-

"H5

 -

G

  I

-

!"-+

&" 
&"

4*"

-5%&

+%)-

#=


2%."

8&.""

#=

"

B
#

%=


"
B  
#

A    =

 -

EFE F  7

 +-%&#

 +-%&#

'> %)-C%),%"&&%>

BH$

 -

"H5

 -

G

  I

"

 %)-

,- "&&%

4*,- "&&%

-

!"-+

&" 
&"

4*"

-5%&

+%)-

67

8*6&).96:6.;

 %)-

-

!"-+

&" 
&"

4*"

-5%&

+%)-

67

8*6&).96:6.;

 %)-

2%."

8&.""

"
B  

!    

!      

/> %)-C%),%?>

 "%

78*

-5%&9

:

?"

%2%."

-5%&

%&"&

"#

8$"."

 %)-

BH$

 -

"H5

 -

G

  I

+&

 %)-

2))

B)%+

"#

#"$"&

BH$

 -

"H5

 -

G

  I

 &&#

(")

2%)),.D

,.D

 %)-

% ;  <= ---


EF E F      -E 

F


% ;<  


EF E F     -

F  

% ;=<-   -  = -:  


EF E F     -E 

F  


> %)-C%),%&&#&"">

 %)-

"H5

 -

G

  I

-

!"-+

&" 
&"

4*"

-5%&

+%)-

 %)-

"H5

 -

G

  I

-

!"-+

&" 
&"

4*"

-5%&

+%)-

 %)-

"H5

 -

G

  I

-

!"-+

&" 
&"

4*"

-5%&

+%)-

 %)-

"H5

 -

G

  I

-

!"-+

&" 
&"

4*"

-5%&

+%)-

 %)-

"H5

 -

G

  I

-

!"-+

&" 
&"

4*"

-5%&

+%)-

#=


2%."

8&.""

#=

"

B
#

%=


"
B  
#

A    =

 -

EFE F  7

 +-%&#

 +-%&#

'> %)-C%),%"&&%>

BH$

 -

"H5

 -

G

  I

"

 %)-

,- "&&%

4*,- "&&%

-

!"-+

&" 
&"

4*"

-5%&

+%)-

67

8*6&).96:6.;

 %)-

-

!"-+

&" 
&"

4*"

-5%&

+%)-

67

8*6&).96:6.;

 %)-

2%."

8&.""

"
B  

!    

!      

/> %)-C%),%?>

 "%

78*

-5%&9

:

?"

%2%."

-5%&

%&"&

"#

8$"."

 %)-

BH$

 -

"H5

 -

G

  I

+&

 %)-

2))

B)%+

"#

#"$"&

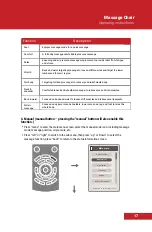
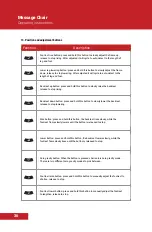
Function

Description

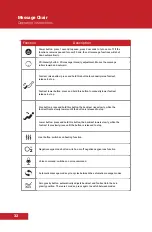
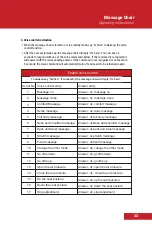
Turn on/off upper air pressure.

Turn on/off lower air pressure.

Upper air

Lower air

Massage Chair

Operating instructions

Содержание Z-SMART PLUS

Страница 1: ...Massage Chair Z SMART PLUS ...

Страница 2: ...rives us each day Without customer feedback we would not have the knowledge to continue to innovate our products and perform the research our customers need the most Thanks to all our customers providing us with their feedback each of our medical products have been designed with you in mind We pay the utmost care and attention to detail in order to continue delivering nothing short of the best med...

Страница 3: ... 11 12 13 13 13 30 31 32 33 34 34 34 36 36 38 38 39 39 40 Safety Warnings Safety and Maintenance Parts and Functions Remote Control Introduction Operating Instructions 1 Plug in and Power on 2 Massage Functions and Controls 3 Quick Access Controls 4 Voice Commands 5 Stop Massage and Power off 6 Bluetooth 7 Armrest Installation 8 Footrest Installation 9 Backrest and Head Pillow Adjustments 10 Floor...

Страница 4: ... not use if chair cover material or leather is broken or damaged Do not operate under a blanket or pillow Excessive heating can occur and cause fire electric shock or injury to persons Do not operate where aerosol spray products are being used or where oxygen is being administered Do not massage any area of the body that is swollen inflamed or where skin broken Do not use this product while sleepi...

Страница 5: ... due to past injury or ailment the curvature of the spine scoliosis acute neck sprain whiplash or any other medical condition that may contraindicate usage of this product Seek medical advice before using this chair if you have a pacemaker or other electronic medical device if you have been restricted to bed rest if you are planning to use this chair to treat a specific ailment to recover from sur...

Страница 6: ...und Do not use this product outdoors Do not use in humid or in high temperature areas such as a bathroom Do not use it in a heavily dusty or caustic environment Use in a well ventilated environment Trouble Shooting If the controller is not working normally check the cable and plug socket Ensure the plug is properly plugged in and secure Check to ensure that the cable is undamaged This product is e...

Страница 7: ... in an environment that is dust and moisture free Do not store near heat or open flame Do not leave exposed to sunlight This may cause damage or fading to the chair Do not store in extreme temperatures Excessive heat or cold may cause damage to components Clean with a dry cloth and or vacuum with soft brush extension regularly If the product becomes dirty use a water based upholstery cleaner only ...

Страница 8: ...rning Do not push down on the footrest when the footrest is lifting this may result in personal injury or damage to the chair Do not sit or stand on footrest Ensure massaging hands are lowered before sitting to avoid discomfort A 7 7 A 7 7 A 7 7 A 7 7 ...

Страница 9: ...ng Do not pull on the remote control cable or power cord It is recommended that the power cable is unplugged when the chair is not in use Inspect the area before enabling zero gravity mode to make sure the area is free of children and pets to avoid injury A 4 7 A 4 7 ...

Страница 10: ... airbag component 6 Quick access controller 7 Hip airbag component 8 Seat cushion 9 Legrest 10 Footrest 11 Back cushion 12 Back airbag 13 Remote controller 14 Remote controller storage 15 Armrest 16 Side panel 17 Back cover 18 LED lights 19 PCB box cover 20 Wheels 21 Power cable and power plug 22 Power socket 23 Power switch Name and function of components ...

Страница 11: ...o S and L shape track for full body massage from head to toe Intelligent voice control functionality 3D Best In Class Bluetooth Speakers with fast pairing functionality Waist Twisting functionality stretches and moves the waist using the left and right waist airbags Quick access controller embedded into right armrest for quick and easy access to adjustments Zero G experience the legs extend 135 an...

Страница 12: ... display 8 Leg and foot air pressure display 9 Foot roller display 10 Speed adjustment 11 Adjustment menu 12 Shoulder position adjustment 13 Bluetooth display 14 Massage mode display 15 Massage position display 16 Back and leg heat display 17 Width adjustment 18 Massage intensity adjustment 19 Upper body air pressure adjustment 20 Lower body air pressure adjustment 21 Status bar Note Remote pictur...

Страница 13: ...krest up backrest goes up 9 Backrest down backrest goes down 10 Down guide button goes down 11 Raise up raises backrest up and lowers footrest down 12 Lie down lowers backrest down and raises footrest up 13 Zero gravity adjust zero gravity function 14 Pause pause at current function 15 Manual enter to manual function selection 16 Back back to function information 17 Right guide button goes right 1...

Страница 14: ...tart a massage Press the power button start the massage the backrest will stay in position and the footrest will rise slightly Choose an automatic function mode to start the massage The massage chair will automatically shut down if no mode is selected within 5 minutes 2 Massage function and controls When the massage chair is powered on and off it is in standby mode The set function is the only fun...

Страница 15: ... press OK to skip this and start the default massage program Choose an automatic massage mode the backrest and leg rest will adjust after selection to a fixed angle Once the shoulder position is detected the buzzer tone will sound At this point if you would like to adjust the shoulder positioning you can adjust up and down to find the perfect position The remote has 11 built in levels If no adjust...

Страница 16: ...e function remains paused for over 20 min then all massage functions will shut down automatically E F 3 8 7 7 6 7 8 6 96 6 5 3 4 6 7 8 6 96 6 2 5 3 4 5 6 7 8 6 96 6 2 3 4 5 6 7 8 6 96 6 E F 3 8 7 7 6 7 8 6 96 6 5 3 4 6 7 8 6 96 6 2 5 3 4 5 6 7 8 6 96 6 2 3 4 5 6 7 8 6 96 6 E F 3 8 7 7 6 7 8 6 96 6 5 3 4 6 7 8 6 96 6 2 5 3 4 5 6 7 8 6 96 6 2 3 4 5 6 7 8 6 96 6 After entering the massage modes the s...

Страница 17: ...st comfort relax ease ache fatigue recover spinal care pressure relief waist stretch Note the selected functions will show in the massage function status bar press back to check it directly Press up or down to select the massage function press OK to confirm and enter the selected massage function Press back to go back to the function setting screen 4 Menu Press menu to navigate to the main menu se...

Страница 18: ...ting massage to loosen stiff muscles and target the lower lumbar and thoracic region Targeting full body massager to recovery and relief whole body Comfortable neck and shoulder massage to relieve sore and tired muscles Focused on back and waist to loosen stiff muscles and relieve sore ligaments Focused on upper arm and shoulders lower arm knee leg and foot to relax the whole body 6 Manual manual ...

Страница 19: ... F E F 2 72 B H H5 G I 2 D D B H H5 G I 4 B H H5 G I 2 B C 2 72 4 5 6 7 8 6 96 6 2 8 G G 5 4 7 4 7 5 7 7 E F E F E F 2 72 B H H5 G I 2 D D B H H5 G I 4 B H H5 G I 2 B C 2 72 4 5 6 7 8 6 96 6 2 8 G G 5 4 7 4 7 5 7 7 E F E F E F 2 72 B H H5 G I 2 D D B H H5 G I 4 B H H5 G I 2 B C 2 72 4 5 6 7 8 6 96 6 2 8 G G 5 4 7 4 7 Press up or down to select the manual function icon press back to confirm startin...

Страница 20: ...Express massage mode for a quick massage Spot Overall massage of full back Full back Upper back massage Upper back Lower back massage Lower back Partial Small area narrow targeting massage Press up or down to select the massage area button press OK to confirm B H H5 G I 2 D D E F E F E F C H5 G I 4 5 H5 G I 4 5 H5 G I 4 5 H5 G I 4 5 H5 G I 4 5 2 8 B B A E F E F 7 B H H5 G I 2 D D E F E F E F C H5 ...

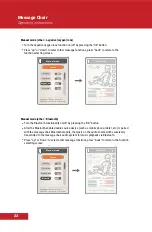
Страница 21: ...on air pressure Manual mode air pressure Including upper body lower body air pressure massage function Press up or down to choose a different air pressure function press OK to confirm it E F E F E F E F E F E F C B H H5 G I 4 4 5 6 7 8 6 96 6 4 5 6 7 8 6 96 6 2 8 B C 78 5 9 2 5 8 B H H5 G I 2 B E F E F E F E F E F E F C B H H5 G I 4 4 5 6 7 8 6 96 6 4 5 6 7 8 6 96 6 2 8 B C 78 5 9 2 5 8 B H H5 G I...

Страница 22: ... 2 H5 G I B H H5 G 2 B 2 H5 G I 4 5 Manual mode other heat therapy Press OK to turn on off back heating or footrest heating Once enabled allow 3 min for it to come up to temperature Press up or down to select other massage functions press back to return to the function selecting screen Turn the foot roller massage function on off by pressing the OK button Manual mode other foot roller Press up or ...

Страница 23: ...functions press back to return to the function selecting screen Turn the Bluetooth functionality on off by pressing the OK button Manual mode other Bluetooth Press up or down to select other massage functions press back to return to the function selecting screen After the Bluetooth enabled audio source device such as mobile phone tablet etc is paired with the massage chair Bluetooth module the mus...

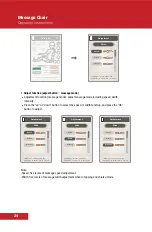
Страница 24: ... E F E F E F E F 7 E F E F A E 7 F 7 7 Adjustment function adjustment button you can also directly press the adjustment button to enter the adjustment function interface Press menu to enter the main menu interface select the adjustment function button This will adjust massage techniques massage area intensity other currently timing and other adjustment functions Press the left button or right butt...

Страница 25: ...djustment function massage mode adjust massage mode including speed width intensity Press the up or down button to select the speed or width function and press the OK button to adjust 8 7 7 E F E F E F 7 3 4 6 7 8 6 96 6 2 5 B H H5 G 5 5 C 5 B H H5 G 5 B H H5 G 5 B H H5 G 5 J 7 JA 7 Massage Chair Operating instructions Note Speed five levels of massage speed adjustment Width five levels of massage...

Страница 26: ... 7 5 C 5 5 B H H5 G 5 B H H5 G 5 C 5 5 B H H5 G 4 2 5 B H H5 G 4 2 5 B H H5 G 4 2 2 Adjustment function adjustment button massage area Adjustment function massage area In the modes of fixed point or partial massage area press and hold the up button to move the massage area up release to stop Press and hold the down button to move the massage area down release to stop 3 Adjustment function adjustme...

Страница 27: ...Adjustment function other adjustments Settings for timing currently Each time you press the OK button it will be adjusted in increments of 5 min Once the maximum of 40 min is reached it will return to the minimum amount of 5 minutes the cycle will be repeated 8 Custom Press menu to select custom function under the main menu to enter the custom storage and selection menu Select save or use with the...

Страница 28: ... D 4 4 B H H5 G I 4 D B H H5 G I 4 C B H H5 G 4 B H H5 G 4 C E F E F E F E F E F E F E F E F E F E F I 78 5 9 2 5 8 B H H5 G I B D 4 4 B H H5 G I 4 D B H H5 G I 4 C B H H5 G 4 B H H5 G 4 C E F E F E F E F E F E F E F E F E F E F I 78 5 9 2 5 8 B H H5 G I B D 4 4 B H H5 G I 4 D B H H5 G I 4 C B H H5 G 4 B H H5 G 4 C E F E F E F E F E F E F E F E F E F E F I 78 5 9 2 5 8 B H H5 G I B D 4 4 B H H5 G ...

Страница 29: ...ettings lock screen Press OK to adjust the lock screen sleep setting time Each time you press OK the lock screen is adjusted between the following settings 15 seconds 30 seconds 1 minute 2 minutes or never lock screen Press OK to enter the loop and press back to return to the status screen 3 Settings back light Set back light brightness press enter to adjust the brightness a total of 5 level setti...

Страница 30: ... F 7 E F E F 9 6 7 8 6 96 6 2 4 5 6 7 8 6 96 6 2 4 5 3 3 3 2 8 D 7 D 7 A 7 E F 3 4 5 6 7 8 6 96 6 2 11 Zero gravity button Press zero gravity to turn on the zero gravity massage function you can choose zero gravity I or zero gravity II mode to find the setting that best fits your needs 12 Back button To return to the main interface screen press this button to display the current massage mode setti...

Страница 31: ...the backrest release to stop rising Backrest down button press and hold this button to slowly lower the backrest release to stop lowering Rise button press and hold this button the backrest rises slowly while the footrest frame slowly lowers until the button is released to stop Lower button press and hold this button the backrest lowers slowly while the footrest fame slowly rises until the button ...

Страница 32: ...tton to manually adjust the footrest to shorten release to stop 4 Negative oxygen ions button switch on or off negative O2 ionizer 5 Heat button turns on or off carbon fiber heating 6 Automatic massage mode cycle cycles between the automatic massage modes 7 Rise and lower button adjust the backrest and the footrest frame up or down 8 Voice command enables voice command 9 Zero gravity button when t...

Страница 33: ...ower footrest release to stop Rise button press and hold this button the backrest rises slowly while the footrest frame slowly lowers until the button is released to stop Lower button press and hold this button the backrest lowers slowly while the footrest fame slowly rises until the button is released to stop Zero gravity button automatically adjusts backrest and footrest into the zero gravity po...

Страница 34: ...ice control A E8 8 F 8 4 E F 8 8 A 0 1 3 8 E 8 F 8 K K 5 7 8 8 8 8 8 8 8 8 8 8 8 8 8 8 8 8 8 8 7 4 Voice control instruction When the massage chair is turned on or in standby mode say hi Alice to wake up the voice control function After the successful wake up the massage chair will reply I m here You now have 6 seconds to respond with one of the voice commands below If the command is recognized it...

Страница 35: ...anual and navigate by pressing right to the others screen Select Bluetooth and press the OK button to enable Bluetooth 2 Enter the Bluetooth settings on your smartphone tablet or Bluetooth enabled device 3 Pair with the massage chair by selecting the device Once paired the device will show up under a device id formatted as follows IMCM XXXX 4 Once connected you may now play music from your device ...

Страница 36: ...el frame and secure it in place figure 5 6 Connect the LED lighting wire at the rear end of the armrest and tuck in the excess wire Then align the connectors on the rear of the armrest a connect them firmly in place note that connectors must be properly spaced for accurate fit figure 6 7 Secure the rear end of the armrest in place with a M6x20 screw figure 7 8 Then secure the upper arm holster and...

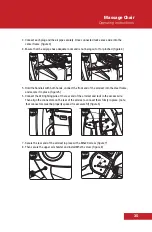
Страница 37: ...crew cover for the rear end screw recess figure 10 8 Installing footrest 1 Remove the tie securing the wiring connection and air pipe connection to the metal for shipping figure 1 2 Connect the wiring connector and the air pipe and the leg joint in the lower portion of the frame Ensure the docking is in place Then insert the docking cable and the air piper from the lower end of the frame into the ...

Страница 38: ...eg note the large step must face inward figure 3 4 Open the footrest support hinge cover on the left and right mounts of the massage chair figure 4 5 Hang the lower leg left and right shaft into the frame support hinge plat at the same time figure 5 6 Cover the rotating shaft cover press footrest rotating cover and then tighten footrest rotating cover board with two M5x14 12 9 screws and a flat pa...

Страница 39: ...est adjustments The head pillow has a three part three layer fold down design Choose the number of layers for the right fit for you For a gentler massage separate the hook and loop fastener on the headrest to reveal the back pad The additional head pillow backrest portion may also be removed by unzipping 1 and or detaching the hook and loop fastener 2 Hook and loop fastener ...

Страница 40: ...Two people are required to lift the massage chair Remove footrest and armrests Note Turn off the power and unplug and detach the power cable before moving 11 Moving the chair Before moving detach or secure the power cable Tilt the chair by the backrest backward until well balanced at the center of gravity on the wheels Push the chair forward or backward to the desired location then set the chair d...

Страница 41: ...0 Massage Chair Product Specifications 8 3 34 3 P 3 34 3 P 3 3 3A 3 8 H 8 C 8B BC8 C B A 5 8 3 34 3 P 3 34 3 P 3 3 3A 3 8 H 8 C 8B BC8 C B A 5 8 3 34 3 P 3 34 3 P 3 3 3A 3 8 H 8 C 8B BC8 C B A 5 Class I ...

Страница 42: ...ZARIFA USA 465 West Century Dr 3 Murray UT 84123 ...

Отзывы: