background image

10

English

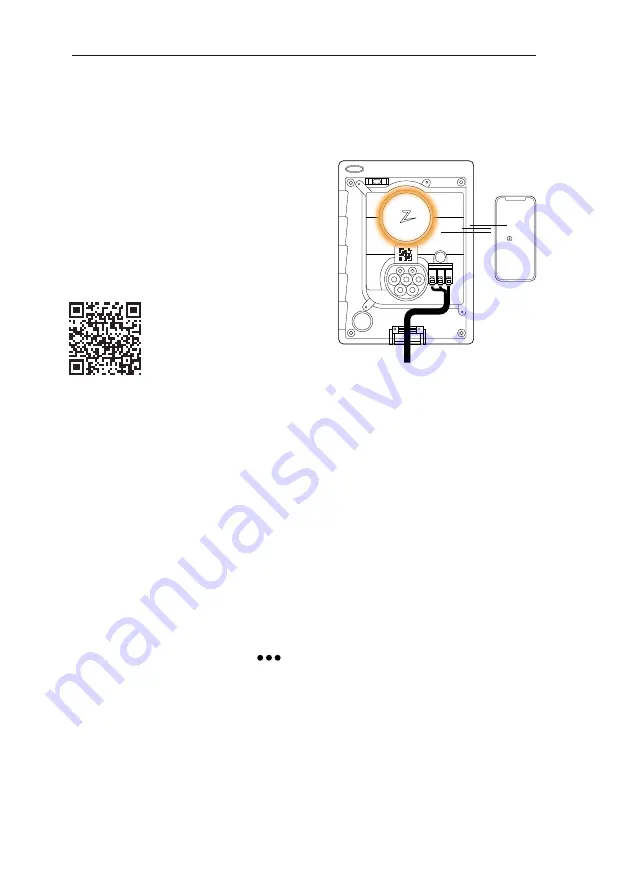
6. Configure charging station

To configure the Zaptec Go

with a Zaptec account 

 
1.   Open the Zaptec app and log in with
  your Zaptec account  
2.  From the Home, tap the symbol
3.  Select the “

Install product

” button  

4.  Scan the QR code located inside
  the charger  
5.  Set the installation details (circuit breaker
  size, maximum current  and country) 
6.  If the settings are set correctly, tap  


Finish


To configure the Zaptec Go

without a Zaptec account 

 
1.  Open the Zaptec App   
2.  Tap “

Install a charging station

”   

3.  Scan the QR code that is located
  inside the charger   
4.  Set the installation details (circuit
  breaker size, maximum current and
  country)    
5.  If the settings are set correctly,
 tap 

Finish

Zaptec

Before you begin, install the Zaptec App
from the App Store (iOS) or Google Play Store 
(Android) and make sure the Bluetooth
on your phone is switched on.  
 
When the Zaptec Go charger is switched on, 
the status indicator will be orange.
This means it is ready to be configured.  

Scan here for the
configuration video

Содержание Go

Страница 1: ...Zaptec Smart small and safe Zaptec Go Installation Manual...

Страница 2: ......

Страница 3: ...r No matter what you drive or where you re going Zaptec Go is the surest way to power your journey Built on leading edge Norwegian green tech we ve created a charger that s as smart on the inside as i...

Страница 4: ...rkshop All applicable local regional and national laws and regulations must be followed when installing repairing and maintaining the product Do not install or use a product which is damaged in any wa...

Страница 5: ...5 English Installing Zaptec Go Status light Type 2 socket Charge card authentication RFID Zaptec QR code for installation and activation Scan here for the installation video...

Страница 6: ...6 English Included in the box 3 x Cable seals 1 x Cable clamp 1 x Zaptec Go User Manual Installation Manual 4 x T20 2 x T20 2 x T20 A B C 12 18 mm cable diameter 8 14 mm cable diameter...

Страница 7: ...7 English 1 Remove the front cover C 2 Mount the charging station A Recommended height 0 9 m Using the built in spirit level make sure it s straight and at the appropriate height...

Страница 8: ...The cover is much easier to remove if you gently press on the retaining tab through the hole by the configuration switch while pulling downwards The Zaptec Go needs an upstream circuit breaker and dua...

Страница 9: ...L1 L2 PE L1 L2 Max 6 mm2 Max 12 mm Click Connect all wires and firmly press down all levers as illustrated When the wires are safely attached replace the terminal cover and turn on the circuit breake...

Страница 10: ...figure the Zaptec Go without a Zaptec account 1 Open the Zaptec App 2 Tap Install a charging station 3 Scan the QR code that is located inside the charger 4 Set the installation details circuit breake...

Страница 11: ...ng the app by using the switch Note that configuring this way will limit the functionality of the charger Circuit breaker value and available power for charging is set to the same value set by the swi...

Страница 12: ...English 7 Confirm status indicator 8 Mount the front cover C Configuration is complete when the circular light status indicator changes from green to white Secure and lock the front cover max torque 1...

Страница 13: ...the steps so far then the Zaptec Go should be configured and online Make sure you hand over the User Manual to the owner of the charger Remind the owner that they should create a Zaptec App account t...

Страница 14: ...e A Must be equal in value on installations with several Zaptec Go One circuit breaker and RCD type A per Zaptec Go Integrated residual current protection RDC DD 6mA DC according to IEC 62955 Integrat...

Страница 15: ...t configured Waiting for authorization via Zaptec App or RFID Charging complete or charging is waiting for scheduled start Charging The configuration is complete and the charger is ready for the owner...

Страница 16: ...16 English 12 Support and repairs If you discover an issue please read the Troubleshooting section before contacting Zaptec Support or visit zaptec com support...

Страница 17: ...rging legislation the charger is supplied pre configured with a schedule that prevents charging between 8am and 11am and 4pm and 10pm on weekdays During these times charging will be paused The schedul...

Страница 18: ...ublicly accessible installations an annual inspection must be carried out by qualified personnel in accordance with Norwegian legislation and regulations In the case of publicly accessible installatio...

Страница 19: ...t 1 3 kg Altitude 2000 m Input cable cross section 1 5 6 mm2 Input cable diameter 9 18 5 mm Degree of protection IP54 Charging mode Mode 3 case B Mechanical strength IK08 Pollution degree Installation...

Страница 20: ...temperature 30 40 o C Maximum charging power TN 1 phase 32 A 7 4 kW Protection class I Overvoltage category III Connectivity PROTOCOL SUPPORTED STANDARDS 4G LTE Cat M1 Wi Fi 802 11b g n 2 4 GHz Bluet...

Страница 21: ...t Inc 3 kA Rated conditional residual short circuit current I c 3 kA Upstream circuit breaker and RCD PARAMETER SYMBOL MIN TYP MAX UNIT Residual operating current I n 0 03 A Rated current In 40 A Oper...

Страница 22: ...22 English...

Страница 23: ...23 English...

Страница 24: ...24 English Zaptec Charger AS 28 10 2022 All rights reserved ZM000909 Zaptec Charger AS Professor Olav Hanssens vei 7A 4021 Stavanger Norway Made in Norway zaptec com...

Отзывы: