background image

15

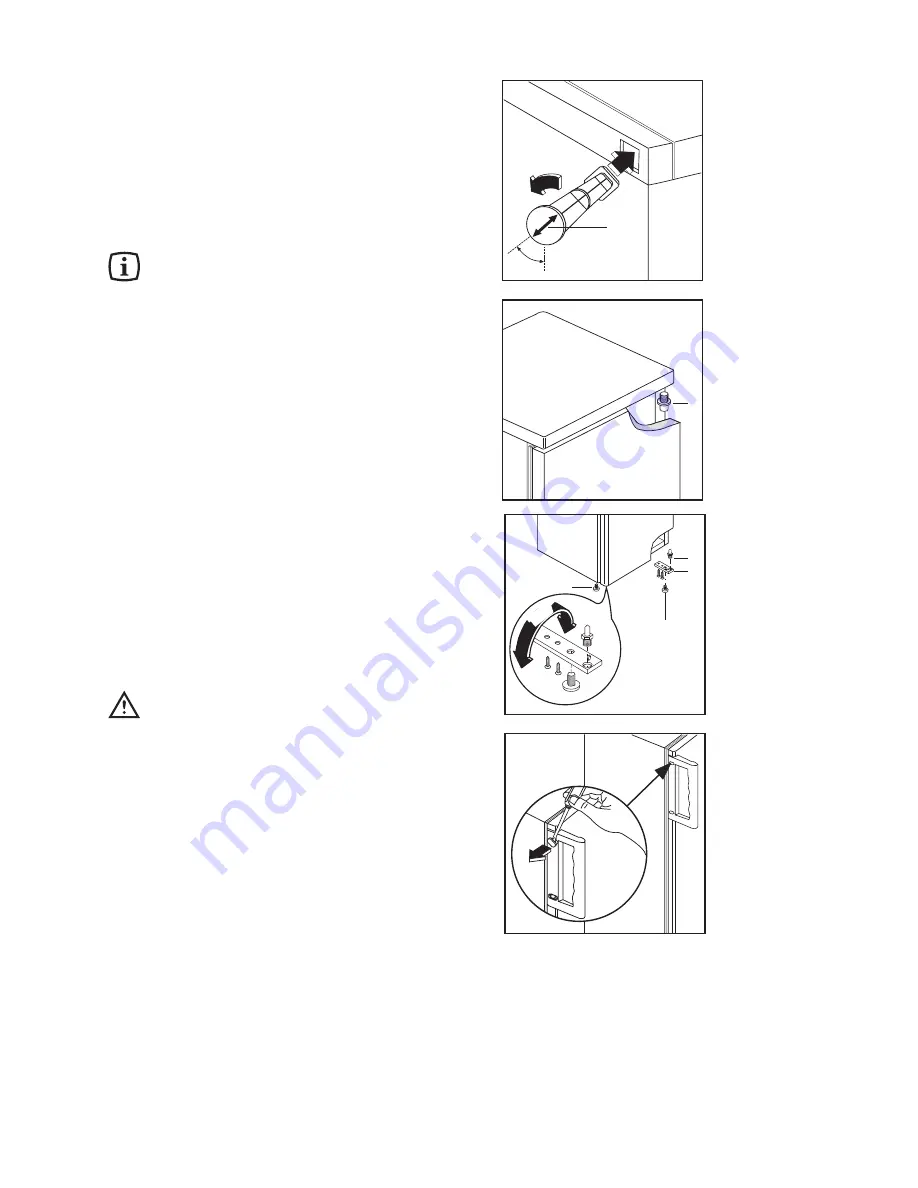
Rear spacers

The plastic bag containing all relevant documentation
also contains two rear wall spacers to be fitted into spe-
cial slots on the back of the appliance. Fit the spacers
into the slots, taking care to ensure that the arrow (A) is
positioned as shown in the figure. Next, turn them
through 45¡ (arrow in vertical position) until they lock into
place.

Door reversal

Unplug the appliance before all operations.

To reverse the door, proceed as follows:

1. dismantle the lower hinge (3), pin (1) and the screw

(2); 

2. slide the door out from pin (D),unscrew the pin and

reposition on the opposite side;

3. unscrew the left front foot and reposition on the oppo-

site side;

4. unscrew the two screws which mask the holes for fix-

ing the hinge from the left front side;

5. reassemble the door;

6. reassemble the lower hinge (turning it 180¡), the pin

and the screw on the opposite side, as shown in the
figure;

7. remove the handle, after having removed the screw

cover and refit it on the opposite side. The holes that
are not used must be mask with the plastic plugs
removed.

Warning:

After having reversed the opening direction of the
doors check that all the screws are properly tight-
ened and that the magnetic seal adheres to the cabi-
net. 

If the ambient temperature is cold (i.e. in Wõnter), the

gasket may not fit perfectly to the cabinet. In that case,
wait for the natural fitting of the gasket or accelerate this
process by heating up the part involved with a normal
hairdrier.

Fitting the door panel

(for models equipped with door frame)

To fit the door panel, proceed as follows:
¥

remove the fixing screws and remove the frame side
opposite the handle;

¥

loosen, without removing them, all remaining screws
fixing the door frame;

¥

insert the panel from the side on which the frame has
been removed and push it fully in;

¥

refit the frame side and tighten all the screws.

Note

The panel size should be 1-2 mm smaller than the door;
the maximum permissible panel thickness is 4 mm.

PR60

A

45

°

D

D590

180

°

1

3

2

D299

2

Содержание ZV 190 P

Страница 1: ...CONGELADOR FREEZER ZV 190 P LIBRODEINSTRUCCIONES INSTRUCTION BOOKLET 2222 090 56 ...

Страница 2: ... pressure on the container which may cause it to explode resulting in damage to the appliance Installation There are working parts in this product which heat up Always ensure that there is adequate ventilation as a failure to do this will result in component failure and possible food loss See installation instructions Parts which heat up should not be exposed Wherever possible the back of the prod...

Страница 3: ...thoroughly Do not use detergents or abrasive powders as these will damage the finish CONTENTS USE This freezer has been marked with the symbol which means that it is suited to the freezing of fresh foods the conservation of frozen foods and the production of ice cubes The control panel A B C S D E 1 2 3 4 5 6 N S A Thermostat knob B N S knob C Function indicator light D Quick freezing indicator li...

Страница 4: ... freezer that is the maximum quantity of food that may be frozen in 24 hours This freezing capacity is 20 kg Distribute the packages as shown in Figure Arrange the foods to be frozen in the upper compartments When the necessary freezing time has elapsed distribute the newly frozen foods into the drawers to free the compartments for new foods to be frozen Important When electrical current happens t...

Страница 5: ...oods to be frozen whenever a Quick freezing phase is already in progress HINTS Hints for storage of frozen food Always check the preparation date indicated on the frozen foods you buy and respect the expiration time provided by the producer Do not open the freezer door too often and leave it open only for the minimum time necessary Unnecessary increases in temperature will notably reduce the durat...

Страница 6: ...n height For this operation you do not need to unplug the freezer or remove all frozen foods Whenever the layer of frost exceeds 4 mm in thickness you must proceed to a complete defrosting Take advantage of the periods when you do not trave too much food in storage to do this by proceeding as follows 1 Empty the freezer and temporarily store the frozen food removed in a cool place wrapped in sever...

Страница 7: ...sitioned below an overhanging wall unit the minimum distance between the top of the cabinet and the wall unit must be at least 100 mm A Ideally however the appliance should not be positioned below overhanging wall units B Accurate levelling is ensured by one or more adjustable feet at the base of the cabinet Important It is essential that the appliance be connected to an efficient earth tap For th...

Страница 8: ...remove the handle after having removed the screw cover and refit it on the opposite side The holes that are not used must be mask with the plastic plugs removed Warning After having reversed the opening direction of the doors check that all the screws are properly tight ened and that the magnetic seal adheres to the cabi net If the ambient temperature is cold i e in Wõnter the gasket may not fit p...

Отзывы: