background image

CLOCK FUNCTIONS

CLOCK FUNCTIONS

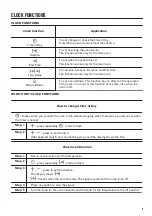
Clock function

Application

Time of Day

To set, change or check the time of day.

Only the top oven works without the set time.

Duration

To set how long the oven works.

The function works only for the main oven.

End Time

To set when the oven turns off.

The function works only for the main oven.


Time Delay

To combine functions: Duration and End Time.

The function works only for the main oven.

Minute Minder

To set a countdown. This function has no effect on the operation

of the oven. You can set this function at any time, also when the

oven is off.

HOW TO SET: CLOCK FUNCTIONS

How to change: Time of Day

 - flashes when you connect the oven to the electrical supply, when there was a power cut or when

the timer is not set.
Step 1

 - press repeatedly.   - starts to flash.

Step 2

 ,   - press to set the time.

After approximately 5 sec., the flashing stops and the display shows the time.

How to set: Duration

Step 1

Set an oven function and the temperature.

Step 2

 - press repeatedly. 

 - starts to flash.

Step 3

 ,   - press to set the duration.

The display shows: 

.

 - flashes when the set time ends. The signal sounds and the oven turns off.

Step 4

Press any button to stop the signal.

Step 5

Turn the knob for the oven functions and the knob for the temperature to the off position.

9

Содержание ZOA35660XK

Страница 1: ...GETTING STARTED EASY User Manual ZOA35660XK EN User Manual Built In Double Oven ...

Страница 2: ...ision or instruction concerning the use of the appliance in a safe way and understand the hazards involved Children between 3 and 8 years of age and persons with very extensive and complex disabilities shall be kept away from the appliance unless continuously supervised Children of less than 3 years of age should be kept away from the appliance unless continuously supervised Do not let children pl...

Страница 3: ...he shelf support and then the rear end away from the side walls Install the shelf supports in the opposite sequence The means for disconnection must be incorporated in the fixed wiring in accordance with the wiring rules SAFETY INSTRUCTIONS INSTALLATION WARNING Only a qualified person must install this appliance Remove all the packaging Do not install or use a damaged appliance Follow the installa...

Страница 4: ... plug Use only correct isolation devices line protecting cut outs fuses screw type fuses removed from the holder earth leakage trips and contactors The electrical installation must have an isolation device which lets you disconnect the appliance from the mains at all poles The isolation device must have a contact opening width of minimum 3 mm This appliance is supplied without a main plug and a ma...

Страница 5: ...Replace immediately the door glass panels when they are damaged Contact the Authorised Service Centre Be careful when you remove the door from the appliance The door is heavy Clean regularly the appliance to prevent the deterioration of the surface material Clean the appliance with a moist soft cloth Use only neutral detergents Do not use abrasive products abrasive cleaning pads solvents or metal ...

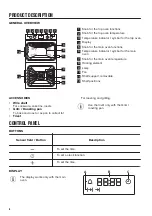
Страница 6: ...he main oven 7 Knob for the main oven temperature 8 Heating element 9 Lamp 10 Fan 11 Shelf support removable 12 Shelf positions ACCESSORIES Wire shelf For cookware cake tins roasts Grill Roasting pan To bake and roast or as pan to collect fat Trivet For roasting and grilling Use the trivet only with the Grill roasting pan CONTROL PANEL BUTTONS Sensor field Button Description To set the time To set...

Страница 7: ... mild detergent Place the accessories and the removable shelf supports in the oven INITIAL PREHEATING Preheat the empty oven before the first use Step 1 Remove all accessories and removable shelf supports from the oven Preheat the two ovens Heat up one oven at a time Step 2 Set the maximum temperature for the function Let the oven operate for 1 h Step 3 Set the maximum temperature for the function...

Страница 8: ... food on one shelf position Top Heat To brown bread cakes and pastries To finish cooked dishes Bottom Heat To bake cakes with crispy bottom and to preserve food Grill To grill thin pieces of food and to toast bread Fast Grilling To grill thin pieces of food in large quantities and to toast bread MAIN OVEN FUNCTIONS Symbol Oven function Application Light To turn on the lamp True Fan Cooking To bake...

Страница 9: ...tion at any time also when the oven is off HOW TO SET CLOCK FUNCTIONS How to change Time of Day flashes when you connect the oven to the electrical supply when there was a power cut or when the timer is not set Step 1 press repeatedly starts to flash Step 2 press to set the time After approximately 5 sec the flashing stops and the display shows the time How to set Duration Step 1 Set an oven funct...

Страница 10: ...eatedly starts to flash Step 3 press to set the time for Duration Step 4 Press Step 5 press to set the time for End Time Step 6 Press At the set time the signal sounds and the oven turns off Step 7 Press any button to stop the signal Step 8 Turn the knob for the oven functions and the knob for the temperature to the off position How to set Minute Minder Step 1 press repeatedly starts to flash Step...

Страница 11: ... ACCESSORIES WARNING Refer to Safety chapters INSERTING ACCESSORIES A small indentation at the top increases safety The indentations are also anti tip devices The high rim around the shelf prevents cookware from slipping of the shelf Wire shelf Push the shelf between the guide bars of the shelf support Deep pan Push the deep pan between the guide bars of the shelf support 11 ...

Страница 12: ...cally to keep the surfaces of the oven cool If you turn off the oven the cooling fan can continue to operate until the oven cools down HINTS AND TIPS WARNING Refer to Safety chapters DOUBLE OVEN Top oven The top oven is the smaller of the two ovens It has 4 shelf positions Use it to cook smaller quantities of food It gives especially good results when used to cook fruitcakes sweets and savoury fla...

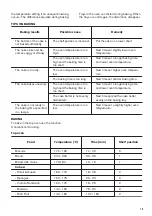
Страница 13: ...too low Next time set higher oven tempera ture The baking time is too long Next time set shorter baking time The cake bakes unevenly The oven temperature is too high and the baking time is too short Next time set a longer baking time and lower oven temperature The cake batter is not evenly distributed Next time spread the cake batter evenly on the baking tray The cake is not ready in the baking ti...

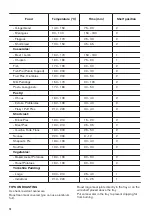
Страница 14: ...s 180 190 30 40 2 Flaky Puff Pies 210 220 30 40 2 Shortcrust Mince Pies 190 210 15 20 2 Meat Pies 190 210 25 35 2 Quiche Tarts Flans 180 200 25 50 2 Scones 220 230 8 12 2 Shepard s Pie 180 190 30 40 2 Souffles 190 200 20 30 2 Vegetables Baked Jacket Potatoes 180 190 60 90 2 Roast Potatoes 180 190 60 90 2 Yorkshire Pudding Large 200 210 25 40 1 Individual 210 220 15 25 1 TIPS ON ROASTING Use heat r...

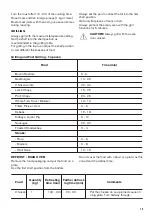
Страница 15: ...tions for 5 minutes CAUTION Always grill with the oven door closed Grilling and Fast Grilling Top oven Food Time min Bacon Rashers 5 6 Beefburgers 10 20 Chicken Joints 20 40 Lamb Chops 15 25 Pork Chops 20 25 Whole Fish Trout Makarel 10 12 Fillets Plaice Cod 4 6 Kebabs 12 18 Kidneys Lamb Pig 6 10 Sausages 20 30 Toasted Sandwiches 3 4 Steaks Rare 4 6 Medium 6 8 Well Done 12 15 DEFROST MAIN OVEN Remo...

Страница 16: ...with a soft cloth with warm water and a mild detergent Use a cleaning solution to clean metal surfaces Clean stains with a mild detergent Do not apply it on the catalytic surfaces Everyday Use Clean the cavity after each use Fat accumulation or other residue may cause fire Dry the cavity with a soft cloth after each use Accessories Clean all accessories after each use and let them dry Use a soft c...

Страница 17: ...ng Clean one oven at a time Before the catalytic cleaning Turn off the oven and wait un til it is cold Remove all accessories and re movable shelf supports Clean the oven floor and the inner door glass with warm wa ter soft cloth and mild deter gent Clean the oven with catalytic cleaning Step 1 Step 2 Step 3 Step 4 To clean the top oven set the function To clean the main oven set the function Set ...

Страница 18: ...y connected to the electrical supply refer to the connection diagram if available The oven does not heat up The oven is deactivated Activate the oven The oven does not heat up The clock is not set Set the clock The oven does not heat up The necessary settings are not set Make sure that the settings are correct The oven does not heat up The fuse is blown Make sure that the fuse is the cause of the ...

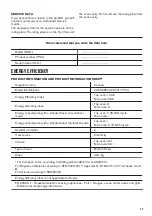
Страница 19: ...en 106 8 Main oven 95 2 Energy efficiency class Top oven A Main oven A Energy consumption with a standard load conventional mode Top oven 0 78 kWh cycle Main oven Energy consumption with a standard load fan forced mode Top oven Main oven 0 79 kWh cycle Number of cavities 2 Heat source Electricity Volume Top oven 42 l Main oven 66 l Type of oven Built In Oven Mass 48 1 kg For European Union accordi...

Страница 20: ...ave energy Residual heat When the cooking duration is longer than 30 minutes reduce the oven temperature to minimum 3 10 minutes before the end of cooking The residual heat inside the oven will continue to cook Use the residual heat to warm up other dishes Keep food warm Choose the lowest possible temperature setting to use residual heat and keep a meal warm ENVIRONMENTAL CONCERNS Recycle material...

Страница 21: ...21 ...

Страница 22: ...22 ...

Страница 23: ...23 ...

Страница 24: ...WWW ZANUSSI COM SHOP 867353314 B 052020 ...

Отзывы: