background image


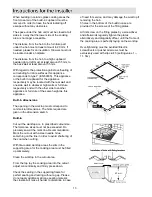
When building in ceramic glass cooking areas the 
front cross-rail of the build-in cupboard must be 
removed in order to have the heat radiating off 
escape without any obstacles. 
 
The space under the hob unit must be closed at all 
sides in a way that the lower side of the cooking 
area is no longer accessible. 
 
The distance from the hob to the furniture part 
under the hob must at least amount to 20 mm. If 
needed, please fix an insulation. Drawers must not 
be located under a hotplate. 
 
The distance from the hob to a high cupboard 
beside right or left must at least amount 55 mm, to 
the back wall at least amount 55 mm. 
 
With regard to the protection against overheating of 
surrounding furniture surfaces this appliance 
corresponds to type Y (EN 60335). This appliance 
or the built-in cupboard for the appliance 
respectively may be located with the rear wall and 
one side wall to whatever high walls or furniture 
respectively and with the other side to another 
appliance or furniture of the same height as this 
appliance. 
 

Built-in dimensions 

 
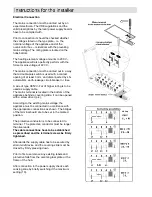
The opening in the worktop must correspond to 
commercial dimensions. The hints required are 
given in the dimension sketch. 
 

Built-in 

 
Cut out the worktop acc. to prescribed cutout size. 
The tolerance sizes must not be exceeded. Do 
precisely saw at the mark line. Recommendation: 
Mark the cut-out with a steel needle. Glue 
something on the line in order to avoid shattering of 
the coat when cutting. 
 
With tile-coated worktop areas the slits in the 
supporting area for the cooking area must be filled 
up completely. 
 
Clean the worktop in the cutout area. 
 
From the top lay the cooking area into the cutout, 
adjust concentrically and firmly press down. 
 
Check the sealing in the supporting frame for 
perfect seating and resting without a gap. Please 
do not apply additional silicone sealing material, 
the closure will make it harder to dismantle in case 

of need for service, and may damage the worktop if 
removing the hob. 
5 holes in the bottom of the build-in case are 
provided for the screws of the fitting plates. 
 
At first screw on the fitting plates by a screwdriver 
and afterwards regularly tighten the plates 
alternatively and diagonally offset, until the frame of 
the cooking area is perfectly laying on the worktop. 
 
Over-tightening must be avoided! Electric 
screwdrivers or pusher airscrews must be 
exclusively used with slip clutch (setting value 1 -- 
1.1 Nm). 
 

13 

Содержание ZKF641H

Страница 1: ...Operating and Installation Instructions Electric Ceramic Hob ZKF641H ...

Страница 2: ... 8 Service and Spare Parts 8 Guarantee Conditions 9 Service Force Centres 10 Installation Instructions Technical Details 12 Unpacking and Disposal 12 Installing in the kitchen worktop 12 Building In 13 Electrical Connection 14 RATING PLATE The rating plate is located on the bottom of the appliance Once the appliance has been built in the rating plate is no longer visible Please write the F Nr into...

Страница 3: ... OFF switch is off when the hob is not in use When using other electrical appliances ensure the cable does not come into contact with the hot surfaces of the hob Do not use unstable or misshapen pans on the hob Never leave the hob unattended when cooking with fat or oil Never use plastic or aluminium foil dishes on the hob The cooking zones heat up quickly when they are turned on Only turn them on...

Страница 4: ...ces with obvious transport damage must not be connected to the mains First Cleaning In order to remove any remnants left by production clean the hob before it is first use Ensure any labels and protective films on the hob are removed Clean the ceramic glass and the frame with hot water and a little washing up liquid added First Heating Up Check each cooking zone in turn by briefly switching to the...

Страница 5: ...terials that might smelt away from the heat zones Sugar solutions food stuffs with a high sugar content plastics or kitchen foil must be removed immediately with a glass scraper If this type of soiling is not removed immediately it can cause irreparable damage to the ceramic glass surface Which is not covered by the guarantee When the surface has cooled wipe over with a damp cloth and Vitroclen He...

Страница 6: ...er the cooking surface with the pan or by burrs and rims on the base of pans To avoid scratching or damaging the ceramic glass surface pots and pans should be moved on the hob by lifting them and not by sliding Utensils with aluminium and copper bases can leave behind metallic discolouration which can only be removed with difficulty and sometimes not at all When cold pan bases normally curve sligh...

Страница 7: ... immediately it can cause irreparable damage to the ceramic glass surface When the surface has cooled wipe over with a damp cloth and Vitroclen Before using any detergent or cleaning agent on the ceramic glass surface ensure they are recommended for use on ceramic hobs Do not apply any cleaning agents to hot cooking zones Ensure that any residues are wiped off before the cooking zones are used aga...

Страница 8: ...ult contact your local Zanussi Service Force Centre In the event of your appliance requiring service or if you wish to purchase spare parts please contact your local Zanussi Service Force Centre by telephoning 08705 929929 Your telephone call will be automatically routed to the Service Force Centre covering your post code area The addresses are listed on the following pages Before calling out an e...

Страница 9: ...calls to appliances outside the United Kingdom Appliances found to be in use within a commercial environment plus those which are the subject of rental agreements Products of Zanussi manufacture which are not marketed by Zanussi This guarantee is in addition to your statutory and legal rights ZANUSSI EUROPEAN GUARANTEE If you should move to another country within Europe then your guarantee moves w...

Страница 10: ...OWN SALES Perth PH1 3AF SHETLAND 3 4 Carlton Place Lerwick Shetland OWN SALES ZE1 0PW SHETLAND Bolts Shetland 26 North Road Lerwick OWN SALES Shetland ZE1 0PE WHALSAY Leask Electrical Harisdale Symbister Whalsay OWN SALES Shetland ZE2 9AA NORTHERN IRELAND BELFAST Owenmore House Kilwee Business Park Dunmurry Belfast BT17 0HD WALES CARDIFF Unit 4 Guardian Industrial Estate Clydesmuir Road Cardiff CF...

Страница 11: ...field London EN3 7BB GRAVESEND Unit B4 Imperial Business Estate West Mill Gravesend Kent DA11 0DL IPSWICH Unit 6C Elton Park Business Centre Hadleigh Road Ipswich IP2 0DD LETCHWORTH 16 17 Woodside Ind Park Works Road Letchworth Herts SG6 1LA LONDON 2 4 Royal Lane Yiewsley West Drayton Middlesex UB7 8DL MAIDENHEAD Reform Road Maidenhead Berkshire SL6 8BY MOLESEY 10 Island Farm Avenue West Molesey S...

Страница 12: ... and B S 6891 Current Editions Disposal All packaging parts are recyclable wooden strips are non treated foils and hard foam are marked Packaging materials and old appliance should be disposed of at authorised disposal sites Installation into the kitchen worktop Protection against accidental contact according to the regulations set by VDE or other local authorities and EN60335 must be ensured by t...

Страница 13: ...al dimensions The hints required are given in the dimension sketch Built in Cut out the worktop acc to prescribed cutout size The tolerance sizes must not be exceeded Do precisely saw at the mark line Recommendation Mark the cut out with a steel needle Glue something on the line in order to avoid shattering of the coat when cutting With tile coated worktop areas the slits in the supporting area fo...

Страница 14: ...of type H05VV F or of higher rating is to be used as supply cable The mains terminal is located in the bottom of the appliance behind a covering slide It can be opened with a screw driver pic According to the existing mains voltage the appliance must be connected in accordance with the appropriate connections as shown The bridges of the terminal board are to be set in the marked position The prote...

Страница 15: ...14 ...

Страница 16: ... Electrolux Household Appliances Limited 2001 ...

Отзывы: