background image

2

4

1

3

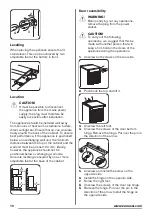
Levelling

When placing the appliance ensure that it

stands level. This can be achieved by two

adjustable feet at the bottom in front.

Location

CAUTION!

It must be possible to disconnect

the appliance from the mains power

supply; the plug must therefore be

easily accessible after installation.

The appliance should be installed well away

from sources of heat such as radiators, boilers,

direct sunlight etc. Ensure that air can circulate

freely around the back of the cabinet. To ensure

best performance, if the appliance is positioned

below an overhanging wall unit, the minimum

distance between the top of the cabinet and the

wall unit must be at least 100 mm . Ideally,

however, the appliance should not be

positioned below overhanging wall units.

Accurate levelling is ensured by one or more

adjustable feet at the base of the cabinet.

min.

100 mm

15 mm

15 mm

Door reversibility

WARNING!

Before carrying out any operations,

remove the plug from the power

socket.

CAUTION!

To carry out the following

operations, we suggest that this be

made with another person that will

keep a firm hold on the doors of the

appliance during the operations.

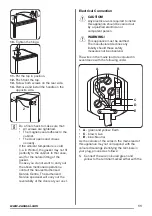
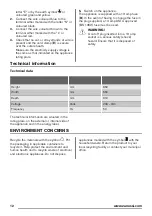
1. Unscrew both screws on the rear side.

2. Push back the top and lift it.

3. Unscrew the left foot.

4. Unscrew the screws of the door bottom

hinge. Remove the hinge. Put over the pin in

the direction of the arrow.

5. Unscrew and install the screw on the

opposite side.

6. Install the hinge on the opposite side.

7. Screw the right foot.

8. Unscrew the screws of the door top hinge.

9. Remove the hinge. Put over the pin in the

direction of the arrow. Install the hinge on

the opposite side.

10

www.zanussi.com

Содержание ZGR16606WA

Страница 1: ...EN ZGR16606WA User Manual Refrigerator...

Страница 2: ...nd above and persons with reduced physical sensory or mental capabilities or lack of experience and knowledge if they have been given supervision or instruction concerning use of the appliance in a sa...

Страница 3: ...Wait at least 4 hours before connecting the appliance to the power supply This is to allow the oil to flow back in the compressor Do not install the appliance close to radiators or cookers oven or hob...

Страница 4: ...cooling unit Only a qualified person must do the maintenance and the recharging of the unit Regularly examine the drain of the appliance and if necessary clean it If the drain is blocked defrosted wat...

Страница 5: ...N Do not use detergents or abrasive powders as these will damage the finish Daily use WARNING Refer to Safety chapters Movable shelves The walls of the refrigerator are equipped with a series of runne...

Страница 6: ...at the most Cooked foods cold dishes etc these should be covered and may be placed on any shelf Fruit and vegetables these should be thoroughly cleaned and placed in the special drawer s provided But...

Страница 7: ...g onto the food inside Periods of non operation When the appliance is not in use for long periods take the following precautions 1 Disconnect the appliance from electricity supply 2 Remove all food 3...

Страница 8: ...rature is set incorrectly Refer to Operation chapter Water flows on the rear plate of the refrigerator During the automatic defrost ing process frost melts on the rear plate This is correct Water flow...

Страница 9: ...sary adjust the door Refer to Installation 3 If necessary replace the defective door gaskets Contact the Authorised Service Centre Installation WARNING Refer to Safety chapters Positioning This applia...

Страница 10: ...ioned below overhanging wall units Accurate levelling is ensured by one or more adjustable feet at the base of the cabinet min 100 mm 15 mm 15 mm Door reversibility WARNING Before carrying out any ope...

Страница 11: ...Authorised Service specialist will carry out the reversibility of the doors at your cost Electrical Connection CAUTION Any electrical work required to install this appliance should be carried out by...

Страница 12: ...A approved BS 1362 fuse must be used WARNING A cut off plug inserted into a 13 amp socket is a serious safety shock hazard Ensure that it is disposed of safely Technical information Technical data Hei...

Страница 13: ...www zanussi com 13...

Страница 14: ...14 www zanussi com...

Страница 15: ...www zanussi com 15...

Страница 16: ...www zanussi com shop 212000988 A 032015...

Отзывы: