background image

2

BUILT-IN

DOUBLE OVEN

MODEL ZDF 866

INSTRUCTION BOOKLET

Please read this instruction booklet before using the oven

Содержание ZDF 866

Страница 1: ...2 BUILT IN DOUBLE OVEN MODEL ZDF 866 INSTRUCTION BOOKLET Please read this instruction booklet before using the oven ...

Страница 2: ...remove and replace food in the oven Ensure that all control knobs are in the OFF position when not in use Do not leave cookware containing foodstuffs e g fat or oil in or on the oven in case it is inadvertently switched ON When using other electrical appliances ensure the cable does not come into contact with the hot surfaces of the oven Maintenance and Cleaning Only clean this oven in accordance ...

Страница 3: ... Page 6 24 hour Clock and Timer Page 7 Before the First Use Page 9 Using the Oven Page 9 Using the Fan Oven Page 11 Cooking Chart Page 12 Defrosting Page 14 Using the Lower Oven Page 15 Grilling Page 17 Cleaning the Oven Page 18 Care of Catalytic Liners Page 20 Replacing the Oven Light Page 20 Cleaning the Hinged Grill Page 21 What happens if something goes wrong Page 22 Service and Spare Parts Pa...

Страница 4: ...in Oven Thermostat Control Light Lower Oven Thermostat Control Light Grill trivet Grill roasting pan Removable handle Main Oven Control Knob Lower Oven Control Knobs Shelves x 3 Grease Filter Oven Light Fan Rating Plate Grill Element Shelf Supports Shelf Supports Main Oven Lower Oven ...

Страница 5: ... can be adjusted by turning the knob on the required setting Thermostat Control Knob Turn the thermostat control knob clockwise to select temperatures between 50 C and 250 C MAX OFF 1 0 0 1 5 0 2 0 0 MAX 5 0 OFF Main Oven 0 Oven Function Control Knob Conventional cooking The heat comes from both the top and bottom element ensuring even heating inside the oven Top heating element The heat comes fro...

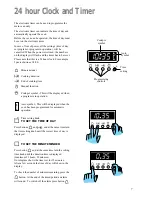
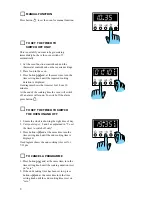
Страница 6: ...rn the time setting knob until the correct time of day is displayed TO SET THE MINUTE MINDER Press button and at the same time turn the setting time knob until the duration time is displayed maximum 23 hours 59 minutes Our diagram shows the timer set for 35 minutes After a few seconds the time of day will show in the display To check the number of minutes remaining press the button At the end of t...

Страница 7: ...t the end of the cooking time the oven will switch off an alarm will sound To switch off the alarm press button TO SET THE TIMER TO SWITCH THE OVEN ON AND OFF 1 Ensure the clock is showing the right time of day 2 Carry out steps 1 2 and 3 as explained in To set the timer to switch off only 3 Press button and at the same time turn the time setting knob until the end cooking time is displayed Our di...

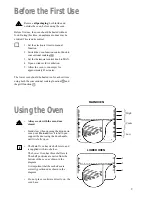
Страница 8: ...oven should be heated too for a short time using both the conventional cooking function and the grill function 3 2 1 Using the Oven Always cook with the oven door closed Stand clear when opening the drop down oven door Do not allow it to fall open support the door using the door handle until it is fully open The Main Oven has six shelf levels and is supplied with two shelves The Lower Oven has thr...

Страница 9: ...bright shiny utensils reduce cooking and underneath browning B Enamelled cast iron anodized aluminium aluminium with non stick interior and coloured exterior and dark heavy utensils increase cooking and underneath browning Condensation and steam When food is heated it produces steam in the same way as a boiling kettle The oven vents allow some of this steam to escape However always stand back from...

Страница 10: ...onventional cooking Even Heating for Baking The fan oven has uniform heating on all runner positions This means that batches of the same food can be cooked in the oven at the same time However the top shelf may brown slightly quicker than the lower one This is quite usual There is no mixing of flavours between dishes How to Use the Fan Oven Turn the oven function control knob to the required tempe...

Страница 11: ...140 Christmas 130 140 Meringues 90 100 Fish 170 190 Fruit Pies and Crumbles 170 200 Milk Puddings 130 140 Pastry Choux Shortcrust Flaky 190 200 Puff Plate Tarts 180 Quiches Flans 170 180 Scones 210 220 Roasting Meat Poultry 160 180 Shelf positions are not critical but ensure that oven shelves are evenly spaced when more than one is used When roasting ensure the meat is cooked thoroughly use a meat...

Страница 12: ...ooked they will not necessarily be ready together The fan oven can be used to heat foods through without thawing first e g fruit tarts mince pies sausage rolls and other small pastry items Use a temperature of 190 200 C and allow 20 40 minutes depending on the quantity of food in the oven The use of too high temperatures can cause uneven browning Check with the recommendations for oven temperature...

Страница 13: ...osting process Only joints of meat and poultry up to 2 kg 4 lb are suitable for defrosting in this way Refer to the following table for approximate defrosting times i Chicken 1000 g 100 140 20 30 Place the chicken on an inverted saucer on a large plate Defrost open and turn at half time or defrost covered with foil Remove giblets as soon as possible Meat 1000 g 100 140 20 30 Defrost open and turn ...

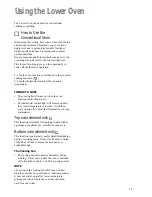
Страница 14: ...he oven function control knob is set The thermostat control light will remain on until the correct temperature is reached It will then cycle on and off to show that temperature is being maintained Top oven element only This function is suitable for finishing cooked dishes eg lasagne shepherds pie cauliflower cheese etc Bottom oven element only This function is particularly useful when blind baking...

Страница 15: ... trays to prevent spillage onto the oven base and to help reduce cleaning The material and finish of the baking tray and dishes will affect the degree of base browning of the food Enamelware dark heavy or non stick utensils increase base browning Shiny aluminium or polished steel trays reflect the heat away and give less base browning DO NOT use the grill pan or meat tin as a baking tray as this w...

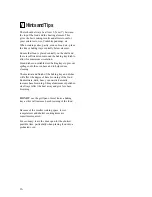
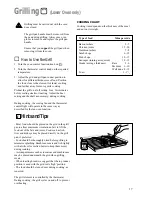
Страница 16: ...rid in the grill pan to allow maximum circulation of air to lift the food out of the fats and juices Food such as fish liver and kidneys may be placed directly on the grill pan if preferred Food should be thoroughly dried before grilling to minimise splashing Brush lean meats and fish lightly with a little oil or melted butter to keep them moist during cooking Accompaniments such as tomatoes and m...

Страница 17: ...ing up liquid has been added To prevent damaging or weakening the door glass panels avoid the use of the following Household detergent and bleaches Impregnated pads unsuitable for non stick saucepans Brillo Ajax pads or steel wool pads Chemical oven pads or aerosols Rust removers Bath Sink stain removers Clean the outer and inner door glass using warm soapy water Should the inner door glass become...

Страница 18: ...on does not boil over as it could mark your hob Rinse filter in clear water and dry Remember to refit the filter before using the oven again Oven Cavity The enamelled oven cavity is best cleaned whilst the oven is still warm Wipe the oven over with a soft cloth soaked in warm soapy water after each use From time to time it will be necessary to do a more thorough cleaning using a proprietary oven c...

Страница 19: ...ow to keep oven soilage to a minimum Hints andTips i COOKING TO REDUCE SOILAGE Cook at the recommended temperatures Higher temperatures during roasting will increase soilage Try cooking to lower temperatures for an increased length of time you will save energy and often the joint is more tender Use minimal if any extra oil or fat when roasting meat potatoes only require brushing with fat before co...

Страница 20: ...e screw which holds the grill in place see diagram beside FO 0781 FO 0778 2 Then gently pull the grill downward to allow access to the oven roof see diagram beside 3 Clean the oven roof with a suitable cleaner and wipe dry before replacing the hinged grill element 4 Gently push up the grill element into place and firmly screw into place the holding nut Ensure the grill holding nut is firmly in pla...

Страница 21: ...ecially to the chapter Using the Oven Leave dishes inside the oven no longer than 15 20 minutes after the cooking is completed See page 10 Check the instructions for the timer Check the grease filter is correctly fitted Check that shelves and bakeware are not vibrating in contact with the oven back panel If after all these checks the oven still does not work contact your local Zanussi Service Forc...

Страница 22: ...tic Costs incurred for calls to put right an appliance which is improperly installed or calls to appliance outside the United Kingdom Appliances found to be in use within a commercial or similar environment plus those which are the subject to rental agreements Products of Zanussi manufacture which are not marketed by Zanussi European Guarantee If you should move to another country within Europe th...

Страница 23: ...use and the domestic installation can support the load and that the power supply is properly earthed The manufacturer disclaims any responsibility should these safety measures not be carried out Connection Min size Cable flex Fuse via Cable flex type Cooker 6 mm2 PVC PVC 30 A Control twin and Circuit earth For Uk use only For Europe use only Min size Cable flex Cable flex type Fuse 4 mm2 H05 RR F ...

Страница 24: ... which the oven will be built must comply with these specifications the dimensions must be as shown in the relevant diagrams the materials must withstand a temperature increase of at least 60 C above ambient proper arrangements must be made of a continuous supply of air to the oven to prevent the oven overheating 594 888 863 5 20 560 540 20 594 556 19 19 7 min 7 min 878 50 560 min 600 550 50 800 m...

Отзывы: