Zanussi ZCG7551 Скачать руководство пользователя страница 2

Important safety information 


These warnings are provided in the interests 

of  your  safety.  Ensure  that  you  understand 

them  all  before  installing  or  using  the 

appliance.  Your  safety  is  of  paramount 

importance.  If  you  are  unsure  about  any  of 

the  information  in  this  book  contact  the 

Customer Care Department. 


Installation 

The appliance must be installed according to 

the  instructions  supplied.  The  installation 

work  must  be  undertaken  by  a  competent 

person  as  stated  in  the  Gas  Safety 

(Installation  &  Use)  Regulations  current 

editions and the IEE Wiring Regulations.  

The  appliance  should  be  serviced  by  an 

authorised  Service  Engineer  and  only 

genuine  approved  spare  parts  should  be 

used.  

It is important that the appliance is suitable 

for  your  gas  supply.  Your  installer  should 

check the rating plate.  

Make sure that a stability bracket is fitted. 

The  appliance  must  be  installed  in  an 

adequately ventilated room.  

If  the  appliance  is  to  be  placed  on  a  base, 

measures  must  be  taken  to  prevent  the 

appliance from slipping from the base. 

This  appliance  is  heavy  and  care 

must

  be 

taken when moving it.   

Do not

 attempt to lift or move this appliance 

by the handles. 

All  packaging,  both  inside  and  outside  the 

appliance  must  be  removed  before  the 

appliance is used. 

It is dangerous to alter the specifications or 

modify the appliance in any way.  

After  installation  please  dispose  of  the 

packaging with due regard for safety and the 

environment.  Your  local  authority  can 

arrange this. 

Child safety 

Do not

 allow children to play with any part of 

the packaging. 

Do not

 allow children to sit or climb on the 

drop down doors. 

This  appliance  is  not  intended  for  use  by 

children and other persons  whose physical, 

sensory  or  mental  capabilities  or  lack  of 

experience  and  knowledge  prevents  them 

from  using  the  appliance  safely  without 

supervision  or  instruction  by  a  responsible 

person  to  ensure  that  they  can  use  the 

appliance safely. 

Children should be supervised to ensure that 

they do not play with the appliance. 

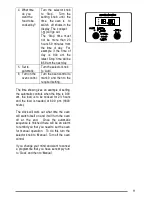
CAUTION:    Accessible  parts  may  be  hot 

when the grill is in use.  Young children 

should be kept away. 


During use 

This  appliance  is  not  intended  to  be 

operated  by  means  of  an  external  timer  or 

separate remote control system. 

This  appliance  has  been  designed  for 

domestic use to cook edible foodstuffs only 

and  must 

not

  be  used  for  any  other 

purposes. 

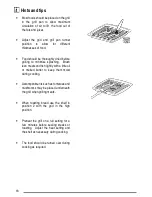
Take  great  care  when  heating  fats  and  oils 

as they will ignite if they become too 

hot

When you are lighting any burner check that 

it is lit before you leave the appliance. When 

turning  off  a  burner, 

do  not

  leave  the 

appliance until the flame has gone out. 

Never place plastic or any other material that 

may melt in or on the oven. 

(NG models only)  

Do not 

leave the grill pan 

handle  in  position  when  grilling  as  it  will 

become 

hot

(NG models only) Always use oven gloves to 

remove  and  replace  the  grill  pan  handle 

when grilling. 

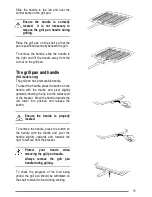
Always support the grill pan when it is in the 

withdrawn or partially withdrawn position. 

Always  use  oven  gloves  to  remove  and 

place food in the oven.  

Содержание ZCG7551

Страница 1: ...User Manual Gas Cooker ZCG7550 ZCG7551 ...

Страница 2: ...ety and the environment Your local authority can arrange this Child safety Do not allow children to play with any part of the packaging Do not allow children to sit or climb on the drop down doors This appliance is not intended for use by children and other persons whose physical sensory or mental capabilities or lack of experience and knowledge prevents them from using the appliance safely withou...

Страница 3: ...rill pan Do not leave cookware containing foodstuffs e g fat or oil in the appliance in case it is inadvertently switched on Do not disconnect the appliance from the gas supply if the supply pipe does not have a bayonet connection as described in the installation section If this is the case contact the person who installed the appliance Always allow the appliance to cool before switching off at th...

Страница 4: ...g slowcook 24 Food preparation 24 General points 25 Care and cleaning 26 Cleaning materials 26 Cleaning the outside of the appliance 26 Cleaning the control knobs and handles 26 Cleaning the hob 27 When replacing hotplate burner parts 27 Cleaning the shelves and grill oven furniture 28 Cleaning the grill 28 Cleaning inside the oven s 28 Hints and tips 28 Cleaning the door s 29 Replacing an oven li...

Страница 5: ...5 Description of the appliance Gas slip in double oven Main oven Control panel Grill Second oven ...

Страница 6: ...r appliance The control panel Features A Hotplate controls B Second oven Grill control C Main oven temperature control D Hotplate controls E Electronic timer F Ignition switch A B C D F 8 7 9 5 4 3 2 1 E 9 1 S 8 7 9 5 4 32 ...

Страница 7: ...iling kettle The vents allow some of this steam to escape However always stand back from the appliance when opening the door s to allow any build up of steam or heat to release If the steam comes into contact with a cool surface on the outside of the appliance e g a trim it will condense and produce water droplets This is quite normal and is not caused by a fault on the appliance To prevent discol...

Страница 8: ...8 1 grill pan grid 311757500 NG models only 1 grill pan 1 grill pan handle 1 grill pan grid All models 1 straight shelf for grilling and second oven cooking 2 straight shelves for main oven cooking ...

Страница 9: ...the selector knob back to Manual To use the timer Turn the selector knob to Timer Turn the setting knob clockwise until the display shows the time you want The bell symbol will be showing and this will stay lit up during the time Our diagram shows the timer set to 5 minutes If you change your mind and want to cancel the time you have set simply turn the setting knob anticlockwise Then turn the sel...

Страница 10: ...g correctly and you ll feel much more confident when you are away from home in the future Setting the controls for automatic use This is very easy All you have to do is work through the steps below The clock will work out the rest for itself 1 Is the electricity supply on 2 Is the clock showing the correct time To adjust turn the selector knob to Manual then to Clock Turn the setting knob in eithe...

Страница 11: ...n control to mark 9 and then to the required setting The time shown gives an example of setting the automatic controls when the time is 9 00 am the food is to be cooked for 2 hours and the food is needed at 6 00 p m 1800 hours The clock will work out what time the oven will switch itself on and it will turn the oven off at the end Once the automatic sequence is finished there will be an alarm to r...

Страница 12: ...r is 230mm 9 The base of the smallest pan should not measure less than 100mm 4 Ensure the pan supports are correctly fitted before using the hob To light the hob burners The hob ignition works by means of an electric spark system Lift up the lid You cannot use the hob when the lid is down Push in and turn the control knob to the left to the highest setting This is shown by a large flame symbol Pre...

Страница 13: ...avy handles which cause the pan to tip The hob surface should be allowed to cool before closing the lid Do not use the lid as a work surface or chopping board This could damage the glass and reduce its strength Place pans on the centre of the burners Position pans so the handles cannot be accidentally knocked or overhang the appliance Lift pans on and off the pan supports Do not slide them across ...

Страница 14: ...the ignition button immediately When the burner has lit release the control and ignition button adjust the setting as required The grill door must be left open when grilling Things to note Some smoke from fat splashes may be evident as the grill cleans itself Never cover the grill pan or grid with foil as this can lead to grill fires The grill pan and handle LPG models only The grill pan is suppli...

Страница 15: ...andle To insert the handle press the button on the handle with the thumb and pivot slightly upwards inserting the lip into the widest part of the bracket Move the handle towards the left lower into position and release the button Ensure the handle is properly located To remove the handle press the button on the handle with the thumb and pivot the handle slightly upwards and towards the right to re...

Страница 16: ...plashing Brush lean meats and fish lightly with a little oil or melted butter to keep them moist during cooking Accompaniments such as tomatoes and mushrooms may be placed underneath the grid when grilling meats When toasting bread use the shelf in position 2 with the grid in the high position Preheat the grill on a full setting for a few minutes before sealing steaks or toasting Adjust the heat s...

Страница 17: ... Rashers Adjust 5 6 Beefburgers grill 10 15 Chicken Joints 30 40 setting Chops Lamb 15 20 Pork and 20 30 Fish Whole Trout Mackerel grill 15 25 Fillets Plaice Cod pan 10 15 Kebabs grid 20 30 Kidneys Lamb Pig to 8 12 Liver Lamb Pig suit 10 20 Sausages different 20 30 Steaks Rare thicknesses 6 12 Medium 12 16 Well Done of 14 20 Toasted Sandwiches food 3 4 ...

Страница 18: ...res e g bread pastries scones soufflés etc best results are achieved if the oven is preheated first For best results when cooking frozen or cooked chilled ready meals always preheat the oven first Using the second oven Open the oven door Push in the control knob and turn it to gas mark 1 and press the ignition button immediately When the burner has lit release the button There will only be small f...

Страница 19: ... too far back as food will burn if it overhangs the burner flame Stand dishes on a suitably sized baking tray on the shelf to prevent spillage onto the oven base and to help reduce cleaning The material and finish of the baking tray and dishes used affect base browning Enamelware dark heavy or non stick utensils increase base browning Shiny aluminium or polished steel trays reflect the heat away a...

Страница 20: ...h temperatures e g bread pastries scones soufflés etc best results are achieved if the oven is preheated first For best results when cooking frozen or cooked chilled ready meals always preheat the oven first To fit the main oven shelves The shelves should be fitted with the straight rods uppermost on the frame and the forms towards the back of the oven If not fitted correctly the anti tilt and saf...

Страница 21: ...se base browning Shiny aluminium or polished steel trays reflect the heat away and give less base browning When cooking more than one dish in the oven place dishes centrally on different shelves rather than cluster several dishes on one shelf this will allow the heat to circulate freely for the best cooking results If you are cooking more than one tray of similar items for example cakes or biscuit...

Страница 22: ...facturer s instructions Fish 2 4 2 4 20 30 Fish Pie Potato Topped 3 6 2 6 20 25 Fruit Pies Crumbles 3 6 2 6 40 50 Milk Puddings 3 2 2 2 1 2h Pasta Lasagne etc 3 5 2 5 30 40 Pastry Choux 2 6 2 6 30 35 Eclairs Profiteroles 2 5 2 5 20 30 Flaky Puff Pies 2 6 2 6 25 40 Shortcrust Mince Pies 2 4 5 2 5 15 20 Meat Pies 2 7 2 7 25 35 Quiche Tarts Flans 2 5 2 5 25 45 Roasting Meat Poultry 4 5 base 5 see roa...

Страница 23: ...7lb then 10 minutes per kg 1lb over 3 kg 7lb Duck 5 25 35 minutes per kg 1lb and 25 30 minutes over Pheasant 5 35 40 minutes per kg 1lb and 35 40 minutes over Rabbit 5 20 minutes per kg 1lb and 20 minutes over The roasting temperatures and times given in the chart should be adequate for most joints but slight adjustments may be required to allow for personal requirements and the shape and texture ...

Страница 24: ... oven down to the slow cook setting This makes sure that the temperature of the food gets hot enough to start the food cooking Food preparation slow cooking Joints of meat and poultry Do not cook meat joints over 2 7kg 6lb Do not cook poultry over 2 kg 4lb 8oz Cook on the middle shelf of the oven or above Cook stuffing separately Cook for at least six hours Only cook joints of pork if you can make...

Страница 25: ...nutes Drain and make the pudding in the usual way General points Frozen Foods Thaw thoroughly before cooking Thickening Toss meat in flour for casseroles Alternatively blend cornflour with water and add it at the end of cooking Flavouring Flavours are held in the food because there is little evaporation Adjust flavouring at the end of the cooking time Liquid Use slightly less liquid as there is li...

Страница 26: ...d or printed finishes as damage may occur Regularly wipe over the control panel doors and appliance sides using a soft cloth and hot soapy water To prevent streaking finish with a soft cloth Stainless Steel cream cleaners are abrasive and should be avoided as they may dull the surface finish Any spillage on the stainless steel finish must be wiped off immediately Do not attempt to remove any of th...

Страница 27: ... crowns and pan supports in this way they will stay reasonably clean However the surface will dull with time After cleaning the appliance parts dry them thoroughly before you put them back When replacing hotplate burner parts 1 Crown to body Do not try to force the crown on to the body Make sure that the hole in the crown is over the electrode Check that the location pegs sit in the slots in the b...

Страница 28: ... Aerosol cleaners must not come into contact with elements burners door seal or any painted finishes as this may cause damage Hints and tips Aerosol cleaners must not be used on Stayclean surfaces To carry out the cleaning cycle remove the oven shelves and set the oven to gas mark 7 It is a good idea to run the oven for an hour or two per week to ensure continued good performance from the Stayclea...

Страница 29: ...of the oven door 2 Loosen the two screws using a Pozidrive screwdriver 3 Hold the door glass securely in place with one hand before removing the screws completely with the other hand 4 Using both hands gently tilt the top of the door glass towards you lift slightly to disengage the locators from the two bottom brackets 5 Clean the outer and inner glass using hot soapy water or Hob Brite cleaner ma...

Страница 30: ...ot water to which a little washing up liquid has been added If the inner panel is heavily soiled Hob Brite may be used Do not use abrasive cleaning materials on the door glass Ensure that all parts are well rinsed and thoroughly dried before attempting to replace the glass Replacing an oven light bulb The type of bulb required is a 300 C 25 watt small Edison Screw Disconnect the appliance from the...

Страница 31: ... with your gas supply You can do this by making sure the other gas appliances such as central heating or gas fires are working Check that the main appliance fuse is working The grill ovens and timer do not work If you have checked the above Allow the appliance to cool for a couple of hours The appliance should now be working normally The grill and second oven work but the main oven does not Check ...

Страница 32: ...ner is not igniting or only partially lighting Check that the burner is dry and that food spillage or cleaning fluids are not present on the burner This can be dried with a cloth and stubborn marks cleaned away with a dry nylon brush old toothbrush etc The burner sounds noisy It is natural for the burners to emit noise as the gas is being drawn through the burner and may reduce as they heat up The...

Страница 33: ...need to give the following details 1 Your name address and post code 2 Your telephone number 3 Clear and concise details of the fault 4 The model and serial number of the appliance found on the rating plate 5 The purchase date Please note that a valid purchase receipt or guarantee documentation is required for in guarantee service calls Customer care department For general enquires concerning your...

Страница 34: ...t authorised by us All service work under this guarantee must be undertaken by a Service Force Centre Any appliance or defective part replaced shall become the Company s property This guarantee is in addition to your statutory and other legal rights Home visits are made between 8 30am and 5 30pm Monday to Friday Visits may be available outside these hours in which case a premium will be charged Ex...

Страница 35: ...llation instructions Minimum distance from rear wall 5mm spacer given by pressed spacer on vent panel Connections Gas connection Rear left hand side of appliance at hotplate level Rc B S P female Electrical connection 230V 240V a c 50Hz mains 3 core cable and moulded plug fuse to 3 amp Hotplate Natural Gas Heat input R H F R H R L H R L H F 1 0kW 1 9kW 1 9kW 2 9kW 3412 Btu h 6483 Btu h 6483 Btu h ...

Страница 36: ...ass Fixed internal Fixed internal Main Oven Heat input 2 4kW 8189 Btu h 2 4kW 172 4g h Injector marking 108 078 Thermostat bypass marking 069 078 General Ignition H T Spark Spark gap 3 4mm Gas category countries of destination CAT I2H GB CAT I3 GB This appliance complies with European Council Directives Low voltage Directive 73 23 EEC Gas Directive 90 396 EEC EMC Directive 89 336 EEC CE Marking Di...

Страница 37: ...device It shall be installed and connected in accordance with the current installation regulations Particular attention shall be given to the relevant requirements regarding ventilation The room containing the appliance should have an air supply in accordance with BS 5440 Part 2 Current Edition All rooms require an openable window or equivalent and some rooms will require a permanent vent as well ...

Страница 38: ...e hotplate or greater for cooker hoods if recommended by manufacturers instructions and 400mm above the hotplate when fitted in line with the outside of the appliance If the units are intended to be fitted adjacent to the appliance but less than 400mm above the hotplate then a minimum space of 100mm must be maintained between the sides of the unit and the appliance See Fig 1b Curtains must not be ...

Страница 39: ...nce and capable of electrical isolation The cooker point should be within 1 7m of the appliance to make it accessible to switch off the appliance in case of emergency The mains lead should be routed so that it cannot touch hot parts of the cooker i e the back panel above a height of 650mm from the floor Should this plug not fit the socket outlet in your home it should be cut off and replaced with ...

Страница 40: ...nected to the terminal which is marked with the letter L or coloured red Ensure that the cable does not become trapped when pushing the appliance into position If a moulded plug is fitted In the event of replacing a fuse in the plug supplied a 3 amp ASTA approved fuse to B S 1362 must be fitted Note The fuse cover must be refitted when changing the fuse In the event of losing the fuse cover the pl...

Страница 41: ...acket be fitted and is available from your supplier see Important Safety Requirements These instructions should be read in conjunction with any leaflet packed with the stability bracket 1 Place the appliance in its intended position and level appliance 2 Mark off 277mm from the left hand side of the appliance as shown in dimension A Fig 3a This is the centre line of the fixing bracket 3 Draw a lin...

Страница 42: ...ner 4 Check operation of the oven Checking the grill Place the grill pan containing the grid with the handle attached into the grill compartment Light the grill burner by turning the grill tap full on and pressing the ignition button on the fascia panel As soon as the burner is lit the button can be released Checking the hotplate Lift the lid Fit the burner crowns and caps ensuring that they are c...

Страница 43: ... a low gas rate to the burner which is the F S D bypass rate 3 When the F S D phial has heated up it opens the F S D valve which allows the main gas supply to the oven burner 4 After 1 minute check that the flame covers the full width of the burner and is stable 5 Set the oven control to Mk 2 close the oven door and check that after about 10 minutes the flame size has reduced 6 Turn off the contro...

Страница 44: ...www electrolux com www zanussi electrolux co uk 311776600 Subject to change without notice ...

Отзывы: