background image

Clean the condenser (black grill) and the com-
pressor at the back of the appliance with a
brush. This operation will improve the perform-
ance of the appliance and save electricity con-
sumption.

Important!

 Take care of not to damage the

cooling system.

Many proprietary kitchen surface cleaners con-
tain chemicals that can attack/damage the
plastics used in this appliance. For this reason
it is recommended that the outer casing of this
appliance is only cleaned with warm water with
a little washing-up liquid added.
After cleaning, reconnect the equipment to the
mains supply.

Defrosting of the refrigerator

Frost is automatically eliminated from the evap-
orator of the refrigerator compartment every
time the motor compressor stops, during nor-
mal use. The defrost water drains out through a
trough into a special container at the back of
the appliance, over the motor compressor,
where it evaporates.
It is important to periodically clean the defrost
water drain hole in the middle of the refrigerator
compartment channel to prevent the water
overflowing and dripping onto the food inside.
Use the special cleaner provided, which you
will find already inserted into the drain hole.

Defrosting the freezer

A certain amount of frost will always form
on the freezer shelves and around the top

compartment.

Important!

 Defrost the freezer when the frost

layer reaches a thickness of about 3-5 mm.

To remove the frost, do these steps:

1.

Switch off the appliance.

2.

Remove any stored food, wrap it in several
layers of newspaper and put it in a cool
place.

3.

Leave the door open.

4.

When defrosting is completed, dry the in-
terior thoroughly and refit the plug.

5.

Switch on the appliance.

6.

Set the temperature regulator to obtain the
maximum coldness and run the appliance
for two or three hours using this setting.

7.

Reload the previously removed food into
the compartment.

Important!

 Never use sharp metal tools to

scrape off frost from the evaporator as you
could damage it. Do not use a mechanical
device or any artificial means to speed up the
thawing process other than those
recommended by the manufacturer. A
temperature rise of the frozen food packs,
during defrosting, may shorten their safe
storage life.

Periods of non-operation

When the appliance is not in use for long peri-
ods, take the following precautions:

disconnect the appliance from electrici-
ty supply

• remove all food

• defrost (if foreseen) and clean the appliance

and all accessories

• leave the door/doors ajar to prevent unpleas-

ant smells.

If the cabinet will be kept on, ask somebody to
check it once in a while to prevent the food in-
side from spoiling in case of a power failure.

20


www.zanussi.com

Содержание ZBT20420SA

Страница 1: ...NL Gebruiksaanwijzing 2 EN User manual 15 FR Notice d utilisation 26 DE Benutzerinformation 39 Koel vriescombinatie Fridge Freezer Réfrigérateur congélateur Kühl Gefrierschrank ZBT20420SA ...

Страница 2: ...personen waaronder begrepen kinde ren met verminderde fysieke zintuiglijke ver mogens of een gebrek aan ervaring en ken nis tenzij dit onder toezicht gebeurt van een voor hun veiligheid verantwoordelijke per soon of tenzij zij van een dergelijke persoon instructie hebben ontvangen over het gebruik van het apparaat Houd kinderen uit de buurt om te voorkomen dat ze met het apparaat gaan spelen Houd ...

Страница 3: ...zonlicht De eventuele gloeilampen in dit apparaat zijn speciaal geselecteerd en uitsluitend bedoeld voor gebruik in huishoudelijke apparaten De lampjes zijn niet geschikt voor de verlichting van ruimtes Dagelijks gebruik Zet geen hete potten op de kunststof onder delen in het apparaat Bewaar geen brandbare gassen of vloeistof fen in het apparaat deze kunnen ontploffen Zet geen levensmiddelen direc...

Страница 4: ...leen gebruik te worden gemaakt van originele reserveonderdelen Bescherming van het milieu Dit apparaat bevat geen gassen die de ozonlaag kunnen beschadigen niet in het koelcircuit en evenmin in de isolatiematerialen Het apparaat mag niet worden weggegooid bij het normale huishoudelijke afval Het isolatie schuim bevat ontvlambare gassen het apparaat moet weggegooid worden conform de van toe passing...

Страница 5: ...dalen Als dat gebeurt de thermostaatknop op een warmere stand instellen Zet het verse voedsel dat u in wilt vriezen op het bovenste vak Het bewaren van ingevroren voedsel Als u het apparaat voor het eerst of na een pe riode dat het niet gebruikt is inschakelt het ap paraat minstens 2 uur op een hoge instelling la ten werken voordat u er producten in plaatst Belangrijk In het geval van onbedoelde o...

Страница 6: ...lijk omheen kan circuleren Nuttige tips voor het koelen Nuttige tips Vlees alle soorten in plastic zakken verpakken en op het glazen schap leggen boven de groentelade Bewaar het voor de veiligheid slechts een of maximaal twee dagen op deze manier Gekookt voedsel koude schotels enz deze moeten afgedekt worden en mogen op wille keurig welk schap gezet worden Fruit en groente deze moeten zorgvuldig s...

Страница 7: ...door bevoegde tech nici Periodieke reiniging Het apparaat moet regelmatig worden schoon gemaakt maak de binnenkant en de accessoires schoon met lauw water en wat neutrale zeep controleer de afdichtingen regelmatig en wrijf ze schoon om u ervan te verzekeren dat ze schoon zijn en vrij van restjes zijn spoel ze af en maak ze grondig droog Belangrijk Trek niet aan leidingen en of kabels aan de binnen...

Страница 8: ... versnellen behalve die middelen die door de fabrikant zijn aanbevolen Een temperatuurstijging tijdens het ontdooien van de ingevroren levensmiddelen kan de veilige bewaartijd verkorten Periodes dat het apparaat niet gebruikt wordt Als het apparaat gedurende lange tijd niet ge bruikt wordt neem dan de volgende voorzorgs maatregelen trek de stekker uit het stopcontact verwijder al het voedsel Ontdo...

Страница 9: ... opbergt De kamertemperatuur is te hoog Verlaag de kamertemperatuur Er loopt water over de ach terkant van de koelkast Tijdens het automatische ontdooi proces ontdooit de rijp tegen de achterwand Dit is normaal Er loopt water in de koel kast De waterafvoer is verstopt Maak de waterafvoer schoon Producten verhinderen het water om in de wateropvangbak te lopen Zorg ervoor dat de producten de achterw...

Страница 10: ... van het lampje vast Steek de stekker in het stopcontact Open de deur Con troleer of het lampje gaat branden De deur sluiten 1 Maak de afdichtingen van de deur schoon 2 Stel de deur indien nodig af Raadpleeg Montage 3 Vervang indien nodig de defecte deuraf dichtingen Neem contact op met de klan tenservice Technische gegevens Afmetingen van de uitsparing Hoogte 1225 mm Breedte 560 mm Diepte 550 mm ...

Страница 11: ...mming met de geldende re gels raadpleeg hiervoor een gekwalificeerd elektricien De fabrikant neemt geen verantwoordelijkheid op zich als de bovenstaande veiligheidsmaatre gelen niet worden nageleefd Dit apparaat voldoet aan de EU richtlijnen Omkeerbaarheid van de deur De deur van het apparaat gaat naar rechts open Als u wilt dat de deur naar links open gaat ga dan als volgt te werk voordat u het a...

Страница 12: ...m is Zorg ervoor dat er een ruimte van 4 mm tussen het apparaat en de kast aanwezig is Open de deur Be vestig het afdekpla tje van het onderste scharnier op de juiste plek I I 4 Bevestig het ap paraat met 4 schroe ven aan de nis 5 Verwijder het juis te onderdeel van de scharnierafdekking E Verwijder onder deel DX als het scharnier rechts staat of onderdeel SX als het scharnier links staat E E D C ...

Страница 13: ...pparaat uit met behulp van onderdeel Hb Hb Hd 13 Duw onderdeel Hd op onderdeel Hb Controleer goed en verzeker u ervan dat alle schroeven zijn aangedraaid de magnetische afdichtstrip goed bevestigd is aan de kast Belangrijk Als de omgevingstemperatuur laag is bijv in de winter kan de omvang van de pakking kleiner worden De omvang van de pakking neemt toe als de omgevingstemperatuur toeneemt Het mil...

Страница 14: ... voordoen in geval van verkeerde afvalverwerking Voor gedetailleerdere informatie over het recyclen van dit product kunt u contact opnemen met de gemeente de gemeentereiniging of de winkel waar u het product hebt gekocht 14 www zanussi com ...

Страница 15: ...en should be supervised to ensure that they do not play with the appliance Keep all packaging well away from children There is risk of suffocation If you are discarding the appliance pull the plug out of the socket cut the connection cable as close to the appliance as you can and remove the door to prevent playing chil dren to suffer electric shock or to close themselves into it If this appliance ...

Страница 16: ...out Store pre packed frozen food in accordance with the frozen food manufacturer s instruc tions Appliance s manufacturers storage recom mendations should be strictly adhered to Refer to relevant instructions Do not place carbonated or fizzy drinks in the freezer compartment as it creates pressure on the container which may cause it to ex plode resulting in damage to the appliance Ice lollies can ...

Страница 17: ...Temperature regulation The temperature is automatically regulated To operate the appliance proceed as follows turn the Temperature regulator toward lower settings to obtain the minimum coldness turn the Temperature regulator toward higher settings to obtain the maximum coldness A medium setting is generally the most suitable However the exact setting should be chosen keeping in mind that the tempe...

Страница 18: ...ce is equipped with one or more trays for the production of ice cubes Fill these trays with water then put them in the freezer compartment Important Do not use metallic instruments to remove the trays from the freezer Movable shelves The walls of the re frigerator are equip ped with a series of runners so that the shelves can be posi tioned as desired Positioning the door shelves To permit storage...

Страница 19: ...re of the latter lean foods store better and longer than fatty ones salt reduces the storage life of food water ices if consumed immediately after re moval from the freezer compartment can possibly cause the skin to be freeze burnt it is advisable to show the freezing in date on each individual pack to enable you to keep tab of the storage time Hints for storage of frozen food To obtain the best p...

Страница 20: ...ost will always form on the freezer shelves and around the top compartment Important Defrost the freezer when the frost layer reaches a thickness of about 3 5 mm To remove the frost do these steps 1 Switch off the appliance 2 Remove any stored food wrap it in several layers of newspaper and put it in a cool place 3 Leave the door open 4 When defrosting is completed dry the in terior thoroughly and...

Страница 21: ...et a higher temperature The door is not closed correctly Refer to Closing the door The door has been opened too fre quently Do not keep the door open longer than necessary The product temperature is too high Let the product temperature de crease to room temperature before storage The room temperature is too high Decrease the room temperature Water flows on the rear plate of the refrigerator During...

Страница 22: ...sure that the light comes on Closing the door 1 Clean the door gaskets 2 If necessary adjust the door Refer to In stallation 3 If necessary replace the defective door gaskets Contact the Service Center Technical data Dimension of the recess Height 1225 mm Width 560 mm Depth 550 mm Rising Time 20 h Voltage 230 240 V Frequency 50 Hz The technical information are situated in the rat ing plate on the ...

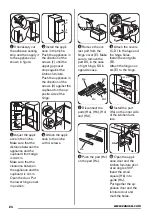
Страница 23: ...s consulting a qualified electrician The manufacturer declines all responsibility if the above safety precautions are not observed This appliance complies with the E E C Direc tives Door reversibility The door of the appliance opens to the right If you want to open the door to the left do these steps before you install the appliance Loosen the upper pin and remove the spacer Remove the upper pin a...

Страница 24: ...Open the door Put the lower hinge cover in position I I 4 Attach the appli ance to the niche with 4 screws 5 Remove the cor rect part from the hinge cover E Make sure to remove the part DX in the case of right hinge SX in opposite case E E D C B 6 Attach the covers C D to the lugs and the hinge holes Install the vent grille B Attach the hinge cov ers E to the hinge Ha Hb Hd Hc 7 Disconnect the par...

Страница 25: ...creases The size of the gasket increases when the ambient temperature increases Environmental concerns The symbol on the product or on its packaging indicates that this product may not be treated as household waste Instead it should be taken to the appropriate collection point for the recycling of electrical and electronic equipment By ensuring this product is disposed of correctly you will help p...

Страница 26: ...érience et de con naissance les empêchent d utiliser l appareil sans risque lorsqu ils sont sans surveillance ou en l absence d instruction d une personne responsable qui puisse leur assurer une utili sation de l appareil sans danger Empêchez les enfants de jouer avec l appa reil Ne laissez pas les différents emballages à portée des enfants Ils pourraient s asphyxier Si l appareil doit être mis au...

Страница 27: ...ules spécifiques uniquement destinées à être utilisées sur des appareils ménagers Elles ne sont pas du tout adaptées à un éclairage quelconque d une habitation Utilisation quotidienne Ne posez pas d éléments chauds sur les par ties en plastique de l appareil Ne stockez pas de gaz ou de liquides inflam mables dans l appareil risque d explosion Ne placez pas d aliments directement contre la sortie d...

Страница 28: ...olation contient des gaz inflamma bles l appareil sera mis au rebut conformé ment aux règlements applicables disponibles auprès des autorités locales Veillez à ne pas détériorer les circuits frigorifiques notamment au niveau du condenseur Les matériaux utilisés dans cet appareil identifiés par le symbole sont recyclables Fonctionnement Mise en fonctionnement Branchez l appareil sur une prise mural...

Страница 29: ... À la mise en service ou après un arrêt prolongé placez le thermostat sur la position Max pen dant 2 heures environ avant d introduire les produits dans le compartiment Important En cas de dégivrage accidentel dû par exemple à une panne de courant si la panne doit se prolonger plus longtemps qu il n est indiqué à la rubrique temps d augmentation dans la section Caractéristiques techniques consomme...

Страница 30: ... liquides en évaporation dans le réfrigé rateur Couvrez ou enveloppez soigneusement les aliments surtout s ils sont aromatiques Placez les aliments pour que l air puisse cir culer librement autour Conseils pour la réfrigération Conseils utiles Viande tous les types enveloppez la dans des sachets en plastique et placez la sur la ta blette en verre au dessus du bac à légumes La période de conservati...

Страница 31: ... souvent la porte du con gélateur et ne la laissez ouverte que le temps nécessaire une fois décongelés les aliments se détério rent rapidement et ne peuvent pas être re congelés ne dépassez pas la durée de conservation indiquée par le fabricant Entretien et nettoyage Attention débrancher l appareil avant toute opération d entretien Cet appareil contient des hydrocarbures dans son circuit réfrigéra...

Страница 32: ...chez bien l intérieur et remettez le bouchon 5 Mettez l appareil en fonctionnement 6 Réglez le thermostat pour obtenir plus de froid et faites fonctionner l appareil pendant deux ou trois heures en utilisant ce réglage 7 Replacez les produits surgelés ou conge lés dans le compartiment Important N utilisez en aucun cas de couteau ou tout autre objet tranchant d objet métallique pour gratter la couc...

Страница 33: ...ouverte plus longtemps que nécessaire La température du produit est trop élevée Laissez le produit revenir à tempéra ture ambiante avant de le ranger dans l appareil La température ambiante est trop élevée Réduisez la température ambiante De l eau s écoule sur la plaque arrière du compar timent réfrigérateur Pendant le dégivrage automatique le givre fond sur la plaque arrière Ce phénomène est norm...

Страница 34: ...secteur Ouvrez la porte Véri fiez que l ampoule s allume Fermeture de la porte 1 Nettoyez les joints de la porte 2 Si nécessaire ajustez la porte Reportez vous au chapitre Installation 3 Si nécessaire remplacez les joints de por te défectueux Contactez votre service après vente Caractéristiques techniques Dimensions de la niche d encas trement Hauteur 1225 mm Largeur 560 mm Profondeur 550 mm Temps...

Страница 35: ...ricant décline toute responsabilité en cas d incident suite au non respect des consignes de sécurité sus mentionnées Cet appareil est conforme aux directives com munautaires Réversibilité de la porte Le sens d ouverture de la porte est orienté vers la droite Si vous souhaitez modifier le sens d ouverture de la porte vers la gauche effec tuez les opérations suivantes avant d installer définitivemen...

Страница 36: ...ppareil dans le meuble d encastre ment Assurez vous que la distance entre l appa reil et le bord avant du meuble est de 44 mm Assurez vous que l écart entre l appareil et le meuble est de 4 mm Ouvrez la porte Met tez en place le cache de la charnière infé rieure I I 4 Fixez l appareil au meuble d encastre ment à l aide de 4 vis 5 Retirez la pièce correcte du cache charnière E Assu rez vous que vou...

Страница 37: ...artir de l arête exté rieure de la porte où le clou doit être posé K Hb 12 Placez de nou veau le petit carré sur le guide et fixez le à l aide des vis fournies Alignez la porte du meuble de cuisine et celle de l appareil en réglant la pièce Hb Hb Hd 13 Appuyez la pièce Hd sur la pièce Hb Contrôlez une dernière fois pour vous assurer que Toutes les vis sont bien serrées Le joint d étanchéité magnét...

Страница 38: ...yclage du matériel électrique et électronique En procédant à la mise au rebut de l appareil dans les règles de l art nous préservons l environnement et notre sécurité s assurant ainsi que les déchets seront traités dans des conditions optimum Pour obtenir plus de détails sur le recyclage de ce produit veuillez prendre contact avec les services de votre commune ou le magasin où vous avez effectué l...

Страница 39: ...tnissen einen sicheren Gebrauch des Gerätes ausschließen nur unter Aufsicht oder nach ausreichender Einweisung durch eine verantwortungsbewusste Person be nutzt werden die sicherstellt dass sie sich der Gefahren des Gebrauchs bewusst sind Kinder müssen beaufsichtigt werden damit sie nicht am Gerät herumspielen können Halten Sie das Verpackungsmaterial unbe dingt von Kindern fern Erstickungsgefahr ...

Страница 40: ...t nicht direkter Sonneneinstrahlung aussetzen Die Leuchtmittel wenn vorgesehen in die sem Gerät sind Speziallampen die nur für Haushaltsgeräte geeignet sind Sie eignen sich nicht zur Raumbeleuchtung Täglicher Gebrauch Stellen Sie keine heißen Töpfe auf die Kunst stoffteile des Gerätes Lagern Sie keine feuergefährlichen Gase oder Flüssigkeiten in dem Gerät Explosions gefahr Legen Sie Lebensmittel n...

Страница 41: ...turen und War tung nur an Fachkräfte der autorisierten Kun dendienststellen und verlangen Sie stets Ori ginal Ersatzteile Umweltschutz Das Gerät enthält im Kältekreis oder in dem Isoliermaterial keine ozonschädigen den Gase Das Gerät darf nicht wie normaler Hausmüll entsorgt werden Die Isolierung ent hält entzündliche Gase das Gerät muss gemäß den geltenden Vorschriften entsorgt werden sie erhalte...

Страница 42: ... der Fall drehen Sie den Temperaturregler auf eine wärmere Einstellung Legen Sie die einzufrierenden frischen Lebens mittel in das obere Fach Lagerung gefrorener Produkte Lassen Sie das Gerät vor der ersten Inbetrieb nahme oder nach einer Zeit in der das Gerät nicht benutzt wurde mindestens zwei Stunden lang auf den höheren Einstellungen laufen be vor Sie Lebensmittel in das Gefrierfach hinein leg...

Страница 43: ...ngt notwendig Wenn die Umgebungstemperatur hoch ist und der Temperaturregler auf eine niedrige Temperatur eingestellt und das Gerät voll beladen ist kann es zu andauerndem Betrieb des Kompressors und damit zu Reif oder Eisbildung am Verdampfer kommen Stellen Sie in diesem Fall den Temperaturregler auf eine höhere Einstellung ein die ein automati sches Abtauen und damit auch einen nied rigeren Ener...

Страница 44: ...müssen die Sie gerade benötigen die einzufrierenden Lebensmittelportionen sollten stets luftdicht in Aluminiumfolie oder in lebensmittelechte Gefrierbeutel verpackt werden um so wenig Luft wie möglich in der Verpackung zu haben achten Sie beim Hineinlegen von frischen noch ungefrorenen Lebensmitteln darauf dass diese keinen Kontakt mit Gefriergut be kommen da dieses sonst antauen kann weniger fett...

Страница 45: ...zversorgung an Abtauen des Kühlschranks Bei normalem Betrieb wird Reif bei jedem An halten des Motorkompressors automatisch aus dem Verdampfer des Kühlschranks entfernt Das Tauwasser läuft durch eine Rinne in einen speziellen Behälter an der Rückseite des Ge räts über dem Motorkompressor wo es ver dampft Reinigen Sie deshalb regelmäßig die Abfluss öffnung des Tauwassers in der Mitte des Kühl schra...

Страница 46: ...or der Fehlersuche immer den Netzstecker aus der Steckdose Die Fehlersuche die in der vorliegenden Gebrauchsanweisung nicht beschrieben ist darf nur von einem qualifizierten Elektriker oder einer kompetenten Person durchgeführt werden Wichtig Während das Gerät in Betrieb ist entstehen bestimmte Geräusche Kompressor und Kühlkreislauf Störung Mögliche Ursache Abhilfe Das Gerät funktioniert nicht Die...

Страница 47: ...nigen Sie den Ablauf Die eingelagerten Lebensmittel ver hindern dass das Wasser zum Wasserablauf fließt Stellen Sie sicher dass die Lebens mittel nicht die Rückwand berühren Wasser fließt auf den Bo den Der Tauwasserablauf läuft nicht in die Verdampferschale über dem Kompressor Befestigen Sie den Tauwasserablauf an der Verdampferschale Die Temperatur im Gerät ist zu niedrig Die Temperatur ist nich...

Страница 48: ...für Haus haltsgeräte vorgese hen ist Bringen Sie die Lam penabdeckung an Ziehen Sie die Schraube an der Lampenabdeckung fest Stecken Sie den Netzstecker in die Steckdose Öffnen Sie die Tür Prüfen Sie ob die Lampe brennt Schließen der Tür 1 Reinigen Sie die Türdichtungen 2 Stellen Sie die Tür nach Bedarf ein Siehe hierzu Montage 3 Ersetzen Sie die defekten Türdichtungen falls erforderlich Wenden Si...

Страница 49: ...s 43 C Elektrischer Anschluss Kontrollieren Sie vor der ersten Benutzung des Gerätes ob die Netzspannung und frequenz Ihres Hausanschlusses mit den auf dem Typen schild angegebenen Anschlusswerten überein stimmen Das Gerät muss geerdet sein Zu diesem Zweck ist die Netzkabelsteckdose mit einem Schutzkontakt ausgestattet Falls die Steckdo se Ihres Hausanschlusses nicht geerdet sein sollte lassen Sie...

Страница 50: ...kulation hinter dem Gerät muss ausreichend groß sein 5 cm min 200cm2 min 200cm2 Aufstellung des Gerätes Vorsicht Vergewissern Sie sich dass sich das Netzkabel des Gerätes frei bewegen lässt Gehen Sie wie folgt vor x x 1 Schneiden Sie bei Bedarf den Dich tungsstreifen zu und bringen Sie ihn wie in der Abbildung ge zeigt am Gerät an 1 2 2 Installieren Sie das Gerät in der Ein baunische Schieben Sie ...

Страница 51: ...erlie genden Scharnier Teil SX zu entfernen E E D C B 6 Setzen Sie die beiliegenden Ab deckkappen C D in die Befestigungs und Scharnierlöcher ein Bauen Sie das Belüf tungsgitter B ein Stecken Sie die Scharnierabdeckun gen E auf das Scharnier auf Ha Hb Hd Hc 7 Trennen Sie die Teile Ha Hb Hc und Hd ab 21 mm 21 mm 50 mm 50 mm 90o 90o 8 Montieren Sie das Teil Ha an der In nenseite der Tür des Küchenmö...

Страница 52: ...temperatur z B im Winter niedrig ist schrumpft die Dichtung Die Größe der Dichtung erhöht sich wenn sich die Umgebungstemperatur erhöht Hinweise zum Umweltschutz Das Symbol auf dem Produkt oder seiner Verpackung weist darauf hin dass dieses Produkt nicht als normaler Haushaltsabfall zu behandeln ist sondern an einem Sammelpunkt für das Recycling von elektrischen und elektronischen Geräten abgegebe...

Страница 53: ...53 www zanussi com ...

Страница 54: ...54 www zanussi com ...

Страница 55: ...55 www zanussi com ...

Страница 56: ...www zanussi com shop 222324663 A 062012 ...

Отзывы: