background image

Some functional problems might

occur for some types of models

when operating outside of that

range. The correct operation can

only be guaranteed within the

specified temperature range. If you

have any doubts regarding where to

install the appliance, please turn to

the vendor, to our customer service

or to the nearest Service Centre

Electrical Connection

CAUTION!

Any electrical work required to install

this appliance should be carried out

by a qualified electrician or

competent person.

WARNING!

This appliance must be earthed. The

manufacturer declines any liability

should these safety measures not be

observed.

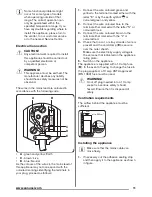
The wires in the mains lead are coloured in

accordance with the following code:

A

B

C

D

E

• A - green and yellow: Earth

• C - brown: Live

• D - blue: Neutral

As the colours of the wires in the mains lead of

this appliance may not correspond with the

coloured markings identifying the terminals in

your plug, proceed as follows:

1. Connect the wire coloured green and

yellow to the terminal marked either with the
letter “E“ or by the earth symbol   or

coloured green and yellow.

2. Connect the wire coloured blue to the

terminal either marked with the letter “N“ or

coloured black.

3. Connect the wire coloured brown to the

terminal either marked with the “L“ or

coloured red.

4. Check that no cut, or stray strands of wire is

present and the cord clamp (E) is secure

over the outer sheath. 

Make sure the electricity supply voltage is

the same as that indicated on the appliance

rating plate.

5. Switch on the appliance.

The appliance is supplied with a 13 amp fuse

(B). In the event of having to change the fuse in

the plug supplied, a 13 amp ASTA approved

(BS 1362) fuse must be used.

WARNING!

A cut off plug inserted into a 13 amp

socket is a serious safety (shock)

hazard. Ensure that it is disposed of

safely.

Ventilation requirements

The airflow behind the appliance must be

sufficient.

5 cm

min. 200cm

2

min.

200cm

2

Installing the appliance

Make sure that the mains cable can

move freely.

1. If necessary cut the adhesive sealing strip

and then apply it to the appliance as shown

in figure.

www.zanussi.com

11

Содержание ZBB27640SA

Страница 1: ...EN ZBB27640SA User Manual Fridge Freezer ...

Страница 2: ...and above and persons with reduced physical sensory or mental capabilities or lack of experience and knowledge if they have been given supervision or instruction concerning use of the appliance in a safe way and understand the hazards involved Do not let children play with the appliance Keep all packaging away from children Cleaning and user maintenance shall not be made by children without superv...

Страница 3: ... appliance Wait at least 4 hours before connecting the appliance to the power supply This is to allow the oil to flow back in the compressor Do not install the appliance close to radiators or cookers oven or hobs The rear of the appliance must stand against the wall Do not install the appliance where there is direct sunlight Do not install this appliance in areas that are too humid or too colds su...

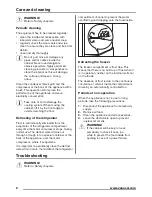
Страница 4: ... are hot Do not remove or touch items from the freezer compartment if your hands are wet or damp Do not freeze again food that has been thawed Obey the storage instructions on the packaging of frozen food Care and cleaning WARNING Risk of injury or damage to the appliance Before maintenance deactivate the appliance and disconnect the mains plug from the mains socket This appliance contains hydroca...

Страница 5: ...r a while Touch the setting button until the required temperature is selected The set will be fixed coldest setting 2 C warmest setting 8 C A medium setting is generally the most suitable However the exact setting should be chosen keeping in mind that the temperature inside the appliance depends on room temperature how often the door is opened quantity of food stored appliance location QuickFreeze...

Страница 6: ...l these trays with water 2 Put the ice trays in the freezer compartment Freezing fresh food The freezer compartment is suitable for freezing fresh food and storing frozen and deep frozen food for a long time To freeze fresh food activate the QuickFreeze function at least 24 hours before placing the food to be frozen in the freezer compartment Place the fresh food to be frozen in the top compartmen...

Страница 7: ...pped on the bottle rack Bananas potatoes onions and garlic if not packed must not be kept in the refrigerator Hints for freezing To help you make the most of the freezing process here are some important hints the maximum quantity of food which can be frozen in 24 hrs is shown on the rating plate the freezing process takes 24 hours No further food to be frozen should be added during this period fre...

Страница 8: ... the motor compressor stops during normal use The defrost water drains out through a trough into a special container at the back of the appliance over the motor compressor where it evaporates It is important to periodically clean the defrost water drain hole in the middle of the refrigerator compartment channel to prevent the water overflowing and dripping onto the food inside Defrosting the freez...

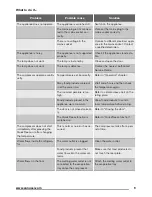
Страница 9: ...e same time Wait some hours and then check the temperature again The room temperature is too high Refer to climate class chart on the rating plate Food products placed in the appliance were too warm Allow food products to cool to room temperature before storing The door is not closed correct ly Refer to Closing the door The QuickFreeze function is switched on Refer to QuickFreeze function The comp...

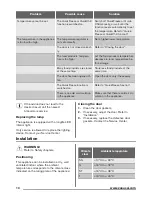
Страница 10: ...QuickFreeze function is switched on Refer to QuickFreeze function There is no cold air circulation in the appliance Make sure that there is cold air cir culation in the appliance If the advice does not lead to the desired result call the nearest brand mark service Replacing the lamp The appliance is equipped with a longlife LED interior light Only service is allowed to replace the lighting device ...

Страница 11: ...wire coloured green and yellow to the terminal marked either with the letter E or by the earth symbol or coloured green and yellow 2 Connect the wire coloured blue to the terminal either marked with the letter N or coloured black 3 Connect the wire coloured brown to the terminal either marked with the L or coloured red 4 Check that no cut or stray strands of wire is present and the cord clamp E is...

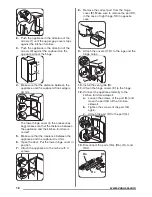
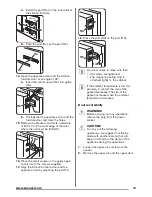
Страница 12: ...appliance and the cupboard is 4 mm 6 Open the door Put the lower hinge cover in position 7 Attach the appliance to the niche with 4 screws I I 8 Remove the correct part from the hinge cover E Make sure to remove the part DX in the case of right hinge SX in opposite case 9 Attach the covers C D to the lugs and the hinge holes E E D C B 10 Install the vent grille B 11 Attach the hinge covers E to th...

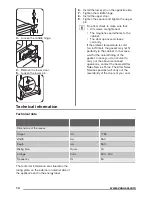
Страница 13: ... furniture door and the appliance door by adjusting the part Hb Hb 18 Press the part Hd on the part Hb Hb Hd Do a final check to make sure that All screws are tightened The magnetic sealing strip is attached tightly to the cabinet If the ambient temperature is low for example in winter the size of the gasket decreases The size of the gasket increases when the ambient temperature increases Door rev...

Страница 14: ... may not fit perfectly to the cabinet In that case wait for the natural fitting of the gasket In case you do not want to carry out the above mentioned operations contact the nearest After Sales Service Force The After Sales Service specialist will carry out the reversibility of the doors at your cost Technical information Technical data Dimensions of the recess Height mm 1780 Width mm 560 Depth mm...

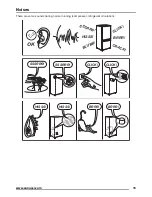
Страница 15: ...Noises There are some sounds during normal running compressor refrigerant circulation BRRR HISSS CLICK BLUBB CRACK SSSRRR OK CLICK CLICK SSSRRR SSSRRR BRRR BRRR HISSS HISSS www zanussi com 15 ...

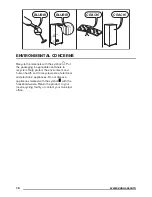
Страница 16: ...able containers to recycle it Help protect the environment and human health and to recycle waste of electrical and electronic appliances Do not dispose appliances marked with the symbol with the household waste Return the product to your local recycling facility or contact your municipal office 16 www zanussi com ...

Страница 17: ...www zanussi com 17 ...

Страница 18: ...18 www zanussi com ...

Страница 19: ...www zanussi com 19 ...

Страница 20: ...www zanussi com shop 222369820 A 082014 ...

Отзывы: