background image

23

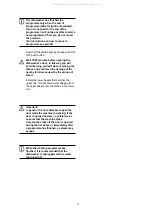
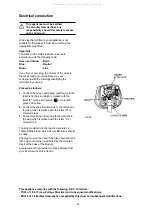
Any electrical work required to install 
this appliance should be carried out by a 
qualified electrician or competent 
person.

Any plumbing work required to install 
this appliance should be carried out by a 
qualified plumber or competent person.

Remove all packaging before positioning the
machine.

If possible, position the machine next to a water tap
and a drain.

Water supply connections 

This dishwasher must be plumbed into a cold water
supply.

The water pressure must be within the limits given in
the technical specifications. 

Your local Water Authority will advise you on the
average mains pressure in your area. 

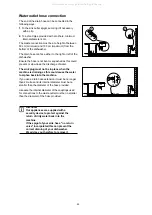
The dishwasher features fill and drain hoses which
can be turned either to the left or the right to suit the
installation. 

Do not use, for the connection, old hoses which
have been used in another appliance.

The locknut must be correctly fitted to avoid
water leaks. 

Avoid bends or kinks in the hose which could
prevent or slow down the water supply. 

If the machine is connected to new pipes or pipes
which have not been used for a long time, you
should run the water for a few minutes before
connecting the inlet hose. This will prevent deposits
of sand or rust clogging the inlet hose filter. 

Installation instructions

All manuals and user guides at all-guides.com

Содержание DE 6544

Страница 1: ...DISHWASHER DE 6544 INSTRUCTION BOOK 152977 29 1 UK All manuals and user guides at all guides com a l l g u i d e s c o m...

Страница 2: ...riods of non operation 19 Frost precautions 19 Moving the machine 19 Something not working 20 Protection against flooding 21 Hints for test centres 22 Technical specifications 22 For the installer Ins...

Страница 3: ...e appliance from the power supply and turn off the water supply after use Care should be taken when cleaning the bottom door seal and hinge area as any exposed metal edges may cut if care is not taken...

Страница 4: ...Control panel 7 Rating plate 8 Rinse aid dispenser 9 Central filter 10 Lower spray arm 11 Upper spray arm 12 SID detergent dispenser Super Intensity Dispenser 13 Upper basket 14 Worktop Description of...

Страница 5: ...he drying phase is running End of programme illuminates when the washing programme has ended Salt and rinse aid indicator lights SALT refilling indicator light illuminates when the salt has run out an...

Страница 6: ...r Authority can advise you on the hardness of the water in your area The dishwasher is factory set at level 3 If this level is not suitable for your area the softener should be adjusted To select a di...

Страница 7: ...cted The INTENSIVE SID 80 indicator light remains off for about 5 seconds after which it starts flashing indicating the new level selected 4 To memorise the new level switch off the dishwasher by pres...

Страница 8: ...st time 3 Using the funnel provided pour in the salt until the container is full Do not worry if water over flows from the unit when filling with salt this is quite normal 4 Replace the cap making sur...

Страница 9: ...aid indicator light will illuminate only in setting mode and at the end of the washing programme During the run of the programme it will remain off Ensure that the lid is closed after every refill Do...

Страница 10: ...to take saucepans lids plates salad bowls cutlery etc Serving dishes and large lids should be arranged around the edge of the basket ensuring that the upper spray arm can turn freely The two rear rows...

Страница 11: ...ogether The cutlery basket is in two parts which can be separated to give greater loading flexibility To separate the two parts slide them horizontally in opposite directions and pull them apart To re...

Страница 12: ...e basket until it stops 2 Carefully lift both sides upwards until the mechanism is engaged and the basket is stable When the top basket is in the higher position it will only take plates up to 20 cm i...

Страница 13: ...ntre of the upper basket If using detergent in tablets proceed as follows 1 For all programmes place 1 tablet inside the detergent dispenser 2 Always close the lid 3 For all programmes with prewash pl...

Страница 14: ...ans with wooden handles aluminium ware crystal ware leaded glass plastic items antique or fine decorated china Certain types of decoration can discolour when washed in a dishwasher Crystal ware and pl...

Страница 15: ...al soil Characterised by a duration of about 80 minutes and a washing temperature of 70 C The time value is approximate and depends on the pressure and the temperature of the water and also by the var...

Страница 16: ...that programme start flashing The start of the programme will occur after about 6 seconds from the last pressure of a push button in this time it is possible to change the programme simply pressing th...

Страница 17: ...ishes and avoid also the damage of the nearby furniture caused by the escape of steam Empty the lower basket first and then the upper one this will avoid water dripping from the upper basket onto the...

Страница 18: ...hing it back to its original position until it engages Cleaning the large filter Every week If necessary clean the large filter B on both sides under running water using a brush To remove the large fi...

Страница 19: ...nt acetone trichloroethylene etc Prolonged periods of non operation If you are not using the machine for any period of time you are advised to 1 Unplug the appliance and then turn off the water 2 Fill...

Страница 20: ...itch off the water supply and clean the filter The dishwasher will not drain Drying phase The drain hose may be squashed or bent Reposition the hose indicator light The sink may be blocked Clear any b...

Страница 21: ...The machine is fitted with a device in the bottom of the machine to protect against flooding The device will operate if there are any water leaks in the machine however it will only operate if the mac...

Страница 22: ...enser Arrangement upper basket Arrangement lower basket Arrangement cutlery basket DIMENSIONS Width 60 cm Height with worktop 85 cm Height without worktop 82 cm Max depth 63 5 cm Max depth with open d...

Страница 23: ...al Water Authority will advise you on the average mains pressure in your area The dishwasher features fill and drain hoses which can be turned either to the left or the right to suit the installation...

Страница 24: ...ing as this could cause the water to siphon back into the machine If you use a drain hose extension it must be no longer than 2 metres and its internal diameter must be no smaller than the diameter of...

Страница 25: ...ith the letter E or the earth symbol or coloured green and yellow 2 Connect the Blue neutral wire to the terminal in the plug which is marked with the letter N or coloured black 3 Connect the Brown li...

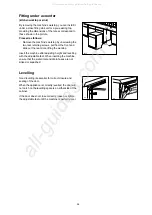
Страница 26: ...op Insert the machine after adjusting height and levelling with the adjustable feet When inserting the machine ensure that the water inlet and drain hoses are not kinked or squashed Levelling Good lev...

Страница 27: ...rce Centre you will need to give the following details 1 Your name address and post code 2 Your telephone number 3 Clear and concise details of the fault 4 The model and serial number found on the rat...

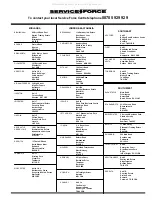
Страница 28: ...F SHETLAND 3 4 Carlton Place Lerwick Shetland OWN SALES ZE1 0PW SHETLAND Bolts Shetland 26 North Road Lerwick OWN SALES Shetland ZE1 0PE WHALSAY Leask Electrical Harisdale Symbister Whalsay OWN SALES...

Страница 29: ...RAVESEND Unit B4 Imperial Business Estate West Mill Gravesend Kent DA11 0DL IPSWICH Unit 6C Elton Park Business Centre Hadleigh Road Ipswich IP2 0DD LETCHWORTH 16 17 Woodside Ind Park Works Road Letch...

Страница 30: ...All manuals and user guides at all guides com...

Страница 31: ...All manuals and user guides at all guides com a l l g u i d e s c o m...

Страница 32: ...est producer of powered appliances for kitchen cleaning and outdoor use More than 55 million Electrolux Group products such as refrigerators cookers vacuum cleaners chain saws and lawn mowers are sold...

Отзывы: