background image

13

If after the checks listed in the previous chapter, the

appliance still does not work correctly, contact your

locals Zanussi Service Centre, specifying the type of

malfunctioning, the appliance model (Mod.), the product

number (Prod. No.) and the serial number (Ser. No.)

marked on the identification plate.

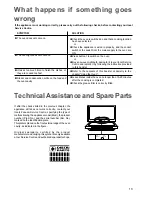
This plate is placed on the front external edge of the oven

cavity, as indicated in the figure.

Original  spareparts,  certified  by  the  product

manufacturer and carrying this symbol are only available

at our Service Centre and authorized spareparts shops.

SER. NO.

Mod.

PROD. NO.

SER. NO.

MOD.

PROD. NO.

TYPE

   SOLUTION

u

Check the oven is switched on and that a cooking function

has been selected

   or

u

Check the appliance is wired in properly, and the socket

switch or the switch from the mains supply to the oven are

ON.

u

Press button 1 to switch on the oven

   or

u

Buy a new oven light bulb, asking for it to your local Service

Centre and replace it by following the instruction provided

in this booklet.

u

Refer to the contents of this booklet, especially to the

chapter "Using the Oven".

u

Leave dishes inside the oven no longer than 15-20 minutes

after the cooking is completed.

u

Check the grease filter is correctly fitted

    SYMPTOM

n

The oven does not come on

n

The oven light does not come on

n

It takes too much time to finish the dishes, or

they are cooked too fast.

n

Steam and condensation settle on the food and

the oven cavity.

If the appliance is not working correctly, please carry out the following checks, before contacting your local

Service Centre.

What  happens  if  something  goes

wrong

Technical Assistance and Spare Parts

Содержание BMS949

Страница 1: ...INSTRUCTION BOOKLET IL BUILT IN OVENS BMS 949 ZBM 974 35675 8402 02 02 ...

Страница 2: ...ppliance is out of order disconnect it from the electric supply Do not leave untensils containing foodstuffs e g fat oroilinorontheappliance Thiscouldcausedamage in case the appliance is inadvertently switched on Alwaysplacethedrippingpaninpositiontocollectfat whenusingthegrillorwhencookingmeat Pouralittle water into the dripping pan to avoid smoke and unpleasant smells Alwaysuseovenglovestoremove...

Страница 3: ...gs time of day program setting or program in operation for about 3 minutes If power misses for a longer time all the settings will be cancelled When the power is restored the numbers on the display will flash and the clock timer has to be reset TEMPERATURE DISPLAY Control Panel Important Safety Information 2 Control Panel 3 When the oven is first installed 5 Programming the oven 6 Extra features 7...

Страница 4: ...an be used with any cooking function or temperature How to select a cooking function Set the oven on by pressing button 1 Press button 2 to select the required oven function Each time button 2 is depressed a pilot light will come on to the left of the currently selected function symbol Here below is a list of the function symbols and their meaning Fancooking Thissettingallowsyoutoroastorroast andb...

Страница 5: ...oven to run empty for approximately 45 minutes openawindowforventilation During this time an unpleasant odour may be emitted This is absolutely normal and is caused by residues of manufacturing Oncethisoperationiscarriedout let theovencooldown thencleantheovencavitywithasoftclothsoakedinwarm soapy water Before cooking for the first time carefully wash the shelf and the dripping pan When the oven i...

Страница 6: ...play 0 00 Press button 5 or 6 to select the required time Maximum time is 19 hours 59 minutes After the setting is carried out the programmer will wait 3 seconds and then start running When time is over the oven will be switched off automatically and an acoustic alarm will be heard to switch off the acoustic alarm press any button between 4 and 9 To cancel the Duration Time press button 8 and whil...

Страница 7: ...automatically switch off some minutes before and the residualheatinsidetheovencavitywillfinishyourdishes withoutenergyconsumption Anyway theovenpilotlight will stay on until the Cooking Duration time is up ThisfunctionisoffwhentheCookingDurationtimeisless than 15 minutes Child safety Toavoidlittlechildrentoswitchontheovenwhileplaying it is possible to lock the oven commands Turn off the oven by pr...

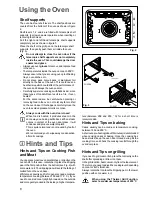
Страница 8: ...ay as a boiling kettle does When steam comes in contact of the oven door glass it will condense and produce water droplets This is quite normal and is not caused by fault of the oven We recommend you to wipe away condensation after all cookings Using the Oven Fig 2 1 2 3 4 FO 2296 FO 2297 Fig 3 Hints and Tips on Cooking Fish and Meat Youcanplacemeatinovenproofdishes ordirectlyonthe oven shelf In t...

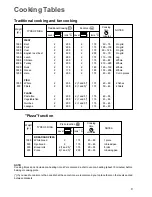
Страница 9: ...45 60 Quiches 2 200 2 1 and 3 175 35 45 Lasagne 2 200 2 175 45 60 Fan Oven Traditional Cooking NOTES Weight gr Cooking time minutes C temp Level 4 3 2 1 Traditional cooking and fan cooking TYPE OF DISH NOTE Cooking times do not include pre heating time We reccomend a short oven pre heating about 10 minutes before baking or cooking pizza Level 4 3 2 1 C If you need to cook more than one dish at the...

Страница 10: ... 3 max 30 20 Kebabs 4 700 4 max 12 10 Chicken breast 4 400 4 max 13 10 Tomatoes 8 500 4 max 12 Fish fillets 4 400 4 max 8 6 Sandwiches 4 4 max 8 Toast 4 4 max 2 3 1 Grilling Upper side C temp Pieces Weight Quantity Cooking time minutes Lower side Grilling TYPE OF DISH Level 4 3 2 1 TYPE OF DISH Quantity gr Shelf level Temperature C Time in minutes from the bottom lower side upper side Pork 1500 2 ...

Страница 11: ...wool or acids as they could damage the stainless steel surface Follow the same procedure for the control panel The Oven Door Before cleaning the oven door we recommend you to removeitfromtheoven Proceed as follows a open the oven door completely b find the hinges linking the door to the oven fig 4 c unlockandturnthesmallleverslocatedonthetwo hinges fig 4 d handle the door by its left and right han...

Страница 12: ...ven Shelves and Shelf Supports Tocleantheovenshelves soakinwarmsoapywaterand remove stubborn marks with a well wetted soap impregnated pad Rinse well and dry with a soft cloth Theshelfsupportscanberemovedforeasycleaning see fig 8 Please ensuretheretainingnutsaresecurewhen refitting the shelf support When cleaning the shelf supports take care not to remove the lubricating grease behind the telescop...

Страница 13: ... is wired in properly and the socket switch or the switch from the mains supply to the oven are ON uPress button 1 to switch on the oven or uBuy a new oven light bulb asking for it to your local Service Centre and replace it by following the instruction provided in this booklet uRefer to the contents of this booklet especially to the chapter Using the Oven uLeave dishes inside the oven no longer t...

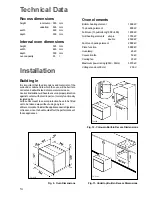
Страница 14: ...ity 53 l Fig 9 Oven Dimensions Fig 10 Coloumn Built in Recess Dimlensions Fig 11 Undertop Built in Recess Dimensions Building In It is important that the dimensions and materials of the surround or cabinet into which the oven will be built are correct and will withstand a temperature increase Acorrectinstallationwillhavetoensureaproperprotection against contact with electric parts or merely functi...

Страница 15: ... double pole switch used for the electrical connectioncanbeeasilyreachedwiththeappliance built in the forniture unit Theapplianceissuppliedwithconnectioncableprovided with plug The plug has to be fitted into a proper socket Incaseofadirectconnectiontothemains itisnecessary thatyouinstalladoublepoleswitchbetweentheappliance and the electricity supply with a minimum gap of 3 mm betweentheswitchconta...

Отзывы: